A little invention of mine from many years ago, is a ’ Half-Round shaped bur '. It is very easy to create on your bench-grinder. Where can it be used, basically in setting Cabochon stones. The following many photographs & texts will explain this process further.
=====================================================
“Half-Round, Round Bur Used for Setting Cabochon Gemstones!”
Although this might seem like a long title, but the application is rather simple, why so?The very first thing is to measure your Cabochon stone in millimeters. The reason for this is that all burs are all measured in Metric. For example; a bur number of #050 is really 5.00mm’s in diameter.
“ THINK METRIC, AT ALL TIMES !”Another point is please avoid asking the tool-supplier for a “half-round bur”, why not? The simple answer is because there aren’t any, you have to make one yourself ! “I’m going to do what? I’m gonna make a “half-round bur”, don’t worry, I will guide through this whole simple process. All you need are a few simple tools; a bench-grinder with little bulbs for up-close viewing! A pair of safety-glasses. A pin-vise to hold your bur while shaping! Not too mention a cup of water, this is to keep your bur ‘cool to the touch’!
Let’s start by measuring your stone; Calculate the distance from the top of the Cabochon to bottom, the circumference of the base. Now determine the height from the base to the start of the curve. Is this important? Yes for the first few times, after a period of some weeks, you can just do this by ‘eye-measuring’ these distances!
How thick must the bezel wall be? No thinner than 1.0 mm but high enough to envelope the curve of the stone. I believe the height of the ‘bearing-groove’ to the tip of the bezel should be about 1/3 of the height of the stone.
You’ve now made all kinds of measurements, bought all of the burs, reshaped many of them and now you’re ready to cut a bearing-cut or inner-groove!
How many burs would you buy , in case one bur is not cutting well? Just don’t keep it, throw it away, use another bur that you bought. I always have ‘duplicates’ or even ‘triplicates’ of the bur sizes. I always allow this, in case of a bur getting worn down during this important bearing-cutting process.
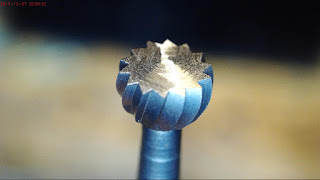
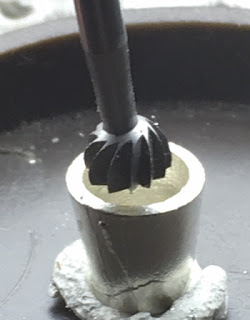
To start, put your new full shaped bur into you pin-vise, finger-tight the vise! Start your new bench-grinder, put on your safety-glasses, have your container of water with-in finger reach. The water is to keep the bur cool, not allowing it to heat up. Sit comfortably & lets start.
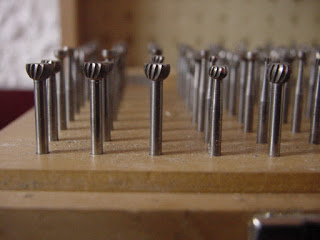
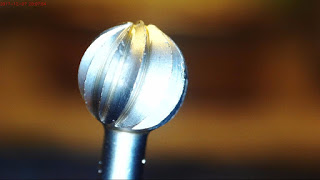
What you must do is to not remove any metal beyond 50% of the ‘round shape’. As this will be the shape of your intended Cabochon stone, keep your bur cool! If it gets hot, it will change colour & loose it’s tensile strength! Keep rotating your bur & keep the bur flat underneath , this so very important. Stop your grinding when you reach the 50% being removed.
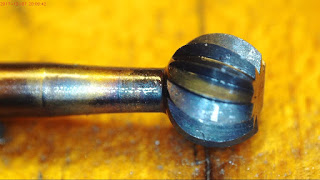
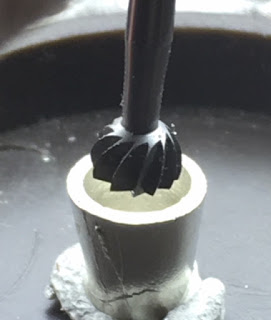
You must do this grinding, in increments of 2-3 actions, to one dunking in water…gotta keep the bur temperature cool to touch! The second photo below shows how the burned bur looks.
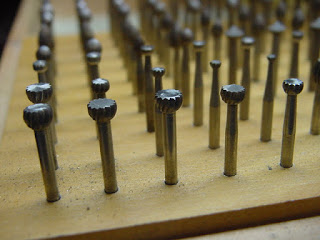
WARNING: Please use your safety glasses on during this procedure . This to protect your eyes. I keep an estimated 30 burs of all sizes in case one bur gets worn down, you have another of similar size. If you find that your active bur is no longer cutting, stop & throw it away, get another. Remember no tool-supplier has these in their inventory, only YOU now have these burs, these are your ‘new friends’!
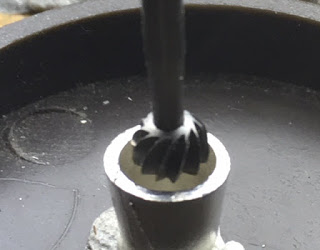
How can you tell if you bur-teeth are worn down? If the bur is turning but not cutting or just sliding, stop the bur, examine it. Look for any shiny surfaces on the edge of the bur, if there are any shiny edges, don’t waste any more time, throw it away. These just cannot be repaired!
The next step is to prepare the Tube-setting for the Cabochon Stone ., this is somewhat easy! On my Difficulty Scale out of 10, this process is rated in at about 6.5, this also includes the bur-reshaping. I suggest a few practice attempts, just to get the ‘feel’ of what to do.
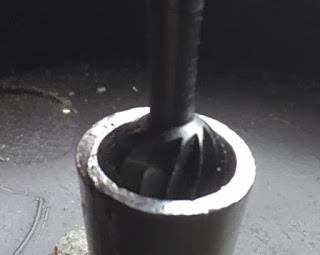
The next step is to determine how low the Cabochon stone must be in the Tube-setting! I want the stone to be as low as the beginning of the stones’ curve. Keep your loup nearby and examine this depth. Get the correct size of bur against the stone and start drilling in 1/3 increments around the top 1/3 of the bezel wall. Hold your bur in an upright position, don’t lean the rotating bur to one side, as the stone will then sitting crooked.
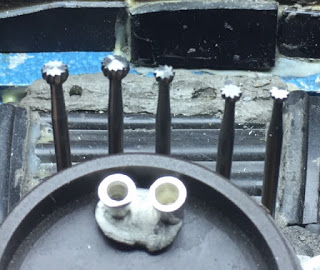
Examine your progress , place your stone into it’s ‘new home’, see if it’s sitting flat. If you’re satisfied, you can now start the pushing over of the metal to envelope the curved surface. Start now to push over the metal with a ‘non-metal’ pusher. I suggest for practical reasons, use only a Brass, or Copper pusher. If you use a steel pusher you might just slip and damage the stone.
On the very top of the pushers, I have another little technique and that is to hit hard the tip of the rod with a Pillar file #1 or #2. This gives the pushing a rough texture to prevent any slips that might ruin your stone.
You now can easily set a Turquoise, Opal, Coral or a even a Pearl. Don’t use a file, in case you slip…good-bye stone…:>(
After everything now has been completed! You can now use a “Flat-Faced, Pumice wheel”
of #180 grit, then use a Pink, Pumice wheel of #1,000 grit as this wheel is like polishing.