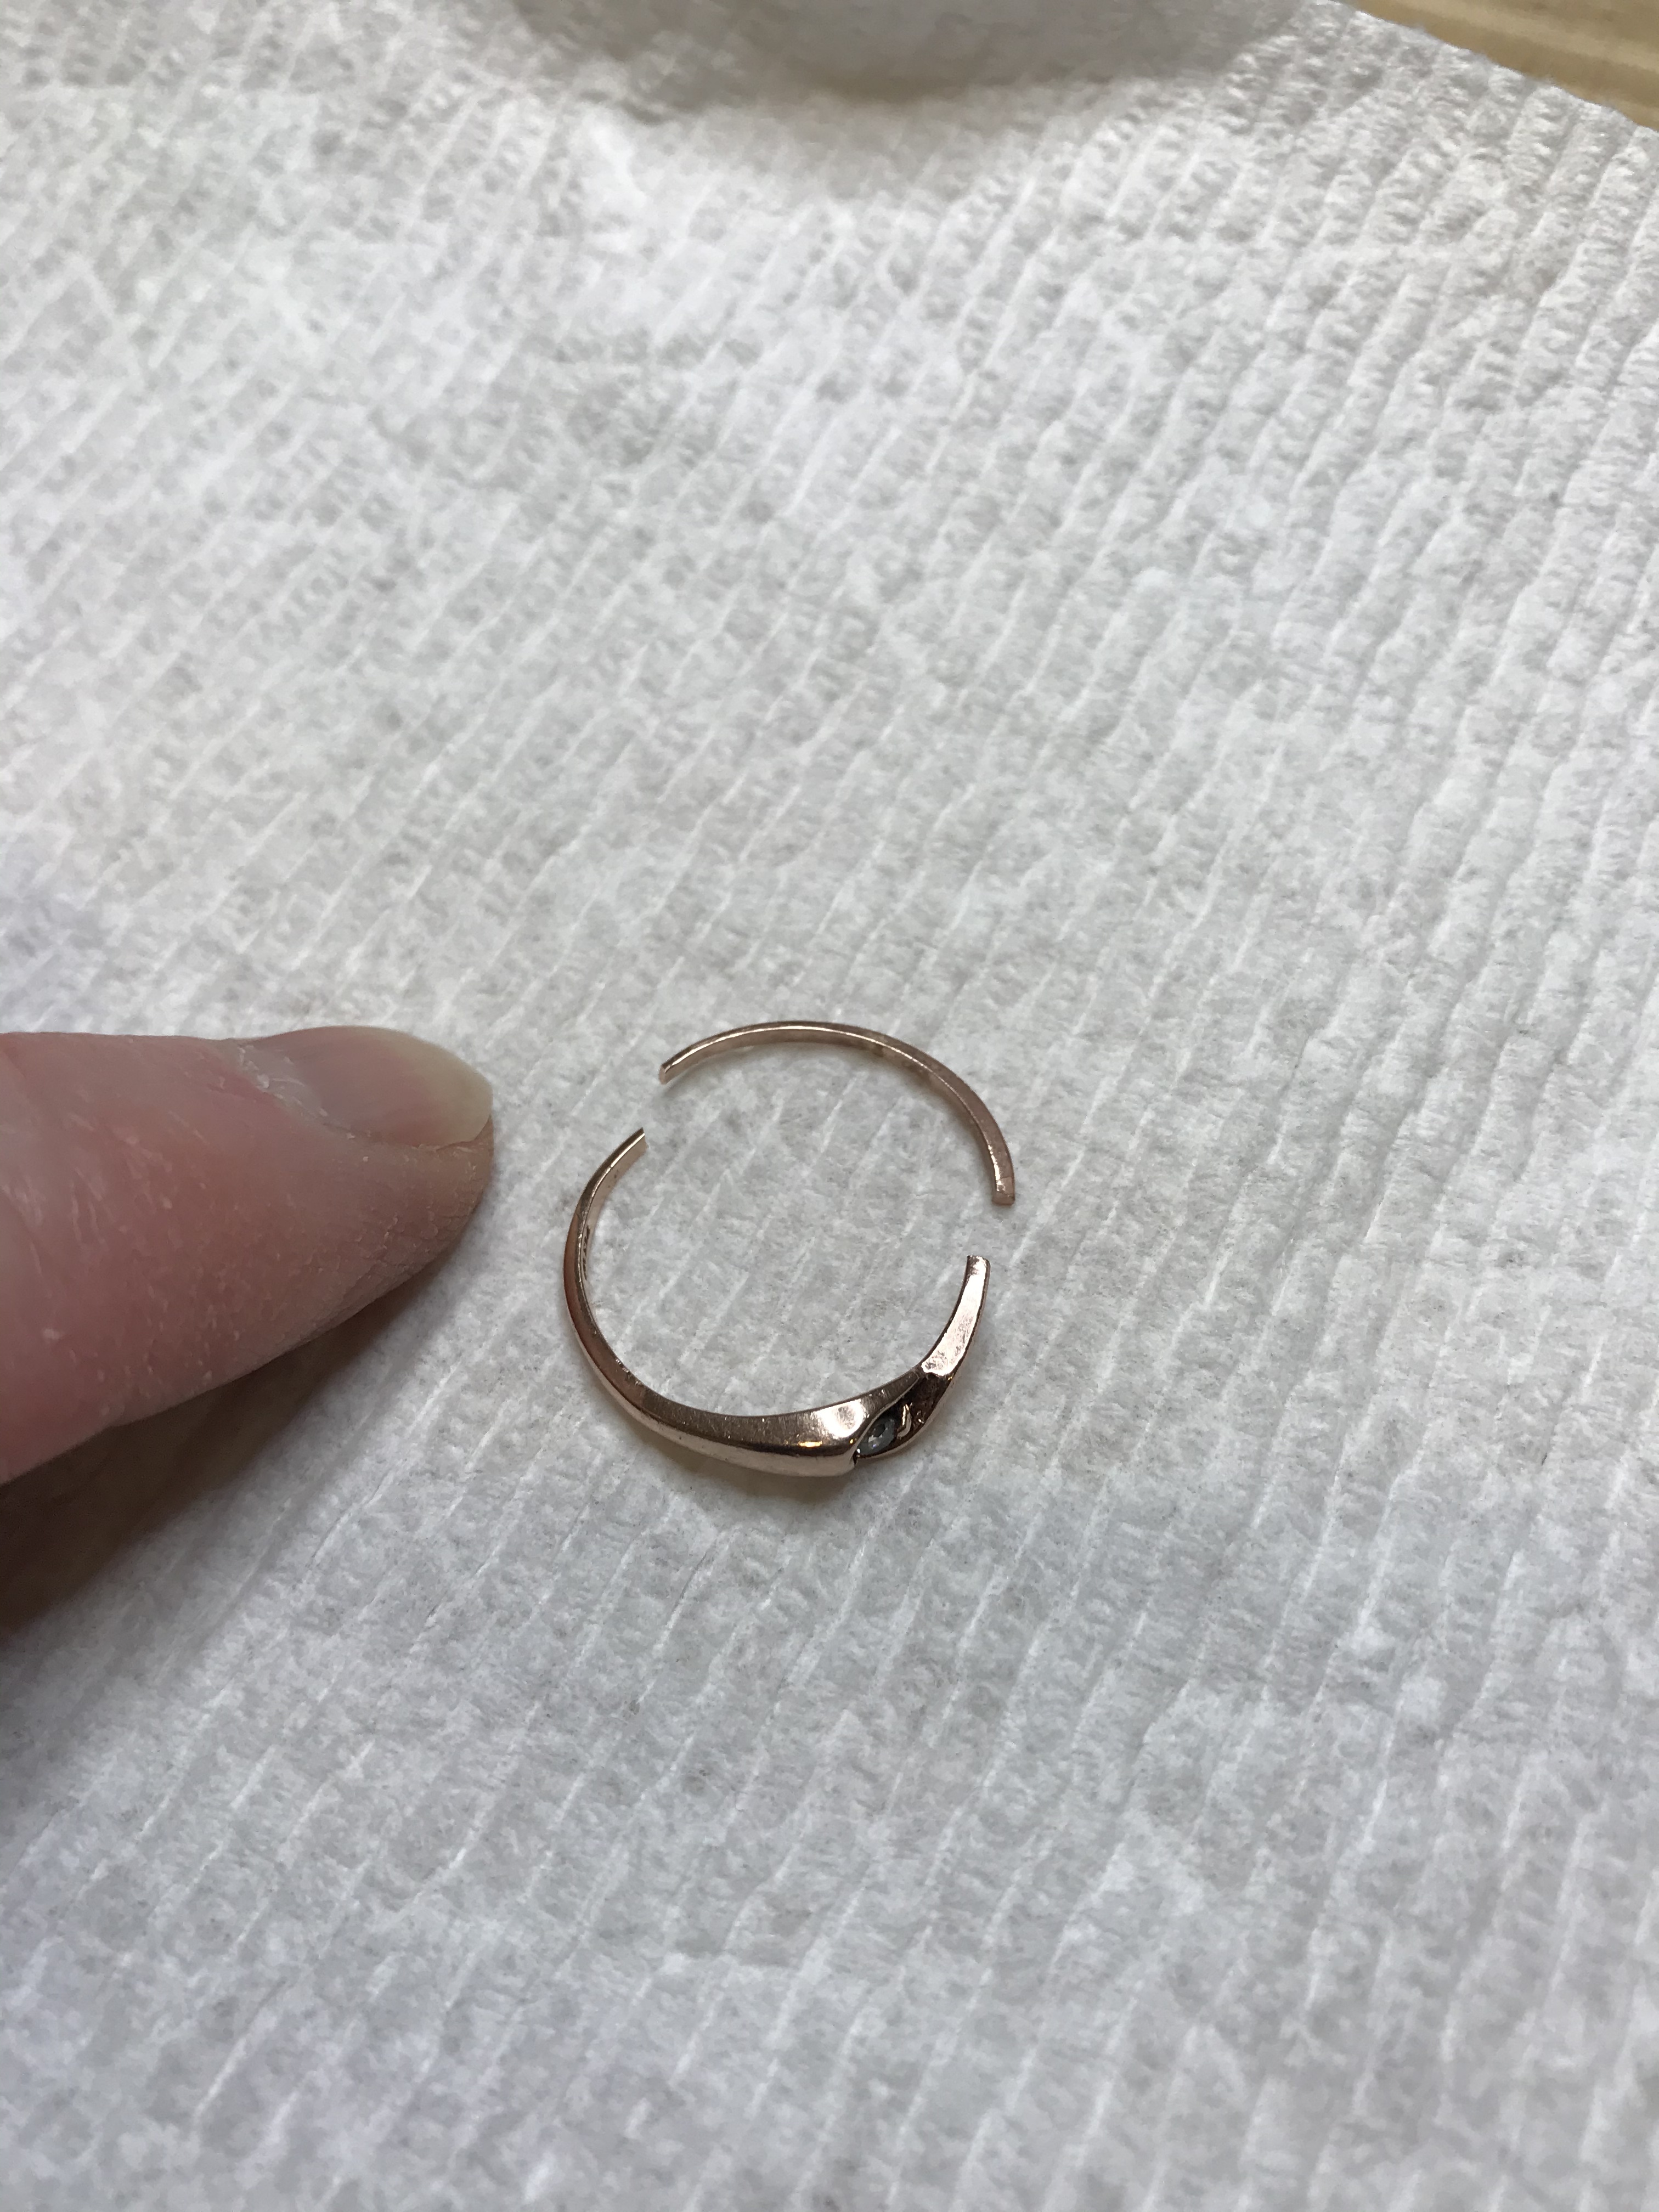
My son asked me to repair his girlfriend’s 10K gold ring with a small diamond in it. It’s an old ring that’s seen a lot of wear. The band is very thin on the bottom but the break was in a thicker area of the band toward the diamond. The bottom line is I now have two pieces and would like advice on how to proceed. I’ll attach a picture.
Some details…After looking closely at the ring, seeing how bent up it was and finding a stress fracture too, I talked to her about it. Turns out she had stepped on it. I explained that the band might melt, but she asked me to give it a try anyhow.
So, I started by filling the stress fracture. I coated the ring with borax/alcohol, used 10K solder, Battern’s Flux, and a very small nozzle on my hydrogen torch. Used a third hand to hold the ring, solder on top of the fracture, flame on the bottom. Success, all good! Put it in pickle to clean then opened up the shank just enough to get a file in the broken area. Smoothed both sides, then same process as above to solder this spot. This time my solder balled up but did not flow. Cleaned it in pickle, worked each side with a smoother file and tried again - same result.
This time when I took the ring out of the pickle the band fell over onto the rest of the ring. Now I have two pieces. I’m guessing I should have annealed the ring before working on the break. Fear of melting it made me shy away from that. And now I’m worried there are other mini cracks I can’t see with my 10X loupe (I don’t have a microscope).
Any advice is appreciated but here are questions going through my mind. And probably obvious, but I only recently started incorporating gold into my designs. Should I buy a new piece of gold and replace the beat up shank? If I try to solder the two pieces back together, should I solder both ends at the same time? Should I file the ends where the new crack is or just jam them together before soldering?
Thanks, Craig
Hard to tell for sure from an image, but my first step would to file the upper break to produce clean edges, and the solder it together there.
I would then address the break lower on the shank.
I would consider using a larger flame, but I have little experience with your torch style.
Personally, myself, I would begin by laser welding the upper break, but that is because I have the laser, and I like how it helps address porosity issues.
Also, in your image, is that a 2nd crack between the lower break and the stamping, or just a reflection?
1 Like
I’m not a bench-jeweller, just a humble setter. What I would do is to cut off the parts that you want to save and…!!!
Get a new clean gold shank and attach to that old “saved” piece. When you’re messing with too many “bits & pieces” of old gold and cruddy old solder. Your language will turn the air blue!!
Problems will nonetheless reoccur many times over. “Don’t get married to problems”.
Hoping that my “limited advice“ helps you. Regards, eh!
Gerry Lewy
“Gerry, on my iPhone”
7 Likes
I agree with Gerry… chop off the thin bit and put a new shank in. More wear… less stress. 
1 Like
If you go that route, you could probably use the old shank and create a couple of/few large shot and solder them to a pair of silver earrings…she gets earrings to go with the ring…just sayin’…royjohn
2 Likes
You made me look! It’s actually porosity. I hadn’t looked carefully at the inside of the band. Another lesson I’ll carry with me from this.
2 Likes
Thanks to all of you for the feedback. I’m headed toward replacing the thin part of the band. I want to make sure my son’s girlfriend is OK with this before I get started.
2 Likes
I did talk with her last night, she’s fine with having me use a new piece of metal on the shank. I’m quite relieved!
Royjohn, using the old part of the shank to make shot is a great idea! I forgot to ask her about this last night, but I think she would like that.
1 Like
Craig,
I got my start in jewelry making 45 years ago doing ring sizings and shank repairs. I have literally done more of this kind of repair than I can count, and I will tell you everything you did is what I would do to fix the breaks. I use an oxy/propane torch so I also can’t speak to what’s happening - or if using a hydrogen torch has anything to do with the troubles you have encountered.
I don’t know if you have done much jewelry repair work, or if you know what this type of repair is called, but I’ll share this info as if you are brand new to the process. It is called installing a new 1/2 shank (or 3/4 shank if you are doing even more). So here are the steps I follow in order:
- Inspect the ring to see what other problems it might have. This involves using magnification. Look for other cracks/stress marks in the whole ring. ID any stones that might be in the piece. It looks like this ring does have a stone in it (?) from your picture. Protect the stone if it is heat sensitive. When in doubt, protect the stone from heat. ID the karat quality of the piece. From your post it’s clear you have already done that.
- Saw off the portion of the shank you plan to replace. If you are looking at the ring from the front, with the top of the ring at 12 o’clock, this means you will cut the shank around 3 and 9 o’clock - again depending upon how much you need to replace. It might be more like 10 and 2. Save the piece(s); they will help you determine how long a piece you will need to put back in. More about this later.
- File the ends of the saw cuts so they are smooth, and “squared off”. Squared off meaning if you look at the ring from the front, imagine where the center of the circle is and file the ends of the ring “square” from that orientation.
- Measure the width and thickness of the ends of the ring with some tool like digital calipers to determine width and thickness of the remaining shank.Write this info down so you can refer to it later.
- Use fresh metal to make the new shank. In your case you want new 10kt gold. So whether you get a ready-made bar, or wire that is the right dimension, or casting grain to make your own ingot, this is important. More than half of all problems in jewelry making arise from trying to use old gold to do the repair. Dimension the new metal by rolling or forging so it is just slightly wider and thicker than than the dimensions of your ring. About .2 mm in each direction should be plenty.
- Take the pieces of the old shank and flatten them out so they are straight and measure the length. This is the length you will need for your new shank.
- Once you have your new material, bend and shape it into a 1/2 ring form. There are lots of ways to do this depending upon what kind of tools you have: ring bending tool, forming pliers, or even just hammering the new piece around a ring mandrel with a soft head mallet/hammer so you don’t thin the new shank and make it longer. Get the new shank as close to the same shape/curve as the original ring as you can.
- Prep your pieces with boric acid/alcohol and flux as you would for any other soldering job. Now is the time to protect the stone(s) with some kind of heat blanket if necessary before proceeding with the soldering. Secure the ring so it won’t move; hold it in tweezers or 3rd hand depending again on what kind of soldering tools you are using.
- I melt some solder to each end of the new shank. Then I re-flux both ends and I line up the new shank on one side of the old ring as best I can. I try to get the joint to line up on the inside of the ring as precisely as possible because I think it’s easier to file the sides and outside of the joint to blend things together. Once attached, I stop, cool the ring, and inspect to see how well I lined up the two pieces, and if the solder flowed well. Many times they align up right on the first attempt, if so, then I can move on to the other side of the shank. But sometimes the two pieces aren’t lined up very well. They may be close, but not close enough to suit me. If this happens to you, don’t sweat it. At least the ring is now 1 piece again. Now you can line up the other solder seam so they meet perfectly, go through the soldering prep again and solder this side of the ring. This is the key to success in doing this job. Just get it back to where you have only one joint to line up precisely before soldering.
- Cool the ring. Inspect the second joint for accurate alignment, proper solder flow. If you are satisfied, then you can saw through the first joint and re-do that seam so it lines up perfectly as well.
- File and sand the solder seams to blend the new shank into the old ring, then polish.
Good luck restoring this ring,
Mike
4 Likes
Mike, thanks much for your awesome post. You have answered a number of questions I was going to need to muddle my way through. And, as you assumed, I have done very few repairs. I had completed a couple of your early steps already - complete inspection inside and out of the ring and measurements with my caliper to size up a replacement piece of metal. I still have one question. I can cut the shank (on the thin side) so that what remains is the same size as where the original break occurred. However, I have clean/solid metal at point where it is more tapered. Is it advisable and preferable that the two ends match in size? Thanks again, Craig
1 Like
Craig,
If I am understanding your question correctly, then the answer is yes. When doing a 1/2 shank you want to cut the ring somewhere up on the sides (9-3, 10-2 o’clock) where there is typically more metal and therefore more surface area for the solder to bond with a new piece of metal. The more surface contact, the stronger the solder joint will be.The other reason the answer is yes is that the whole purpose of doing a 1/2 shank replacement is to have a thicker shank where most of the wear will take place in the future: on the bottom of the ring (6 o’clock).
There are two reasons rings break, generally speaking. One culprit is porosity at some point in the ring which will make it weaker and more likely to bend repeatedly and eventually break due to metal fatigue. The other reason for a shank breaking is at a solder joint because solder is more brittle than the rest of the ring. Sizing joints aren’t a problem when a new ring with a “healthy” shank is sized, but over time as the ring wears down it loses “strength” (for lack of a better word at the moment) to hold its shape. It will bend at the weakest point, which, ironically, is usually also at the most brittle point - the solder joint.
Solder joints can be re-soldered, but if the shank is super thin due to wear, it is only a matter of time before the joint will fail again.
Best of luck working on this job.
Mike
Mike, yes, that was exactly what I was asking. And again, your answer is tremendously helpful. I get it and it completely makes sense. Thanks very much, Craig
I’ve seen this so many times. The ring has likely been exposed to mercury at some point. Other things that make the gold brittle and crack and resist soldering include lead solder and chlorine. There’s no way to fix this contamination. If this is what it is, it will keep breaking and resisting soldering or welding.
Jeff, that’s concerning but would explain a lot. I’m going to try soldering a new 3/4 shank onto it. I won’t push it if it still resists soldering, though that would be an ugly outcome. Is there any way to detect mercury or chlorine contamination? I’d feel better if I could identify contamination before I tear it apart further. Many thanks, Craig
Craig,
If it’s mercury, where the contamination is on the ring it will look sort of “steel” white. If it’s lead it will look more gray-ish where the contamination is. If it’s chlorine contamination there is no tell-tale color change in the metal.
Be very careful if this ring is contaminated with lead and even more so if it is contaminated with mercury. Both are carcinogenic and when heated will become vapors which you don’t want to breathe. If you detect contamination by one of these other metals, my recommendation is to go back to the customer and suggest making an entirely new ring. This would be the only way to protect your health as well as the health of the wearer. This ring then should be sent to a refining company to retrieve the gold in it. Again, this is all assuming you detect contamination of this ring by one of these metals.
If it has porosity due to exposure to chlorine, it is safe for you to work on it without exposing yourself. Regards, Mike