Hello,
Now that I have received many responses for setting my cabochon stone into a bezel on a round cuff bracelet, (and thank you to everyone for your response), I need to form the bezel onto my cuff. I have been struggling with this by grinding the bezel to the shape of the curve of the cuff using fine silver bezel wire, made my own bezel out of 22 G sterling and it still won’t form to the curve of the cuff. I’m not sure what I’m doing wrong in getting a simple bezel to form to a cuff. Help is appreciated with this .
Do you mean you are grinding them on a wheel or filing them manually? You shouldn’t try to put a wire bezel to a grinding wheel, it will deform too easily.
The problem you’re going to have is keeping the wire bezel rigid while you’re filing it. If you set it in shellac on a dop stick, with the upper edge in the shellac and the bottom exposed, you will be able to file the curve of the lower edge without the bezel deforming. As you file keep checking the curve against the bracelet. Only remove it from the shellac when the fit is as close to perfect as makes no nevermind.
Something I’ve tried successfully is placing a piece of sandpaper, rough side up, on my bracelet or other form, and using it as a “sanding block” against the bezel to fine tune the shape of the joining surface. I just move the bezel back and forth, using short strokes, across the sandpaper until there are no gaps.
This doesn’t work well for dramatic curves, especially compound ones, but maybe you’ll find it useful.
Lorainne,
Id like to help but your mentioning of sterling wire? what has that to do with the flat strip of fine silver? for the bezel?
Is the S wire to go around the edge of the copper? Please clarify.
I could help you much more if you could provide
Caboshon size? round or oval? in mm
2 width of copper ? in mm
3 thickness of copper? in mm not gauge?
flat curved? or compound curved?
Perhaps a picture where your at right now?
Ted.
Thank you Alec, I have tried that, I keep checking the fit, still have gaps, but I will try again. Thinking logically it seems like a simple project to form a bezel onto a cuff but, it’s not working for me unfortunately.
Thank you Elliot for your response. I’m not putting the bezel on a grinding wheel, I am using a small sander on my flex shaft. and a file. I do understand the problem with filing the bezel and deforming the shape. I have also tried filing but it takes a long time. I also made another bezel out of a harder silver 22 Guage tried to form that to the curve which is a simple curve on the cuff bracelet. It seemed that I had to file the bottom down to practically nothing and it still did not have a tight fit. What about the shellac when you solder the bezel onto the the cuff? How do you remove it? What am I missing here?
I have always done this by eye using files, abrasive wheels on my flexshaft and my expanding sanding wheel on my lapidary lathe. When you get close, but a piece of abrasive paper over your mandrel, or something similar to the shape you are trying to fit, and fine turn the joint. You will eventually get there. I would go with heavier bezel material that will stand up to the rigor of what you are putting it through. Just a thought, and I have never done this, form your bezel material around the stone. Super glue it in place on the bracelet and, with a pair of dividers held vertical, go around the perimeter of the bezel and scribe a line that will define what you have to remove vs remain when you are done. Remove what needs to be removed in whatever way works, clean up the joint and solder. If you try this, let us know how it works. You can remove the bezel glued to the bracelet by gently heating the joint until it lets go. Good luck…Rob
Hi Ted,
Sterling Bezel Wire - It is the flat strip of fine silver referred to as a bezel wire.
Copper cuff - it is 25.4 mm in width & curved around a bracelet mandrel.
Flat or compound curved? Not sure of the difference.
The cabochon stone is oval and is 25.4 mm in length placed in length (horizontally) along the cuff bracelet.
The width of the stone is approximately 18mm at it’s widest point placed in the center of the bracelet.
All these cut and try solutions seem time wasters to me. I’m not much of a silversmith, but maybe using a thick bezel and tapping it down onto the bracelet and then cutting out a seat would work. Or tack soldering in several places once the bezel was close, followed by surrounding the bezel with a decorative twisted wire or some such. Even a square wire at the edge of the bezel might work. Just like a molding at the floor in your house.
You remove the bezel from the dop stick as you put it on, by heating it. Most of the shellac will stay on the dop. What sticks to the bezel can be dissolved away in alcohol.
Hi Lorainne,
Thank you for your reply.
Im in the UK and have been making cuffs for 50 odd yrs( with hindsight my favorite piece of worn on the body jewellery) in just about every design possible, and enjoyed it too,
So the difference between flat curved or compound curved is, flat is like a cut out of a tube, flat one way, and curved the other.
Compound is curved BOTH ways, like a section of a sphere. Youll come to those in the future,. these are wrought from flat by hammering/thinning the metal most in the middle and less toward the outside of the strip.
Next!, Here we do not call bezel strip wire . Its strip, whatever width needed to hold the stone to its mounting.
So, now I know the stone and cuff measurments, and what your struggling with , if yove not got the curvature right the 1st time, the other way is to make the bezel strip fit the stone, make it 12/15mm wide, place it on a piece of paper. draw around.
Then glue this piece of paper to the copper. saw just inside the line… Then fit the shaped strip through the cut out with enough sticking out outside of the cuff, and a minimum of 3mm inside.
Solder in place.
then cut away anything thats more than 3mm underneath.
then dress the 3mm underneath LEVEL for the stone to sit on… This will make a ledge to support the stone.
Also looks good. When fitting the stone, you dont need sawdust.
Give it some thought. youll get there.
Ted.
Answering your question would be a lot easier if we could see the design. I think you said it was round. If so it would increase the difficulty of fitting the bezel. When I make one I form it on an oval bracelet mandrel which makes the top of it almost flat. That makes filing the bezel to fit much easier. Also I use fairly thick metal for the bezel. If your design permits, you can surround the lower part of the bezel with a decorative wire around the bezel’s base which you bend to fit the curve. You then solder the bezel to the wire where it doesn’t quite meet the oval band.
Hello Ted,
While I’ve been following this thread, I’m now completely confused by these instructions. Would there be any way possible that you could draw some diagrams to explain about the 3mm inside, then cut away from underneath.
How is the stone seated? Does it physically extend through the cuff and out the back side (underneath the cuff)?
I have always riveted my bezels to the cuffs allowing that there will be a small space underneath at the curvature. Just a different way to fabricate.
Many thanks for your expertise.
Denny Diamond
Put a piece of sandpaper on the top of the
bracelet and move the bezel across the
bracelet until it has the curve you need.
I use a heatless mizzy wheel and remove
material from both ends to approximate
the curve of the bracelet or ring.
Be careful to not go too deep or too wide,
when it is close in either width or depth, put
the sandpaper on the bracelet (or ring mandrel
at the size the ring is supposed to be) and
sand until it meets width and length and
makes complete contact all the way around.
Then solder down placing the solder on the
inside of where the bezel meets the bracelet.
You can do it by Ted’s method, cut smaller
and file carefully until it fits perfect. I solder
underneath and then carefully heat the top
and draw the solder up around the bezel
until I get the solder around the bezel to fill in
and have a clean join.
You need to solder an inner bezel to
support the gem doing it this way.
Hope this is clear.
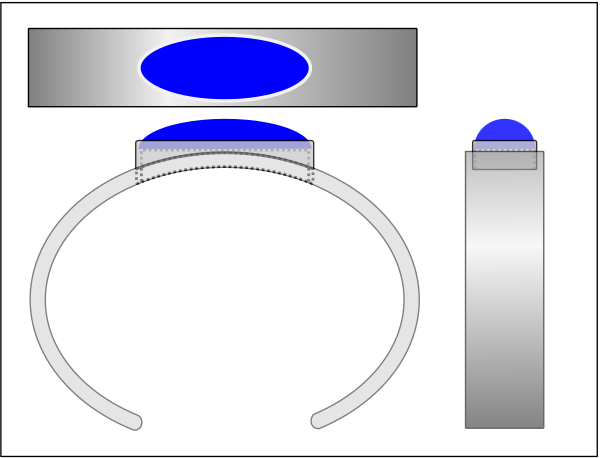
Hi Denny,
Im not competent enough to do drawn pictures here. BUT! look at Elliot’s pictures, the one on the right. This looks like the bezel strip going right through the copper. And yes, with a flat bottomed stone the middle part of the stone will project through the cuff onto the flat part of the bezel like a cup.
At the ends of the stone, it will be flush with the underside.
To dress I mean hammer over the vertical metal into a horizontal oval. with fine silver, its so soft you can do this with a round piece of steel say 3/8ths in to 1/2in dia held vertically in your 3rd hand (a proper vice) you then hammer(gently dress!) the silver inwards over this flat topped steel to make the seat for the stone. Obviously file up and polish after so this flat part is the same width all around.
Hope this is clearer.
Can you explain your way of rivetting the bezel?, I dont do anything with stones being a wholly wrought metal man.
Now speciallising in minting and production runs of my designs with press tooling. See the pics above of the 25 viking roundels minted yesterday.
Just curious tho
Ted.
Thank you both, Ted and Elliot, for your pictures and explanations. I will have to try this.
When I rivet the bezels, I use 5 points for stability; perhaps it’s overkill. Two would work, three (in a triangle) would be stronger, but I prefer to start with a rivet in the centre, then set the other four as the points of a compass. The bezel won’t move at all and I feel much better about the strength. I use the five for cabs that are 18 by 25 mm or larger. The three would suffice for smaller stones.
Many thanks for your kind help.
Denny
Very clear. You’re always the best. How I wish I could study with you in person. $$$'s say it’s not possible even if I could get you to agree to it.
Dick
Ah Mexico! Where “C” on a faucet means HOT, and “M” on a restroom means THE LADIES ROOM.
Richard_Hart3
February 16 |
Put a piece of sandpaper on the top of the
bracelet and move the bezel across the
bracelet until it has the curve you need.
I use a heatless mizzy wheel and remove
material from both ends to approximate
the curve of the bracelet or ring.
Be careful to not go too deep or too wide,
when it is close in either width or depth, put
the sandpaper on the bracelet (or ring mandrel
at the size the ring is supposed to be) and
sand until it meets width and length and
makes complete contact all the way around.
Then solder down placing the solder on the
inside of where the bezel meets the bracelet.
You can do it by Ted’s method, cut smaller
and file carefully until it fits perfect. I solder
underneath and then carefully heat the top
and draw the solder up around the bezel
until I get the solder around the bezel to fill in
and have a clean join.
You need to solder an inner bezel to
support the gem doing it this way.
Hope this is clear.
Visit Topic or reply to this email to respond.
Brought to you by:
You are receiving this because you enabled mailing list mode.
I didn’t see a “reply all” but, I am hoping that all of you very kind, helpful metalsmith’s receive this thank you from me. I’ve re-read all of the replies and will try to work through this dilemma. I will get there and when I do, I will post a picture. I am working with copper, an oval agate and two smaller (marquise shaped) coral stones. These pieces are the ‘practice pieces’ and once I get the curve of the bezel to fit onto the cuff and then set the smaller stones (with bezels too) I will begin to work with the silver 22G cuff and three beautiful turquoise stones of the same design as the copper piece and post the finished picture.
Certainly any further suggestions are more than welcome. Thank you again.