I’m back from grad school and ready to revamp my studio and get to work. Does any one have recommendations for a good floor plan/layout for setting up work and soldering stations for two? The studio space is roughly
about 18’ x 18’.
Could you upload a rough plan of the space, so we will know where doors, windows, columns, or any obstructions are located. Also, is the space plumbed in, as it’s useful to have the wash up sink and reclamation barrel in the studio itself.
Thank you for your response! Yes, I will upload a rough plan. I do have a sink and small cleanup room just on the other side of one wall. It may take me a day or so to get the layout with windows and doors drawn out.
I have one suggestion that doesn’t need the images of your space. Make certain that you set things up so that you are forced to get up and walk to a different station/s. We tend to sit and sit and sit when we work, and we need to sit and stand and walk and stretch during our work hours. Otherwise we become bench potatoes!
1 Like
Absolutely! I have a work station that I stand at. Really breaks things up…
Good that you have a water supply and eye wash nearby. Don’t forget 1 or more fire extinguishers-
Lorraine
2 Likes
Hi there,
Some Interesting possibilities are ahead for you, so it might be of interest to you how I went about the complete reorganisation of my workshop to meet my needs for the next year or so, finished today! A 2 month long project.
.To give you some idea how and why I have done It, it was some 6 months ago I planned to remake everything ive ever made over the past 50 yrs for a major expo here next year.
As many of you may know im not a bench jeweller as such tho I make jewellery which is all wrought, ie forged including holloware , pics posted recently.
To that end I decided to have the tools and machines I will use the most , nearest to the main bench . These are on mobile shelf units on castors so easily moved to access the next lot of
tools and machines behind these used only occasionally which are placed on racking along the 4 walls.
How you organise your area depends on what tools and machines you need to make what you production plans are.
In my case my main bench is some 11ft long by 4ft wide with my main fly press on one end and the other 2 smaller ones on the bench far side.
All the press tooling including minting dies are on strong shelving on one wall. Easy to access to which ever tooling set is needed for each product currently in hand.
Most of what do is done standing, tho I do sit at the brazing area that uses propane and oxygen with the pickle bench on one side. also on castors.
Finally theres the 2in dia propane torch on its stand. this does lots of things.
Then in another building theres the bigger machines, 2 drop stamps, and 2 hyd coining/ minting power presses.
Sanding, finishing and polishing is on another wall with proper vacumn extraction at 600 CFM to a dust recovery unit some 5ft high by 2ft sq.
Each work area has led daylight grade spot lights in addition to the main overhead lighting in dull weather.
The whole roof is fully translucent so the daylight is very good throughout the whole work area.
There are other machine tools, a decent lathe, 3 pillar drilling machines and other smaller machine tools, power hack saw , and all the other hand tools. A nice 100lb anvil also on its own dolly so it can be brought out when a forging project is under way. For example, I will take 1/4in dia round sterling rod and forge it to taper the ends and change the round section to a “D” section. Faster to forge cold than any other way. Bronze is forged hot.
Hope these thoughts help you plan your new work area.
Ted.
Dorset UK.
Note From Ganoksin Staff:
Looking for a led work light for your jewelry projects? We recommend:
- Reading our guide to the Best Led Work Lights Review for jewelry work here
- Searching for more discussions about Jeweler’s Torches here on the Orchid forum
3 Likes
Very good advice. tom
@bnmcfadyen If you don’t have it, consider ordering The Jeweler’s Bench Book:
https://www.ganoksin.com/product/orchid-print-vol-2/
It shows workbenches and work areas of a lot of jewelers, and you might get some good ideas from it.
There are also hundreds of posts by Orchid members of pictures of their benches, and in many cases multiple pictures showing entire shops / studios. Do a search on “Bench Exchange”. In Orchid that will get you 50 hits. Copy / paste the following in your favorite search engine you will get them all:
site:www.ganoksin.com Bench Exchange
Neil A
3 Likes
“The Jeweler’s Bench Book!” Go to lower page 38 & full page 89 see who is
there.>)
*Gerry Lewy *
*Toronto. (905) 886-5961 *
1 Like
I’ve had to move my shop half a dozen times in my life. In the early and later days it was for one person, in the middle for a dozen. Always more of a trade shop than artist studio, but they are close enough. Here are some basic layout things I’ve learned.
Generally I like to think about how work will naturally flow through the shop and position stations accordingly. In a one room shop I like counters, stations and benches around the perimeter with a large central heavy workbench in the center for mills, presses, vises, hammers, blocks, pounding, etc.
Always have more light than a normal room. You need to see the work better than your customers. Same goes for magnification but that’s not a layout issue.
Plan for power early (both draw and outlet number and placement). Same for ventilation, I like an inline fan in the ceiling that has ducts branching around the shop to the kiln hood, plating and soldering stations.
I like the countertops higher than normal since I’m usually standing.
Allow space around the sink for steamer, sonic, magnetic tumbler, plating and an area to layout polished pieces on a towel. Also need storage or shelves for solutions and materials used to wrap up finished pieces for delivery, think assembly line.
It’s better to separate casting and polishing if possible. Quattro makes a nice enclosed polishing system to minimize dust in a small space.
I could go on too long , so lastly. Think about each station being like the cockpit of a plane. You want to be able to reach everything you’ll need quickly and easily when working at that areas task.
Hope that helps a little and have fun.
Mark
1 Like
One thing that I did when I set up my current studio was to tie all of the 110 outlets in the studio to a switch next to the light switch. When I leave the studio at night I throw both switches. Insures that there is no chance of accidentally leaving something, like a pickle pot, on overnight.
Make darn sure all plugs have a ‘ground’ on them…Of course a “surge
protector” in case of an electrical storm hitting your studio. Keep your
insurance updated at all times and letting them know what you do. Read all
of the da*n fine print in your policy. Otherwise, you will have a mighty
big “Woops!” Keep your computer in a separate room away from your active
areas. Not too mention have your external hard-drives not attached to your
tower!
*Gerry Lewy *
*Toronto. (905) 886-5961 *
1 Like
Hello everyone~
Thank you for the suggestions and great tips so far! I have ordered the Jeweler’s Bench Book…
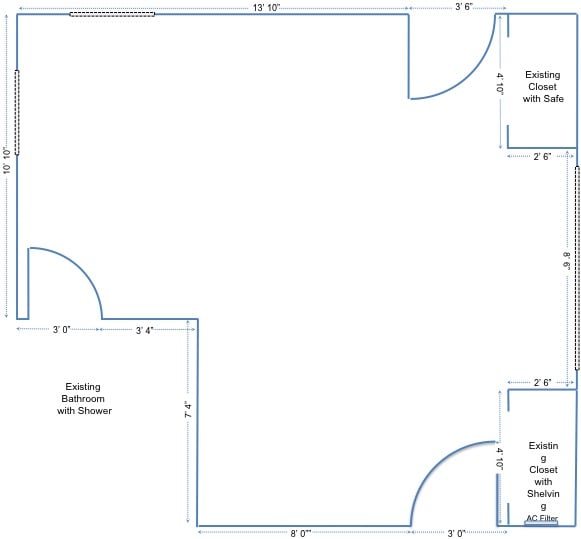
Here is the floor plan of my studio at present. I have a large bench and work tables in there already, but I am looking to rearrange and set up a hot area with proper overhead ventilation for my vcella kiln with a soldering station for two. There is a separate cleanup room with sink and fan,behind the 8 ft. wall on the bottom that has a bookshelf on it. I want to keep my main workbench in the 8’ 6" area in front of the window on right…so I don’t want to have carry pieces to set up for soldering too far… . So far, I am thinking of a T shaped hot area with vent. overhead on the corner of the existing bathroom wall and 7’4" wall. Also, I have a freestanding german sheet and wire rolling mill that usually stands in the center of the room.
I greatly appreciate any thoughts or comments of those of you that have time and insights to share.
Best wishes,
Barbara
1 Like
Studio design buildouts such an exciting adventure. I did a couple things different than the first studio (a public facility) that had great benefits and some really dumb deficits. My studio is semi subterranean basement, built into the slope of a hill by the beach. As a result (and because of codes) I can’t have any tanks (O2 or acetylene) inside. I store my tanks outside and pull a 25 foot line thru a tall window. I was also careful integrating an exhaust system to service all of my equipment / task needs. I upgraded electrical with a 60 amp sub panel ( 3 quad plugs along the walls under my studio windows). There is alot of rigid conduit running across the ceiling as aesthetically as possible. Total electoral available is probably 80 amps because there is a second set of panel electrical also grandfathered into the building. I added overhead custom tracks for movable lighting and extra plugs in the ceiling. I used sliding closet door hangers in the tracks (two steel angles welded) with simple chain. My work lights with led bulbs can be moved around keeping surfaces free. The studio end of the work space is bordered by continuous windows. I added alarms / theft deterrent systems after a rash of breakins in the area.
I put wheels underneath virtually every work table / station. I can clean and move (find) things that inevitably go missing. I treated it about like designing a kitchen - most accessibility with the least amount of steps. With four decent size tables / one with great storage and shelves below for gems and metals, a vintage jewellers bench, a polishing counter station with a double arbe vacuum underneath with one table nesting under in a T configuration. That nested table holds muy flasks and spru bases, a small band sander, and larger anvil and pipes fo shaping / fabrication. It’s a flexible space saver of sorts.
All the work tables and the bench are aligned with windows at 4 feet up to the ceiling. Nice natural light most of the day (with birds and plants). I have an 8 × 10 dense pile new carpet scrap under the jewellers bench and a storage work table. It catches things. I have a tiny rechargeable hand vac for miscreant disappearing elements.
Behind the bench i have a tall upcycled 60’s flat data tape storage unit. With 8 drawers and old plastic inserts and tier waste storage trays, it organizes most of my everyday tools. I can’t leave steel tools our because of hi marine air humidity where i live and work. It eats tools faster than you can deal with.
One station has welder and i also use it for carving waxes and preparing trees. That table is a mid 70’s German multi purpose work station. Originally it was some sort of engineering work station with an adjustable front area like a drafting table. The back top is flat for equipment or computer monitors. Its pleasantly ergonomic. That one has a tambour little cabinet that fits under the right side for miscellaneous storage. It came from a beauty salon. Nice insert trays and a top tray organizer. (Welding electrodes and tips) the injector is on the end of the tables right next to it.
I have.bench anvil pins on each table for convenience.
One table in the middle has my vacuum unit. I use it for messy investment. I use pet peepee pads for mixing and cleanup. My old studio assistant (cat) passed, and i had alot of them. An aha moment of reuse that i will do forever: It’s so convenient. Behind that i have some file cabinets, lateral files and my antique rehabbed rolling mills mounted on wheeled platforms. I store my vulcanizer there as well when not in use. The investment tubs are convenient to the mixing station.
Satellite Kiln (with orton controller and temperature switch cutoff) and centrifuge are co located just past the polishing station also under taller windows (5feet to ceiling). I found vintage rolling tool stands for band saws or similar. With two heights they are perfectly ergonomic for flasks being at a perfect height to transfer to my certifuge. A new lucas centrifuge is mounted on a lower stand and counter with 100 lbs of sandbags on its bottom shelf. Its rock sold when spinning.
The ergonomics of those stands is just wistful. Where i had cast previously. It was ackward and hazardous because both similar casting related pieces of equipment were at the same height. They had a step up & stand on - perching for using the torches for melting in the crucibles.
They are co located on a long stretch of consent block wall and have a dedicated 30amp twisty plug along with a 20 amp quad plug. Both the kiln and centrifuge share an overhead suspended exhaust system i designed and built. It ties into an unused wall heater and i have two reostat controlled fans (256cfm) that are quiet and efficient. It goes out thru the building wall. The only thing is: i have to reposition the kiln to the side and them scoot the centrifuge underneath when i am casting. I swap out one sheet metal bent coupling. When the burnout is complete there are no fumes, so the exhaust is no longer necessary.
I extended the pan walls of the centrifuge up another two feet wrapping the centrifuge 3/4 of its circumference. It supports a flat cover and fan, along with attaching ducting. No gases or fumes escape. I also use kiln bricks and a kiln shelf to use the area above the crucible and arm for a soldering station and also for my vulcanizer. No stinky anything in the studio.
Further over i have a large storage unit fitted with shelving to hold plastic bins and boxes of tools and materials i don’t use everyday. Beyond that is computer work stations by the entry door, book cases of reference materials and a conference station for clients. My tiny bath room holds a storage unit with a couple shelves. I keep cleaning and all my mechanical tumblers in there - three tumblers and a big vibratory tumbler for crushed walnut. Small sink and buckets. Its great to be able to contain the tumbler noise by closing the bathroom door.
At the end, if you get everything working and adjustable to your day to day needs, you will be thrilled. My biggest $ expense was all of the electrical. I looked at the equipment I had and what i needed to add. I based my electrical on that. Personal labor redoing the finish on my polished cement floors, repainting etc added a chunk of work. During that early process, i had a great opportunity to work thru the best remodeled use of the space for jewelry. It evolved over a year.
There’s also creature comforts: my partners big computer desk, a nice futon sofa, 2 comfy recliners, and a wallmount tv & a nice rug. Big fridge, filling cabinets, lateral files, plan files. Wheels under everything except for the jewellers bench and seating. Its the single best strategic decision i made after the electrical upgrade.
Look at safety, what you have, what you might optimally add, ventilation, electrical practicalities, storage needs, great lighting, and containing messes and contamination issues. Then imagine all the creative fun that it will spawn.
Eileen
You can see pictures of my shop on my website (www.robmeixner.com). A few things that I have learned having moved four times: Plan your electrical needs so that they can expand as you add equipment with your power hogs on one or more 20 amp circuits (polishers, exhaust fans etc.). I have always included a switch right next to my bench seat that will allow me to turn off all the nearby lights. This allows me to see the color of any piece that I am annealing. It also lets me quickly turn off all the lights so that I can look for the latest thing that I dropped. Putting a flashlight on the floor causes every thing on the floor to cast long shadows. I can usually find anything lost on the floor this way. I have a second switch that will turn off most of the power in my entire shop. When I leave, I like to know that I left nothing running. This is with the exception of a couple outlets into which I have plugged my tumbler, cordless charger, ultrasonic sump, clock and other devices that need to be powered all the time. Plan for how you will exhaust your polishing hood and soldering/casting hood. They should be on an outside wall that you can poke a hole through. I like to be forced to get up and walk from one area to another and stand once in a while (I am nearly 70 and this is real important for me). I still need to add a sink. Have a fire extinguisher near by. I am slowly converting all of my lighting to LEDs. You would be surprised at what you can see with an LED that you can’t see with an incandescent bulb. Try to keep the dirty operations away from the clean ones. I have cut a hole in the top of my bench in the grinding area and have attached a suction hose to it that ends where all of my polishing debris ends. This allows me to keep this normally very dirty area clean and also allows me to capture recyclable precious metal. I also am a lapidary. I try to keep my lapidary areas separate from metal working areas, but they do overlap in that I use my expansion wheels and resin wheels for both areas. Have One clean area where you keep you books, drawing materials, reference documents, catalogs etc. Build really heavy duty benches for your rolling mills, presses, punches, dapping dies etc. Since I suspect that I will move again or someone will want to move my stuff when I can’t, design your benches to be logically broken down. Mine are build on a 2X6 base with the backs easily removed by undoing a couple bolts. This way they can be moved out of my cellar. Finally, don’t build your shop in the cellar if you can avoid it. My two cents…Rob
Hi Eileen,
Just a short reply.
Its wheels on everything!
For you as well as me.
Ted.
Thank you for your in-depth explanation of your shop Ted! I like the idea of things most used on wheels in front and less used tools behind. Your lighting situation sounds ideal, as well! I would love to see some images of your work.
Barbara
Hi There Barbra,
Where to start? To see some of my work over 50 yrs is only possible in June next year when as mentioned, I will have remade every item ive ever done for a retrospective show here
Added them up and its in excess of 65 different items.
However, the pieces im rather proud of is the new anniversary buckle and associated pendant brooch and button design.
Heres a description of this buckle as it is comprised of the following. My IT guru will post a fresh picture of this tomorrow.
- the minted sterling front of either “Night” or “Day” the Bertal Thorwaldsen bas relief designs of 1830 on the,
- the blanked out 2.25in dia bronze disc.
- Onto the back of which which is soldered 4 minted trefoil claw hooks?
- which hold the rectangular titanium fire oxidised blue wire loops that
- have the 2 part hinged
- belt holder on one side,
- on the other side the upstanding silver topped pin that the the leather locks onto when wearing.
- these have" double" material in sterling and bronze roundels threaded to hold in place with the right screws.
- then theres the sterling rivets holding the minted front onto the bronze back.
finally theres the leather, in cream calf with turquoise swede inside. Have to make this up as you cant buy it.
When worn all you see is the front, the pin,and the silver on bronze keeper.The hidden detail is for the owner!
A total of 22 metal individual metal components plus the leather!. All signed, numbered and dated.
enjoy.
Ted.
One thing I haven’t seen anyone mention is the floor. SOLID color only. No wood grain, no tile with flecks, etc. Makes finding things that end up on the floor much easier. I also use only closed drawers and cabinets…nothing can fly off my benches an hide itself on an open shelf full of stuff.