I’m trying to teach myself how to bezel set cabochons in sterling
silver. I found closing the setting with hand tools to be very
difficult (I have a bad finger). So I got the Foredom hammer
handpiece. I’m using the broadest tip, and it seems to do a good job
of moving the metal. Problem is, it really marks up the outside of
the bezel, and it took me a very long time to file and sand the marks
away. So my questions are:
am I using the wrong tip, or doing something wrong; and
since I’m at the flexshaft already, are there any attachments I
could use in the regular rotary handpiece to replace the hand filing
and sanding.
#1, don’t use that electric hammer. it will leave little 'dents’
all the time, everywhere. A real nuisance to try and remove. I use a
little flat surfaced hammer with a very smooth shiny surface and
lightly tap of the side of he bezel wall. In fact, I use this process
in setting Gypsy settings. go to my video’s on BenchTube. light
tapping is all that is needed!!!
#2, I use a fine paper 3/4" inch (19.5mm) rotating disk to smooth
out any little marks. Then using a Pumice wheel of 180 grit. with a
Flat surface & then if needed, a Tapered wheel…180 grit…*no little
marks, no fuss, no bother afterwards for cleaning…
You’re on the right track, but the first thing I did when I got one
of those handpieces was to take a spare tip and grind it into a
small, broad cross-peen hammer face (just tiny) and then polish it
smooth. Not shiny (it’ll slip) but smooth. Final finish was
probably 400 grit sandpaper.
Take the tapered, flat faced cone, and grind long tapered flats onto
two of the sides of the cone, so that the final face stops being
round, and ends up looking like a rectangle with rounded ends.
Then carefully round the edges, so that it ends up looking like a
tiny little twinkie. (Not quite so rounded on top, but round all the
edges.) I can’t figure out how to describe it, but I then ground
back the face of mine so that the two ends of the rectangular face
were radiused back slightly. Imagine you’d grabbed the twinkie in
both hands, and bent it so that its ‘back’ was arched. Like that,
but very gently. That way if you come in at an angle, the edges
don’t dig in.
For finishing, I am in love with the 3M Bristle discs. They aren’t
my choice for removing heavy marks, but they are definitely my choice
for finishing pieces!
My general routine is to use sandpaper, 320, 400, 600, on the split
metal mandrels. You slip an edge of a strip of sandpaper in the slit
of the mandrel and wrap it around. Then the rotation of the flexshaft
keeps the sand paper rolled in place while working, and you tear off
any worn parts when needed. Extremely economical.
Next up is using the Radial Bristle Discs, and which ones depend on
how high I want to finish. Usually that’s enough for me, but I’m not
after a super high mirror shine all the time.
I’m not afflliated with Rio, nor am I saying they’re the best place
to get these - I just want to show you what they look like. There are
a number of retailers, hobby shops and hardware supply stores that
might carry these at greater or lesser cost.
Just for the record, I don’t think I’ve set eyes on a twinkie in 25
years, let alone eaten one. But it was the only thing I could think
of to explain the shape that would be common enough to make sense.
Or maybe I was just hungry.
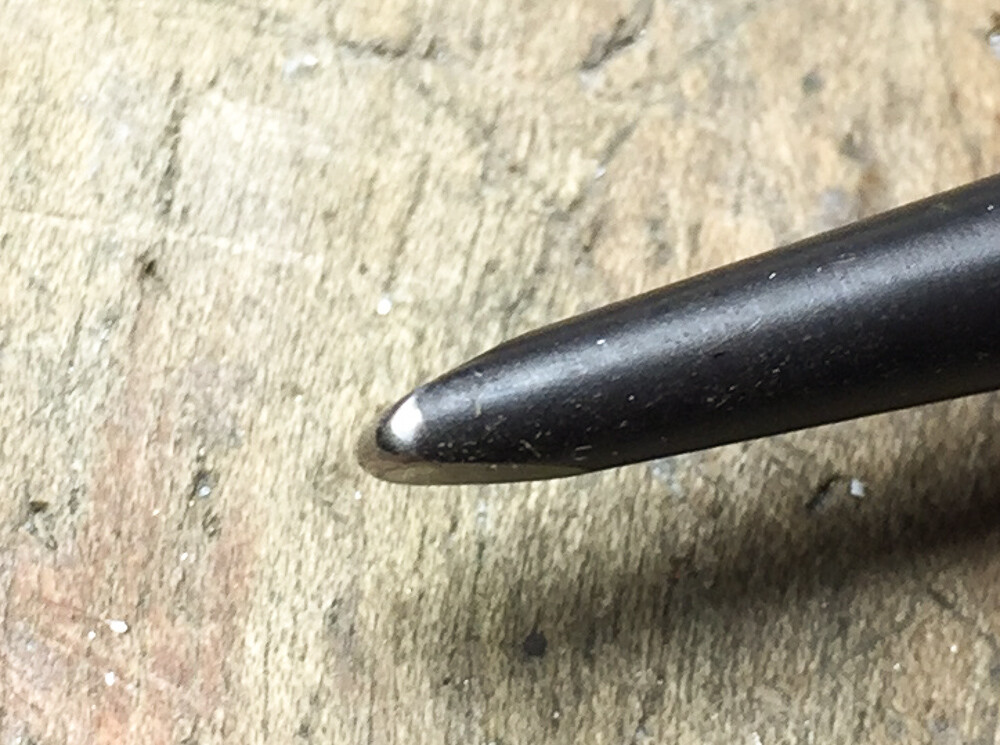
Meanwhile, I’ve gotten several email requests for pictures of the
tip, so here they are.
The discussion of stone setting using a flex shaft with a Twinkie
shaped tipmade me think a bit. I went out and picked up a spring
loaded automatic center punch. The pointedtip became a Twinkie shape,
I had to reduce the tension on the spring by compressing it in a
vise. I did 2 practice bezel settings with cabochons, one afree form
Agate the other a 10 mm round Hematite. Once I softened the spring
tension, I’m of the feeling that it works out well, can be a useful
inexpensive tool. The automatic center punch was under $25. I’ve been
using a hammer and a setting punch till now, possibly could be used
on gypsy settings too. Hope some of you guys find this useful. If
anyone try’s it out, please let me know what you think.
I use a pointed tip in a hammer tool on my flex shaft to texture
areas in mydesigns…
I never liked the looks of oxidized flat surfaces. backgrounds. The
texturing gives a sand cast looking to the background. Texturing on
some brightsections of the design breaks up uninteresting large
surfaces of polished silver.
I'm trying to teach myself how to bezel set cabochons in sterling
silver. I found closing the setting with hand tools to be very
difficult (I have a bad finger)
I would do the twinkie shaped one but do some others also. Flat face
as well but just slightly round the edges.
I had to reduce the tension on the spring by compressing it in a I
did 2 practice bezel settings with cabochons, one afree form Agate
the other a 10 mm round Hematite. Once I softened the spring
tension, I'm of the feeling that it works out well, can be a
useful inexpensive tool. The automatic center punch was under $25.
Not a bad idea. Might be hard to judge your punching strength till
you get used to it. You can use your finger to keep it from hitting
your gem