I am pretty new here as I am just returning to silversmithing after a prolonged absence. I owned an Indian Jewelry store for twenty years and left to practice law, from which I am now retired. I no longer have any of my tools as they were destroyed in a fire, so I am assembling the tools and equipment I need to start a new studio in my apartment. So far I have ordered a new workbench and, instead of a log, I built a stand for my railroad track anvil. My problem is how to secure the anvil to the stand, which is assembled from heavy lumber into a solid, sturdy, and tolerably quiet stand. My first idea is to use two inch rectangular steel tabs with a hole in one end, secured to the base with lag bolts at an angle to hold the anvil down. Unfortunately I am so far unable to find such a thing and am therefore seeking advice from this brilliant community, either on where to acquire such tabs or on other solutions.
I have an anvil made from a heavy piece of rail. I built a stand out of dimensional lumber and hold it in place on top of the stand with pieces of wood molding that go all the way around. It doesn’t seem to want to go anywhere and I can remove it easily to polish the surface. Following should be a picture…Rob

So Rob’s anvil is held in place by its own weight and a border molding around its base. We don’t have a picture of your stand, but using a couple of pieces of pipe strap is one idea…it is bendable and has spaced holes every inch or so, so you could cut and bend what you need and attach it to the top or sides of your stand with the lag bolts or lag screws. Not as pretty as a purpose fashioned and drilled piece of steel, but it will work. -royjohn
royjohn…If mine started moving around, that is probably what I would do…Rob
If you can weld, you could weld a piece of all thread to the bottom and run a hole through your wood base and “tighten” it down. Might have to retighten or create a way to absorb the wood fiber compaction.
Hi,
i am not sure if this will work for you…i built a cube shaped base, out of 4x4’s, on wheels, for my anvil…and then strapped it down using two ratchet tie down straps…without hooks…i wrapped down and around the cube, on both sides of the anvil…
kinda like this…
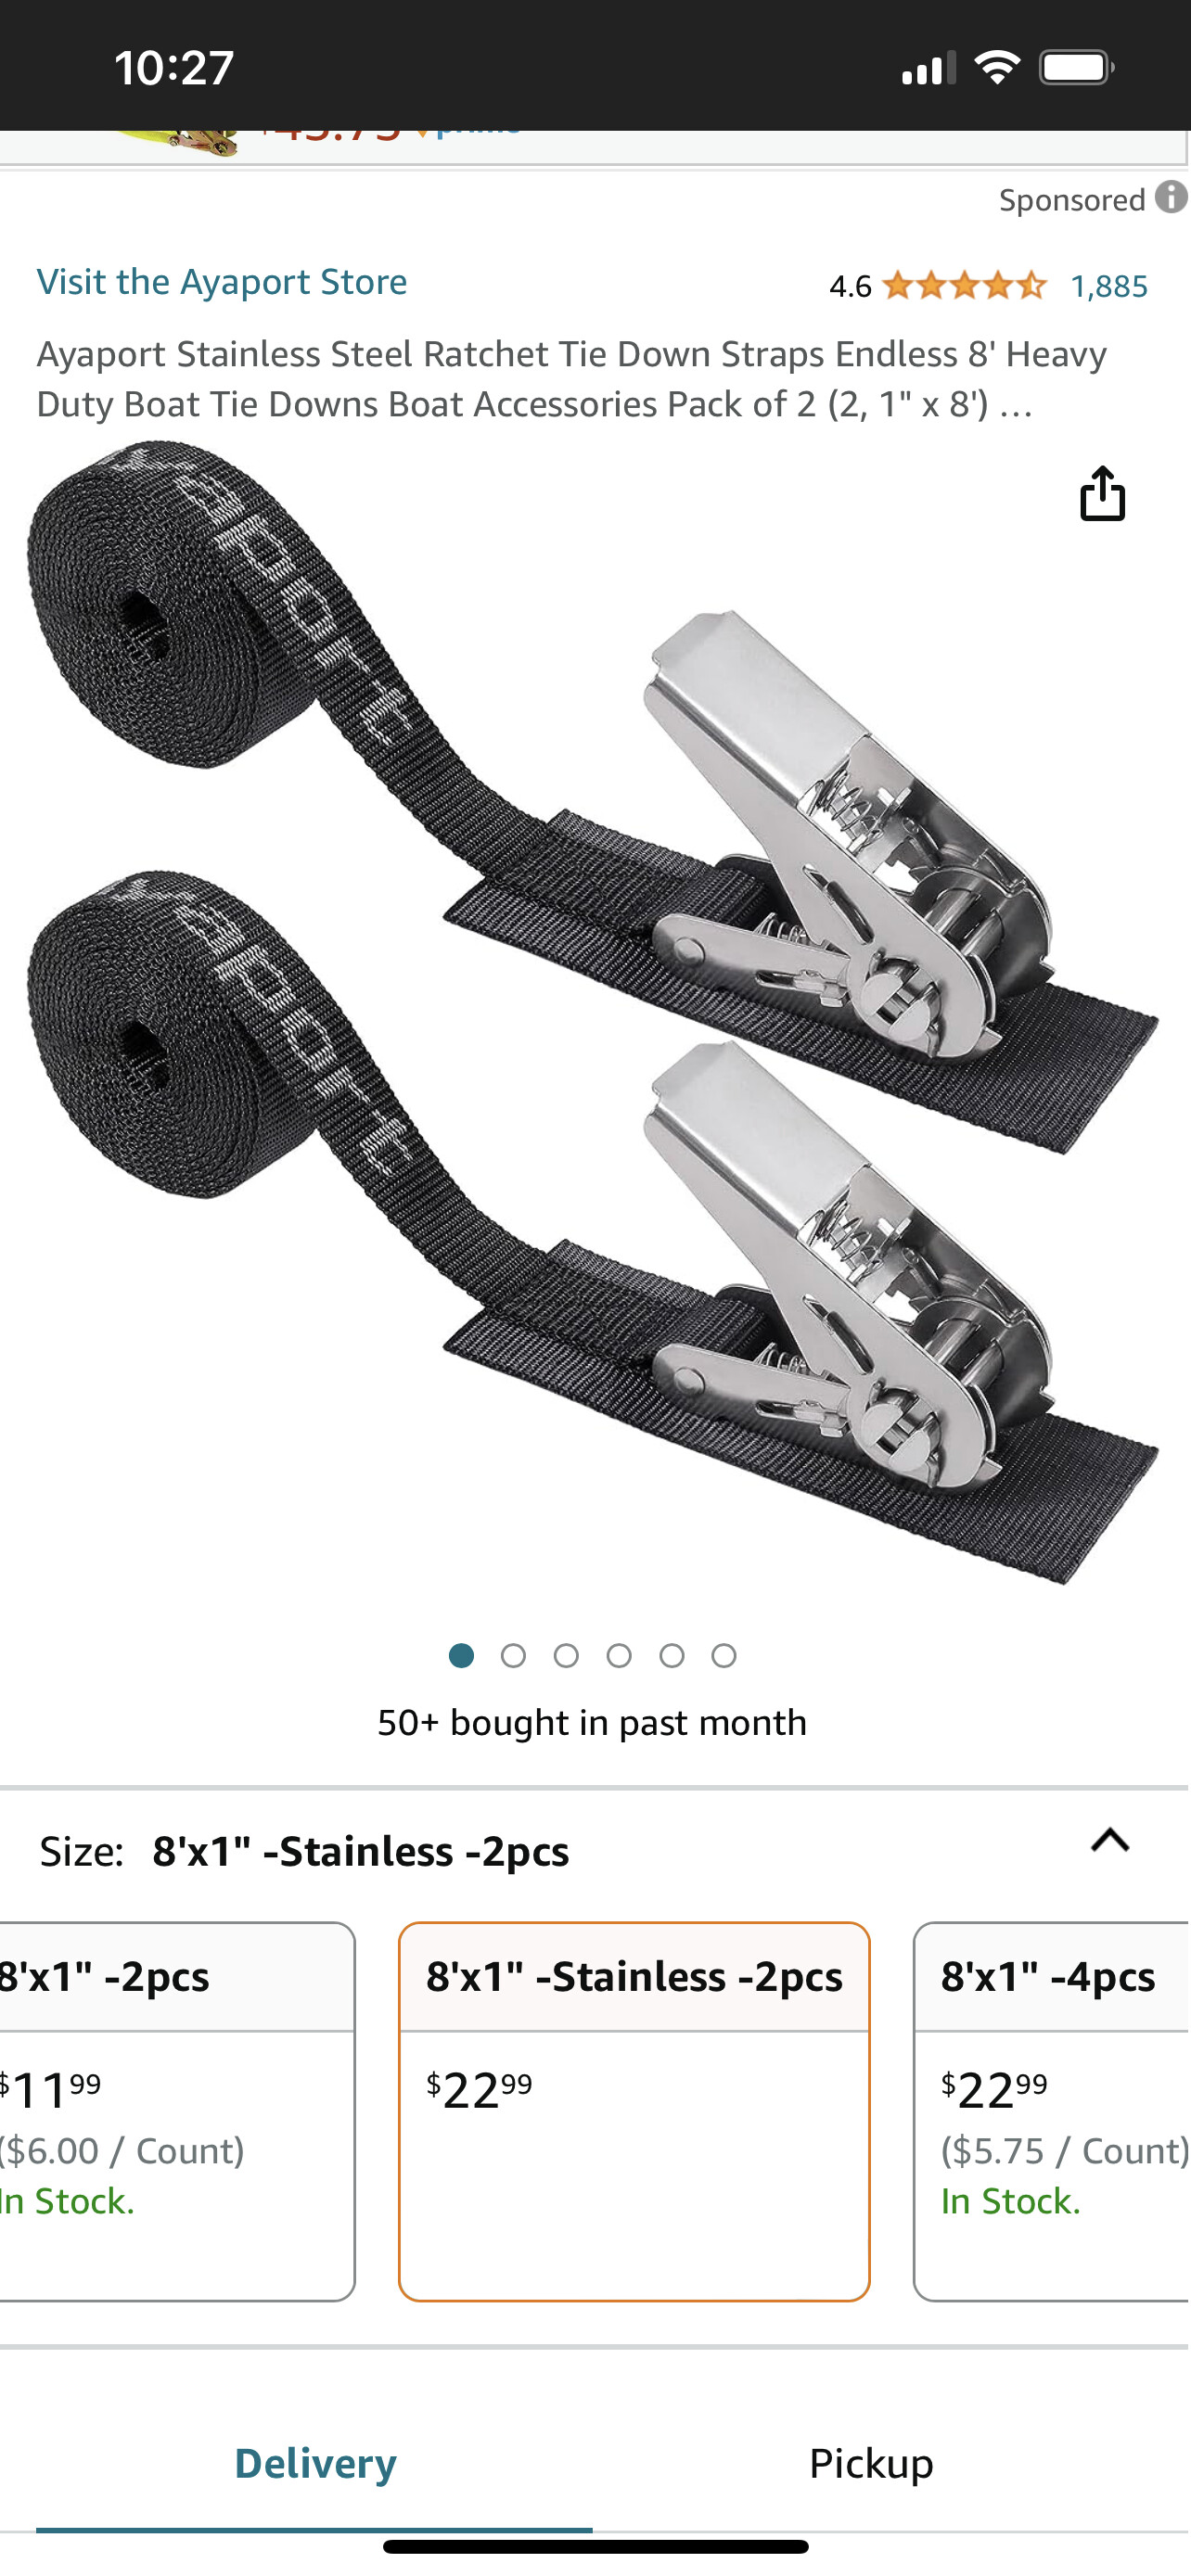
julie
I appreciate the suggestions. I built my stand out of 2x12s. I’ll try to post a picture later today. I should add that it will be quite visible as I am using the dining area of my apartment for my studio; for that reason I would prefer something a little dressier than the plumber’s strap. The wood molding is a good idea as I had been considering routing out the shape of the anvil about 1/2" deep and adding a layer of silicone to help deaden noise. I’m thinking that If I sunk it a little lower I could fasten molding so that it would lap over the base of the anvil to secure it. Julie’s idea of the tie down straps has promise and has me looking at them.
Michael,
If you made a Wood Base similar to the one Rob made, just a little bigger than the Anvil itself, then you should be able to use (2) pieces of Angle Iron (“L”-Shaped Iron) cut to the Length of the Anvil (many hardware or welding stores will do this for you) and then Drill Holes on one side on the “L” and lay the Un-Drilled side over the Top on the Anvil’s Foot and Screw Lag Bolts into the Holes on the other side of the “L” into the Wood Base.
You could also put some thin, flat strips of Foam Insulation under the un-drilled side of the “L” where it lays over the Anvil’s foot, which would take up any space in between the Angle Iron and the Anvil, and may also help to deaden some of the impact ringing.
Lastly, if you wanted to “dress up” the Angle Iron to make it look a little better, you could always Spray Paint it in a colour suitable to the room that you’re using it in - colour-coordinating your Anvil & Stand to dining room… ![]() Good luck!
Good luck!
Jonathan
I like your idea, Jonathon. My stand is about twice the length and width of the 12" anvil. I made it that size so I can have enough space to hammer some depressions and file some grooves into it to resemble as closely as possible the log that I used for years. I think angle iron might just do the trick.
Hi Michael,
Yeah, I understand, plumber’s strap isn’t that pretty. I didn’t think of it yesterday, but if there is space on top of your base, you could drill [four?] holes and put in T-nuts with threads if you can reach far enough up into the inside of your base to place them. Then screw bolts with washers on them into the holes, the washers lapping over the edges of the base of the anvil. A similar arrangement could be done with lag screws if the T-nuts don’t work.
As far as silicone under the base to deaden the sound, that might work well, but it would take away some of the rebound of the anvil back upward when hit, which adds to the effectiveness of your hammer blows. IDK if in practice this would matter at all. The ringing can be loud and annoying and ruin your hearing unless you wear hearing protection. -royjohn
I can’t remember if I drilled holes or used an angle grinder to cut slits, but either way: I made 4 spaces in the base of the rail, set it on top of my stand, and then used four 5" or 6" GRK type screws (the big structural screws with a ‘star-drive’ and washer-head) to drill into my wooden base. It’s not going anywhere.
My sincere thanks to everyone who answered. Your comments ultimately led me to z clips here. I’m considering stainless steel to match the surface of the anvil, which I hand polished to a semi-mirror finish. I intend to bend the upper arm slightly open to the same angle as the anvil; the image is of course upside down, as the hole is in the lower arm. Your comments are most welcome.
This will allow you to remove the anvil easily if you want to use a machine to keep up the polish. I laughed when I read that you polished your anvil. Mine was polished too, about 50 years ago. It now has a series of dents that first appeared 45 years ago when our boys were little and I found them “practicing” on the anvil with one of my steel hammers. I left the dents. About 10 years ago more appeared. I discovered the source was my grand children doing the same thing that their fathers did 35 years ago. I left those dents too, at least for now. It’s getting hard to work around them. I may see if a retired machinist that I know can recondition the face of the anvil and re-mill the V grooves that I use to form bracelets…Rob
Hahaha. I understand exactly how and why you left memorable dings. Fortunately my only grandson within striking distance is fourteen now.
Rob,
The machine shop at a college that I used to teach at cut up and surface ground some railroad iron that a person donated to us to create about 6 anvils.
It’s been a while since I’ve used railroad iron, but as far as I remember railroad iron is either heat hardened steel or is work-hardened by multiple years of very heavy trains repeatedly rolling over them.
What did you do to shape, grind and polish the surface. Was it difficult to do?
If railroad iron is hardened steel, the anvils might be hard to drill to mount?
Related to the railroad iron anvil mounting question. - At this school that I used to teach at, we didn’t mount the railroad iron anvils to anything because we had to lock them in a cabinet at the end of class. We took the railroad anvils out of the cabinet at the start of class and put them on tables and workbenches. Obviously, that wasn’t as solid of a hammering surface as if they were mounted on a heavy stumps, but it worked out fine for this beginning jewelry class.
Jeff
As I recall, the surface was hardened, or so said the guy who cut it in half. Dad only gave me half of the rail and I had to get it cut. The rail appears much larger than a typical RR rail. The story is that it came from a steel mill and has 1959 rolled into the side of it…Rob
I got it on ebay and it was ground flat. It was smooth enough that I probably could have used it just as I received it. I collect Japanese knives and get some used ones that have been neglected, which I resurface and sharpen. I do it by hand so I have sandpaper and sanding blocks, and that’s how I polished my anvil. I treated it as I would a damaged knife and went from 60 grit to 3000. I’m now waiting for my new Durston Superior workbench to arrive so I can start in earnest to set up my new apartment-size studio.
As to it’s size, it is slightly smaller than a normal track.