Several people have asked me offline about the process I use with
the ImagOn line of photo-resistive products for etching so I thought
I would post it here. Over the last 8+ years, I’ve used several of
this line of products (ImagOn, ImageOn Ultra, ImagOn-Rapid, ImagOn
HD). There doesn’t seem to be much difference between them other than
exposure times and the fact they came from different manufacturers.
Some of these products are out of production.
I’m currently using ImagOn HD because that was what was available
last time I ordered. I normally etch brass, nickel silver, stainless
steel and copper. The process is pretty basic and there are a bunch
of printmaking sites that have instructions. They often use a press
to put the film on, but I haven’t found it necessary. I think the
film comes with instructions as well. I basically do the following:
-
Clean metal very well
-
In a dimly lit room, wet metal with spray bottle, take backing
off of the ImagOn film(make sure you take the proper side off). Lay
film on metal and smooth it out. -
Spray top of film with a little bit of water. Use a window
squeegee to press the film down to metal, eliminating any bubbles or
bumps. Work quickly. Trim any film hanging over the edge. -
Dry top of film with a paper towel and rub the whole surface with
the paper towel or sponge, paying special attention to the edges to
make sure the film is adhered. -
Put in a dark place and let dry, usually overnight. When I am in
a hurry, I have used a hair dryer to get it dry right away. I
generally prep a bunch of plates at once and leave them in a box,
sometimes for months before exposing them. It doesn’t seem to affect
the results. -
Print the image you want to etch on a transparency. Wherever
there is toner/ink on the transparency is where the metal will etch.
I print using a laser printer now, but I did it with an inkjet a few
times as well. -
Lay the transparency on the metal. I lay a 3/16" thick glass
place on top to press the transparency against the ImagOn film. I’ve
also taped the transparency down without the glass, which works, but
the glass plate helps with consistency. -
I expose using a halogen work light from Home Depot with the
safety cage removed. I think I have a 300 watt lamp, and expose from
14-16 inches for about three minutes. Shut off the lamp. Time will
vary depending on the distance and intensity of the lamp. I recommend
doing a number of small test pieces to test your exposure time. -
After exposing, and still in a dimly lit room, peel the mylar
layer off the top of the ImagOn film and put it in the developer
solution. The developer solution is made from pool chemical to raise
the Ph of a pool.
Ph Up instead of the Ph Down a lot of people use for pickle. You can
get it at WalMart, Home Depot or any pool supply store. The WalMart
stuff has some fragrance crystals in it, but it doesn’t seem to
affect the process.
I don’t remember the exact concentration at the moment, but it is
right around 4 tablespoons per gallon. It also doesn’t seem that
critical.
- It will be developed after about 9 minutes. I’ve left it in as
long as 20 without significant problems. Pull it out and rinse it off
in the sink.
I rub it with a sponge to make sure I everything off. Then I pour a
little bit of vinegar on it and let it set for 30 seconds to stop
the developing process and rinse again. Let it dry, and you are ready
to etch.
I often set it back under the halogen lamp to dry for a few minutes
when I want to etch right away.
-
Check the film for any pits or anything. If you get a big speck
of dust on the transparency or glass when exposing, it can be enough
to leave a pit in the film that may etch. I repair any pits with nail
polish and a paint brush. I don’t have to do this very often. -
Etch it using your favorite method. Don’t forget to mask off the
back(duct tape to the rescue!). For my projects, I usually use
Ferric Chloride, but I’ve also electroetched, but that doesn’t work
as well because the bubbles can lift the film sometimes. Once you are
done etching, put the piece back in the developer solution and the
film will come off eventually. If you heat the solution, it will take
maybe 10 minutes, otherwise it takes a few hours at room temperature.
I often just toss them in when I am done and come back the next day.
As an example: http://www.ganoksin.com/ftp/stephen_coronet.jpg
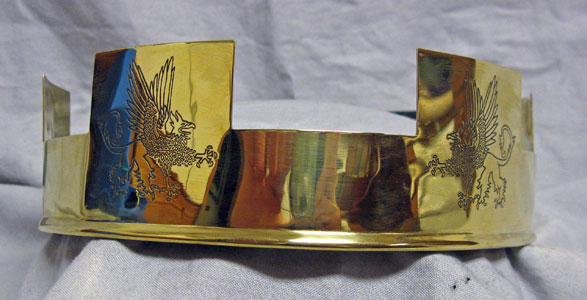
This coronet is about 2.5 inches tall, so the etched griffin is a
little less than 2 inches tall.
Most of my work would fit roughly in a 2x2 inch(5x5 cm) square but
I’ve etched things as large as 6x24 inches using multiple lamps for
exposure. I rarely have pieces that fail. I almost always pierce my
etchings out when I am done, so I always use oversize plates to etch
on because it sometimes etches at the edges of the film. If I need to
preserve the whole plate out to the edge I use additional resist(nail
polish or duct tape) to seal down the edges.
Jason