Jim, thank you. You’re too kind. And Doug, thank you as well.
Thank you Betsy. I realized I left something out. Looking back, it’s funny, but not so much at the time – the first time I melted the sterling casting grain in a mold, I didn’t know how it would behave. I didn’t anticipate that it would bead up like a blob of mercury. So I made another block of plaster of Paris, just a blank surface, sanded the surfaces of the mold blocks and the blank one using 120 grit sand paper so they were very flat. Then, once I had melted the silver in the mold, and while it was still liquid, I capped it with the flat block to force the metal into the mold.
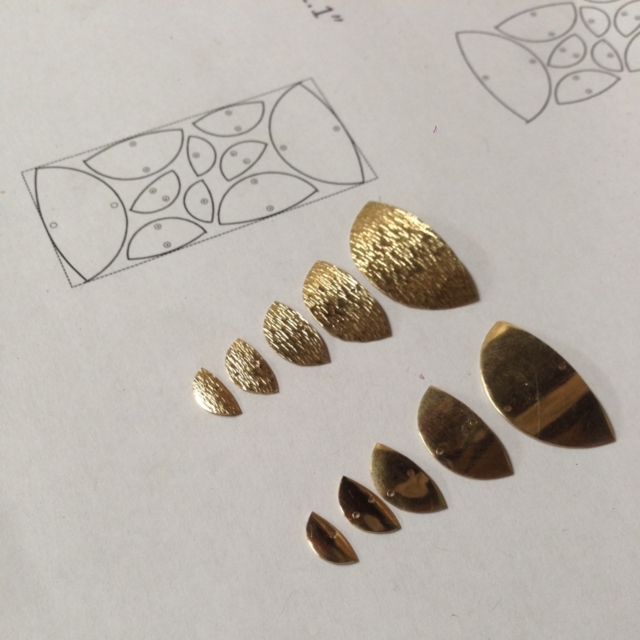
These are one-shot molds. You can see how the plaster fractures in the bottom frame. But sometimes this leads to some great texture on the piece as well.
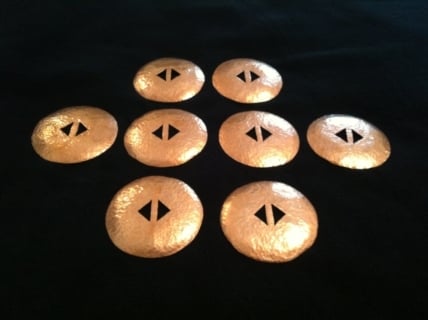
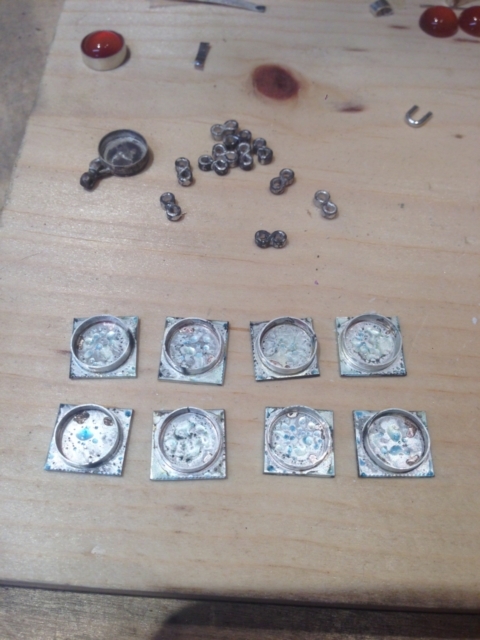
I played around with a number projects in copper, mostly just practice pieces. A friend asked me to make him some large conchos for a belt. These were relatively simple, but a good exercise in making several objects of consistent size and shape:
It may be interesting for some to know that the name for these items is" conchA", not “conchO”. I The name concha comes from the Spanish language and neans “shell”. The misnomer that has become popular for these ornaments however is “conchO”. Substituting the “O” for the “A”. as you might expect, changes the meaning of the word. The word many people have come to use to refer to these pieces changes it to the Spanish word for “dregs”, as in the gunk at the bottom of a coffee cup, or the “dregs of society”, as a reference to the lowest strata. This in my opinion is insulting to those who craft these magnificent examples of Southwest American Indian craftsmanship.
Jerry in Kodiak, (a long time admirer if SW Indian silver)
In case you’re not familiar with it, an easy, low tech and great way to do one-off pieces with cool texture is making cuttlefish molds (you can sometimes find the cuttlefish at pet shops – beak conditioners for birds). Works great (but stinks to high heaven until the heat dissipates!).
I’m familiar with cuttlebone (though I didn’t know about the smell during heating). My wife has a beautiful bracelet from Norman Bia, made from joined pieces of forged and cuttle-cast silver. I like the paraffin & plaster molds because it is so easy to work with the wax, and mistakes can be easily fixed, whereas a slip of the carving knife in cuttlebone is essentially permanent.
Eventually, I gained enough confidence (or suffered enough frustration) to buy my first jeweler’s torch. I bought a Smith Little Torch with an oxygen tank and caddy, and learning to use it made such a difference in what I could achieve.
The bangle bracelet below is what I consider my first serious undertaking. It’s a 1-inch 14 gauge sterling band, with 12 gauge rivets in 14K yellow, green, and pink gold. I have to say, I was nervous as hell, because I spent more on the materials than I had on anything before, and knew it was going to be a stretch for me.
Texturing this piece was fun. I spun it on my wood lathe at high speed, and ran a Dremel buffing pad at 90-degrees to the rotation of the bracelet.
Very nice! I’m pretty much a beginner too, and you’ve inspired me to try something similar to make a belt. So I’m curious how did you attach the conchas to the leather? Are they fixed or on slides?
Concha belts have various means of stringing together. Typical the traditional belt was a soft flat leather strip that was threaded through the triangular holes as shown in Alec’s photo. This was more of a sash as the leather was left Long and was soft and tied on. The points of the triangles help hold the conchas in place. Eventually the sash became a belt. The conchas were tied on individually or laced on with a continuous latigo laced through the belt and the conchas pulling them together.
A loop or bale soldered to the back is great for silver conchas on bridles. Holes for ties is/are great for attaching to flat leather work like bags and holsters.
In recent times the conchas became larger plates with rivets attached that is set through the belt and held in place by everything from cotter pins, peaning the tabs, to threaded fasteners.
I have made them using the sash method for women’s wear. Loops for belts, bridles and headstalls, and guitar straps.
Mine are never heavier than 20 ga. In thickness. Alec’s copper hat band is great work. The look is perfect and for that much metal on a first time try copper would be my choice well.
Probably stuff you already know but have a great time with this.
…Thanks for the tip… was about to try that…think I’ll go outside to do it. I am a novice-hobbyist and you have saved my life from the pain and suffering from my most excellent other for ‘stinking up the laundry room’ …&
Very helpful info, Don. I started some items in my first metalsmithing classes, but didn’t complete them due to the practical issues of attaching them. Well, that and just I was in over my head in the project I chose to start out with. They have just been sitting there making me feel guilty, even though I know I can now comfortably finish them with the skills I’ve worked on since then. This has given me some new directions to get them off the bench. Thanks.
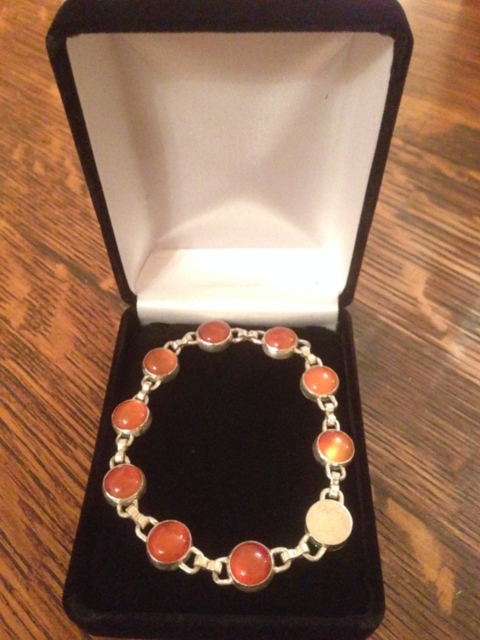
Continuing to learn how to solder, and still finding my own style… This was my first piece using cabs and bezels, an orange chalcedony bracelet. At the time, I didn’t have a disc cutter, so all the backs were cut by hand and then trimmed and filed. I also hand-formed all the figure-8 links. The clasp is a modified lentil style – if I were to do this again, I’d dome one side so it would be identical in shape to the stones.
One of the things I’m enjoying about sharing these pieces here is reflecting on how much time it took to make them, and knowing that I could be so much more efficient (not to mention doing a better job) today. Half my time was spent just figuring out how to do things. I worked with my dad a lot when I was a kid, and one of his sayings was “By the time we’re finished with this project, we’ll know how to do it.” How true.
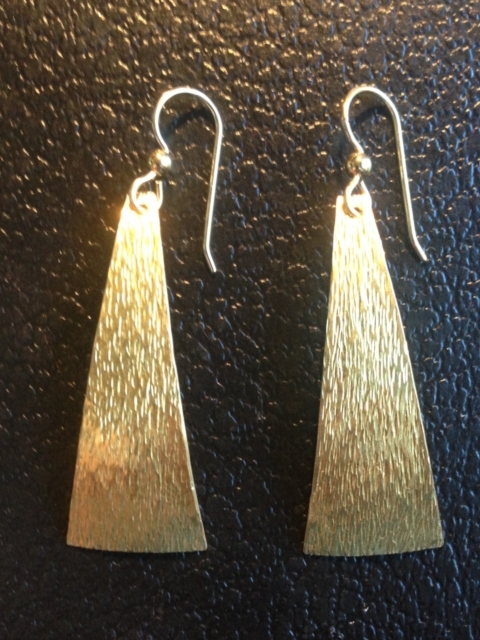
Sufficiently emboldened that I might actually be starting to know what I’m doing, I ventured into solid gold pieces. A couple of earrings in 18K yellow gold. Both of these were primarily exercises in shape and texture.
The layout on the left is me trying to minimize waste with that very expensive gold. Ultimately, I ended up using many of the leftovers without much modification. But that’s another picture for another post.
Thank you so very much for sharing your process to make the conchos. I am just learning how to make things on my own. I have asked other jewelers on Instagram how they make a certain part and I most often never! receive a reply. Why the great secrecy? I was a professional chef/ pastry chef/instructor , ect and ALWAYS shared my knowledge with ANYONE who asked me questions. Many Thanks Deborah
Hi Deborah,
Why the secrecy? since no one has responded I will.
Its because they think they have a commercial advantage in their know how, and therefore dont see why they should giver it away for free.
this is standard practice in the commercial world, all big corporations as well as one man band business follow this principle.
However,heres the other side to this to compensate.
If its been done before it can be done again, if our clever enough to work out how.
so theres hope for you. As an independent, you survive or fall by
your own efforts.
Im not referring to know how in the public domain, there are hundreds of utube ,videos, books, and tutorials at courses that you can access. a lot are free as well.
The reality is Its a tough old world out there when money is involved.
To give you an example, there were 3 Co’s making a particular jewelley product.
the bigger of the 3 made an offer to the other 2 they couldnt refuse.
they took them over, and their customers, then closed them down and scrapped their equipment so they were the only maker left. It didnt effect me, as i make things others do not.
Honorable? But thats the way this commercial world is.
You decide.
Ted.
Hi Ted
Solid reply.
I was close friends with Henry Duney, a well respected and gifted jewelry artist and manufacturer. We were doing a show together and I asked, kinda offhand, how he did his signature texture (knowing full well how it was done) . I loved Henry, super straight up guy, he said it was proprietary and that was that.
Now when you look at Alec’s texture, it’s nearly identical.
Henry’s was applied (in the masters) with a hart burr, it could have been done a number of different ways, yet, though we weren’t competitors, the answer was never shared.
I grew up in that world… lots of questions , few answers. sometimes I thank it for driving me, at all times it seems stingy.
Best,
(to share)
Jim
As I began figuring out what I most enjoy doing, I became interested in overlay. What initially excited me were geoglyphs and petroglyphs. I find these ancient works (some call them “rock art,” but that’s a different discussion/argument for a different time) particularly inspiring.
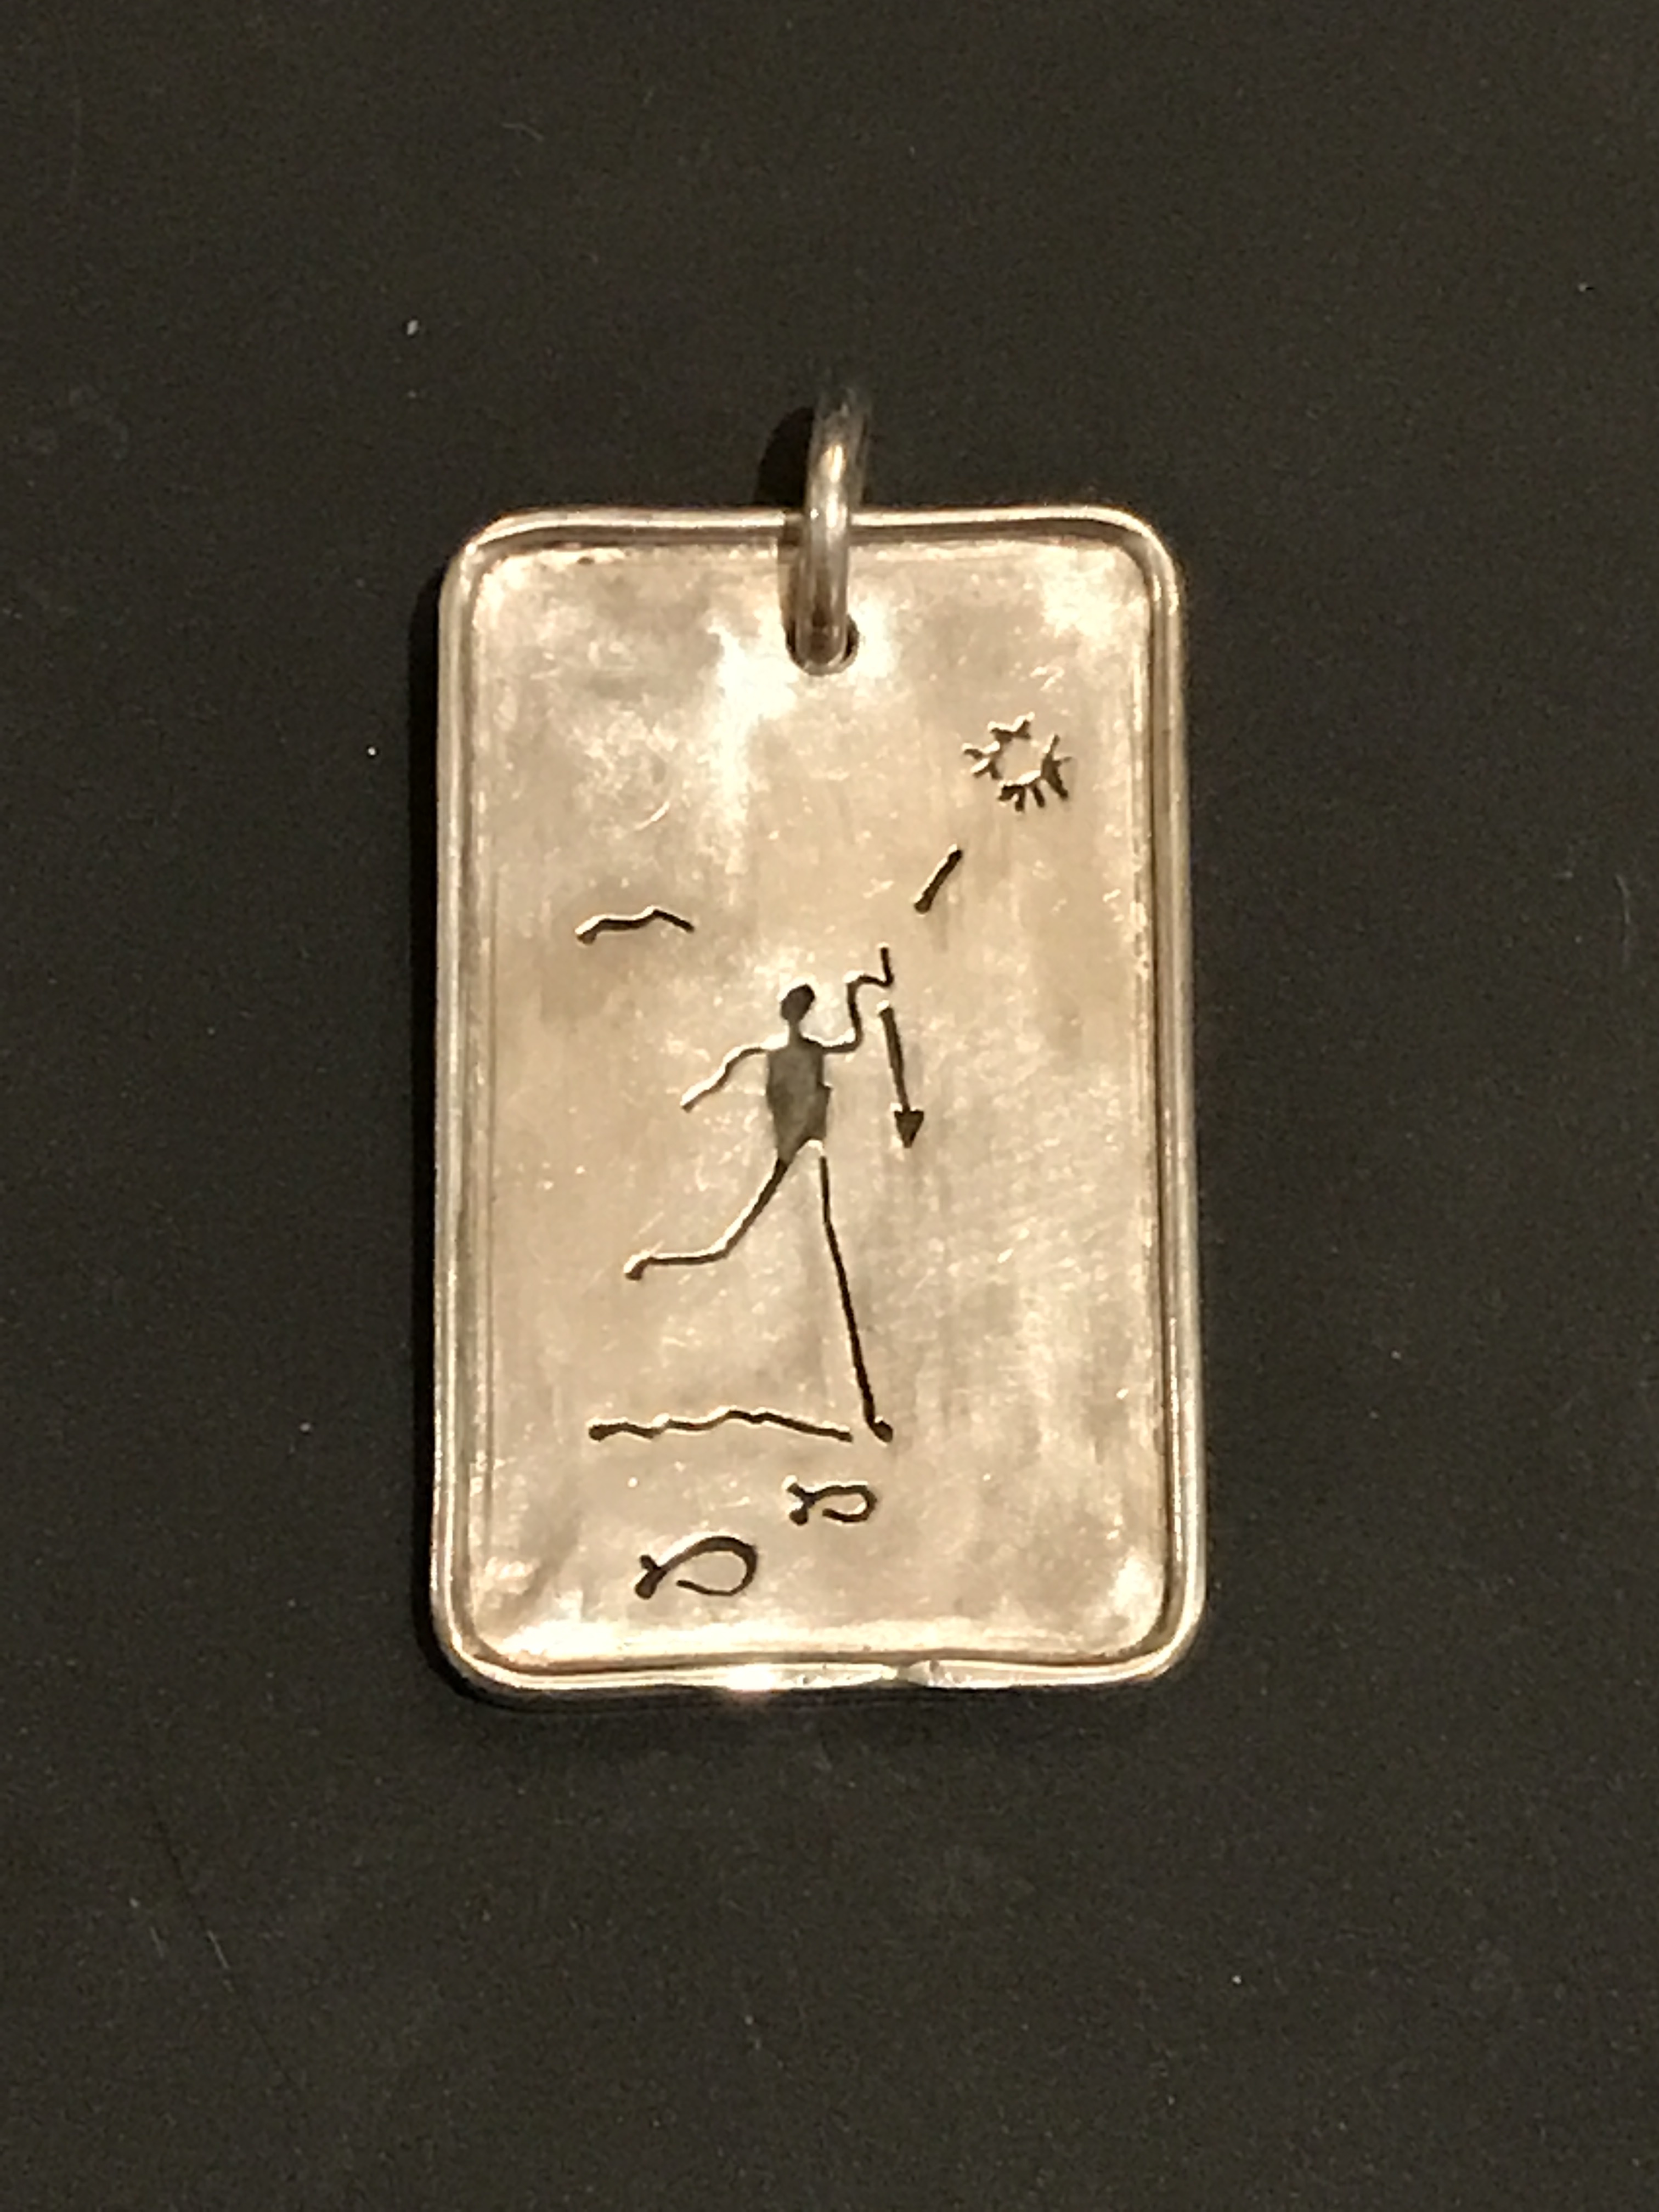
The Colorado River basin holds numerous geoglyphs. In southeastern California, you’ll find the Blythe Intaglios (and I wish I could find the pendants I made, temporary casualties of moving). There’s also the Fisherman Intaglio, or Bouse Fisherman near Bouse, AZ:
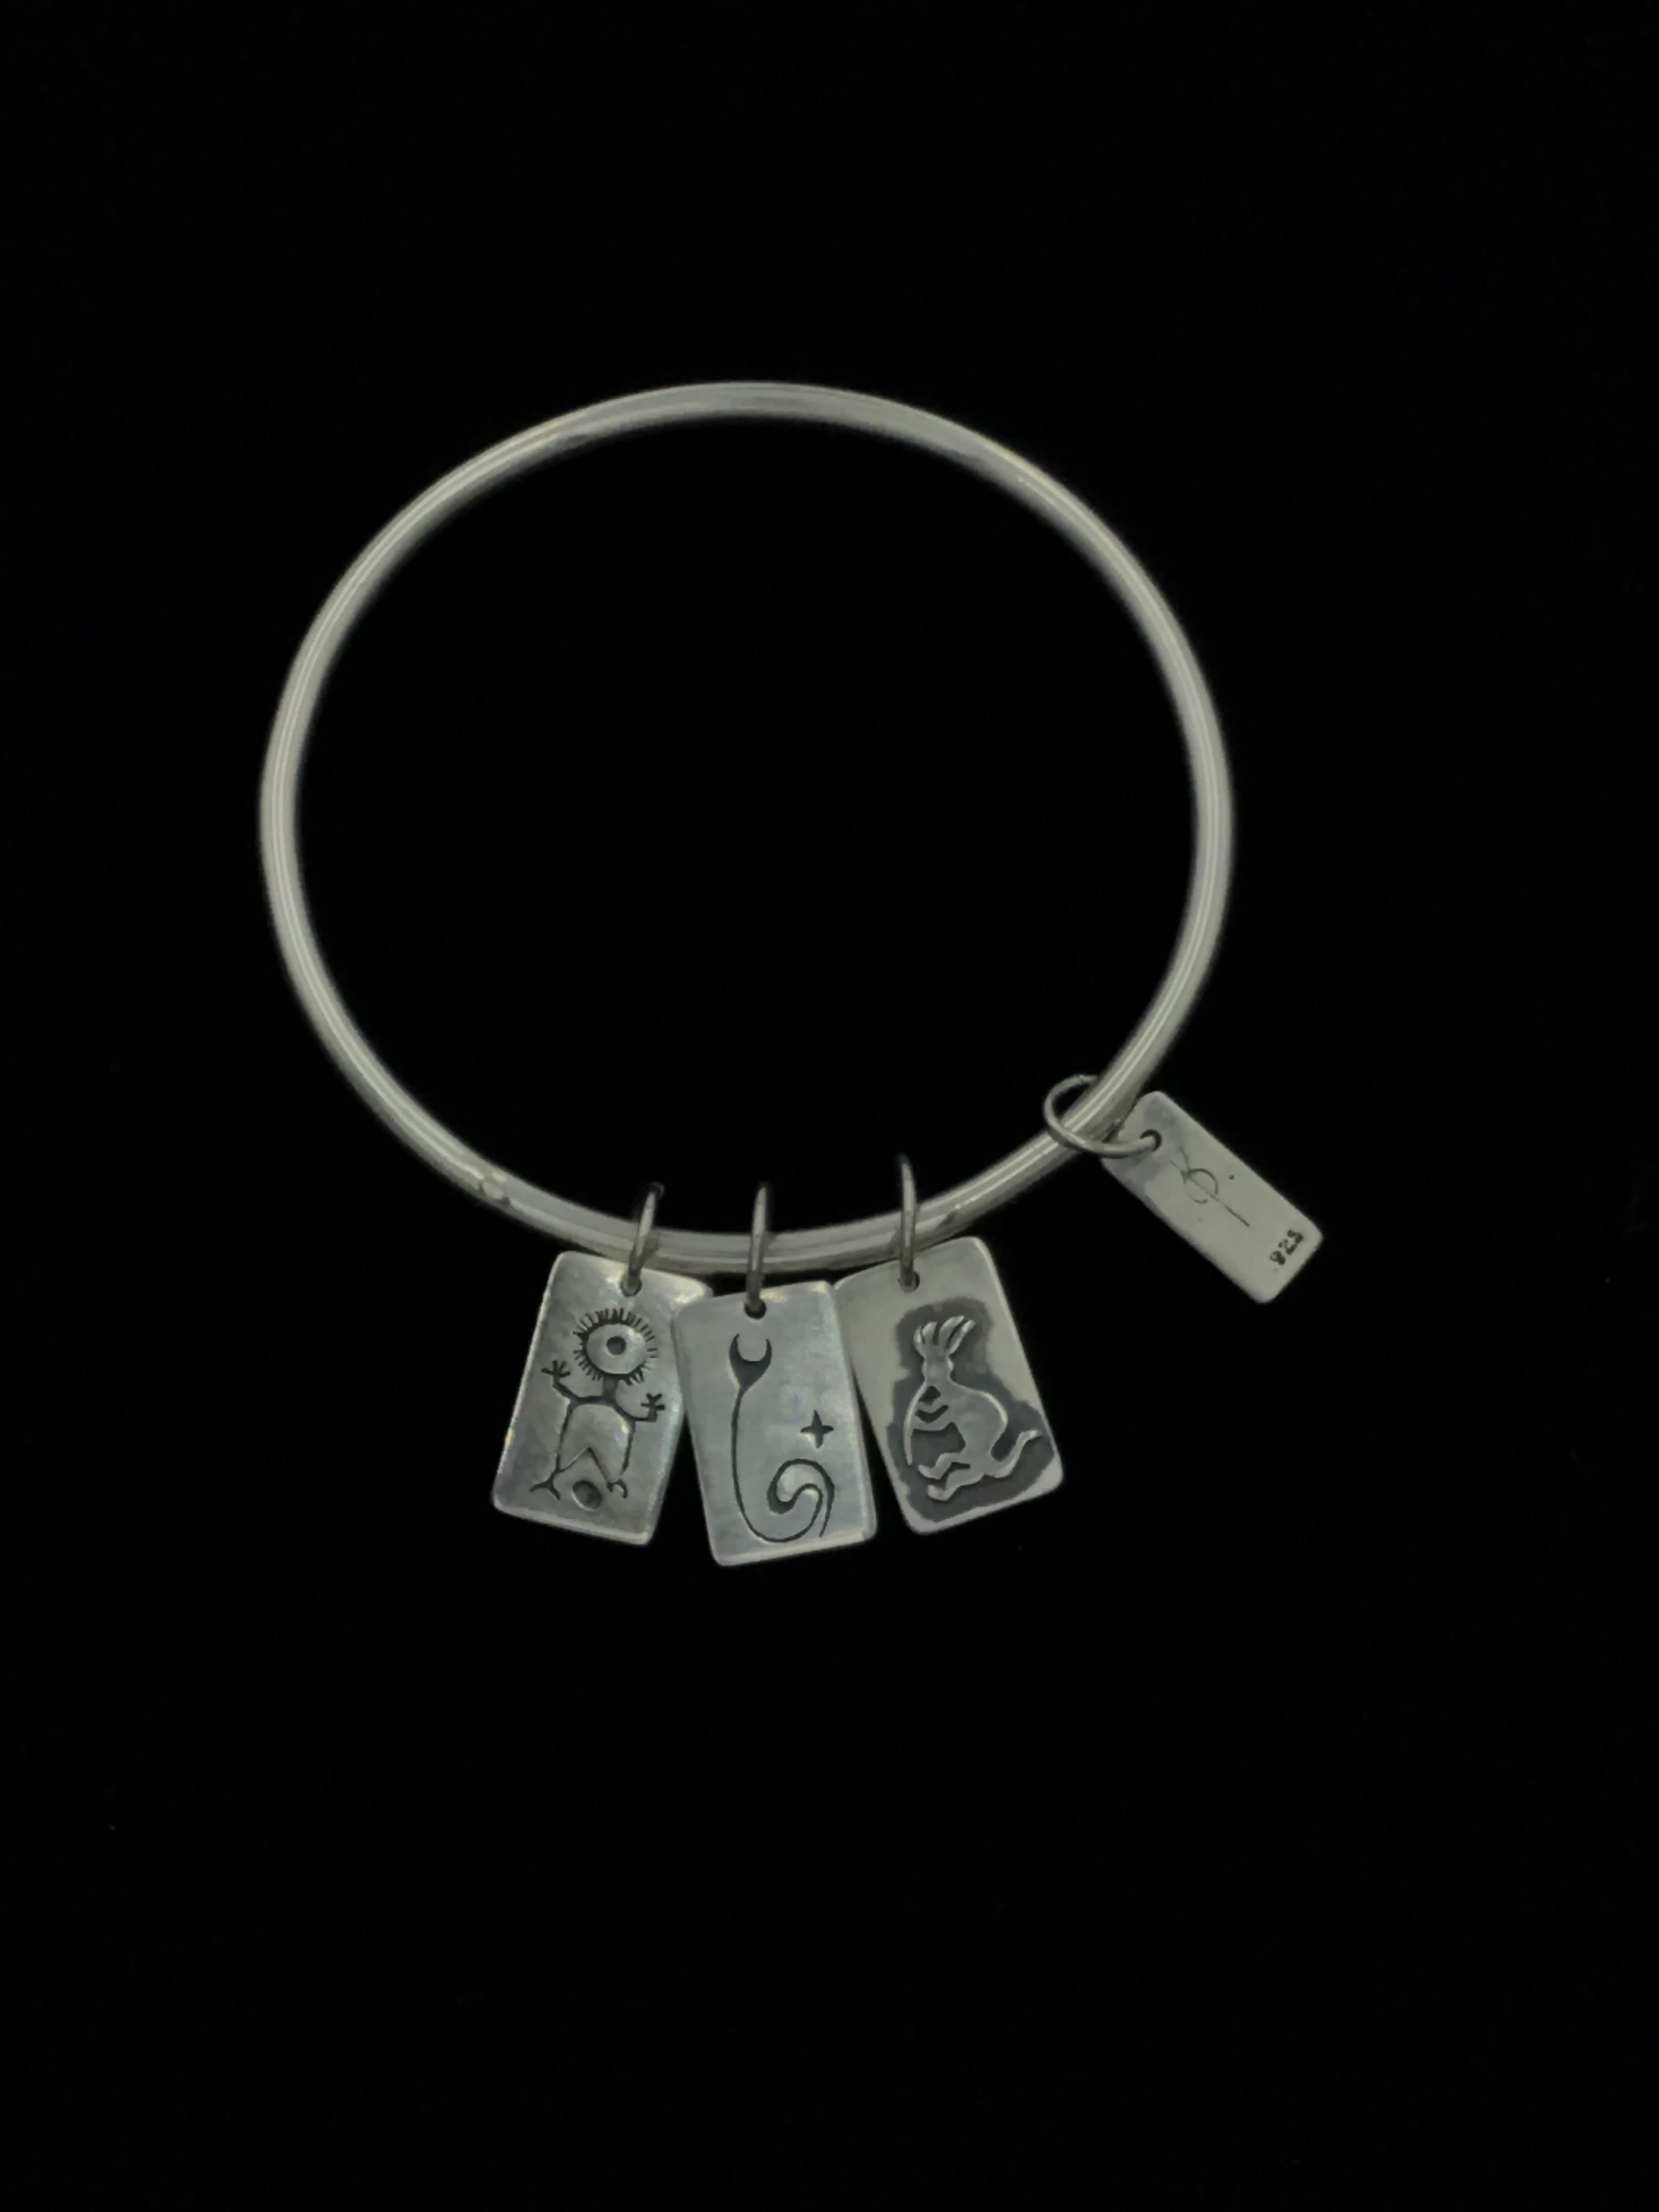
Here in New Mexico, I serve on the board of a not-for-profit, that protects a large expanse of petroglyphs. This a charm bracelet I made for our founder, rendering several actual petroglyphs from the preserve:
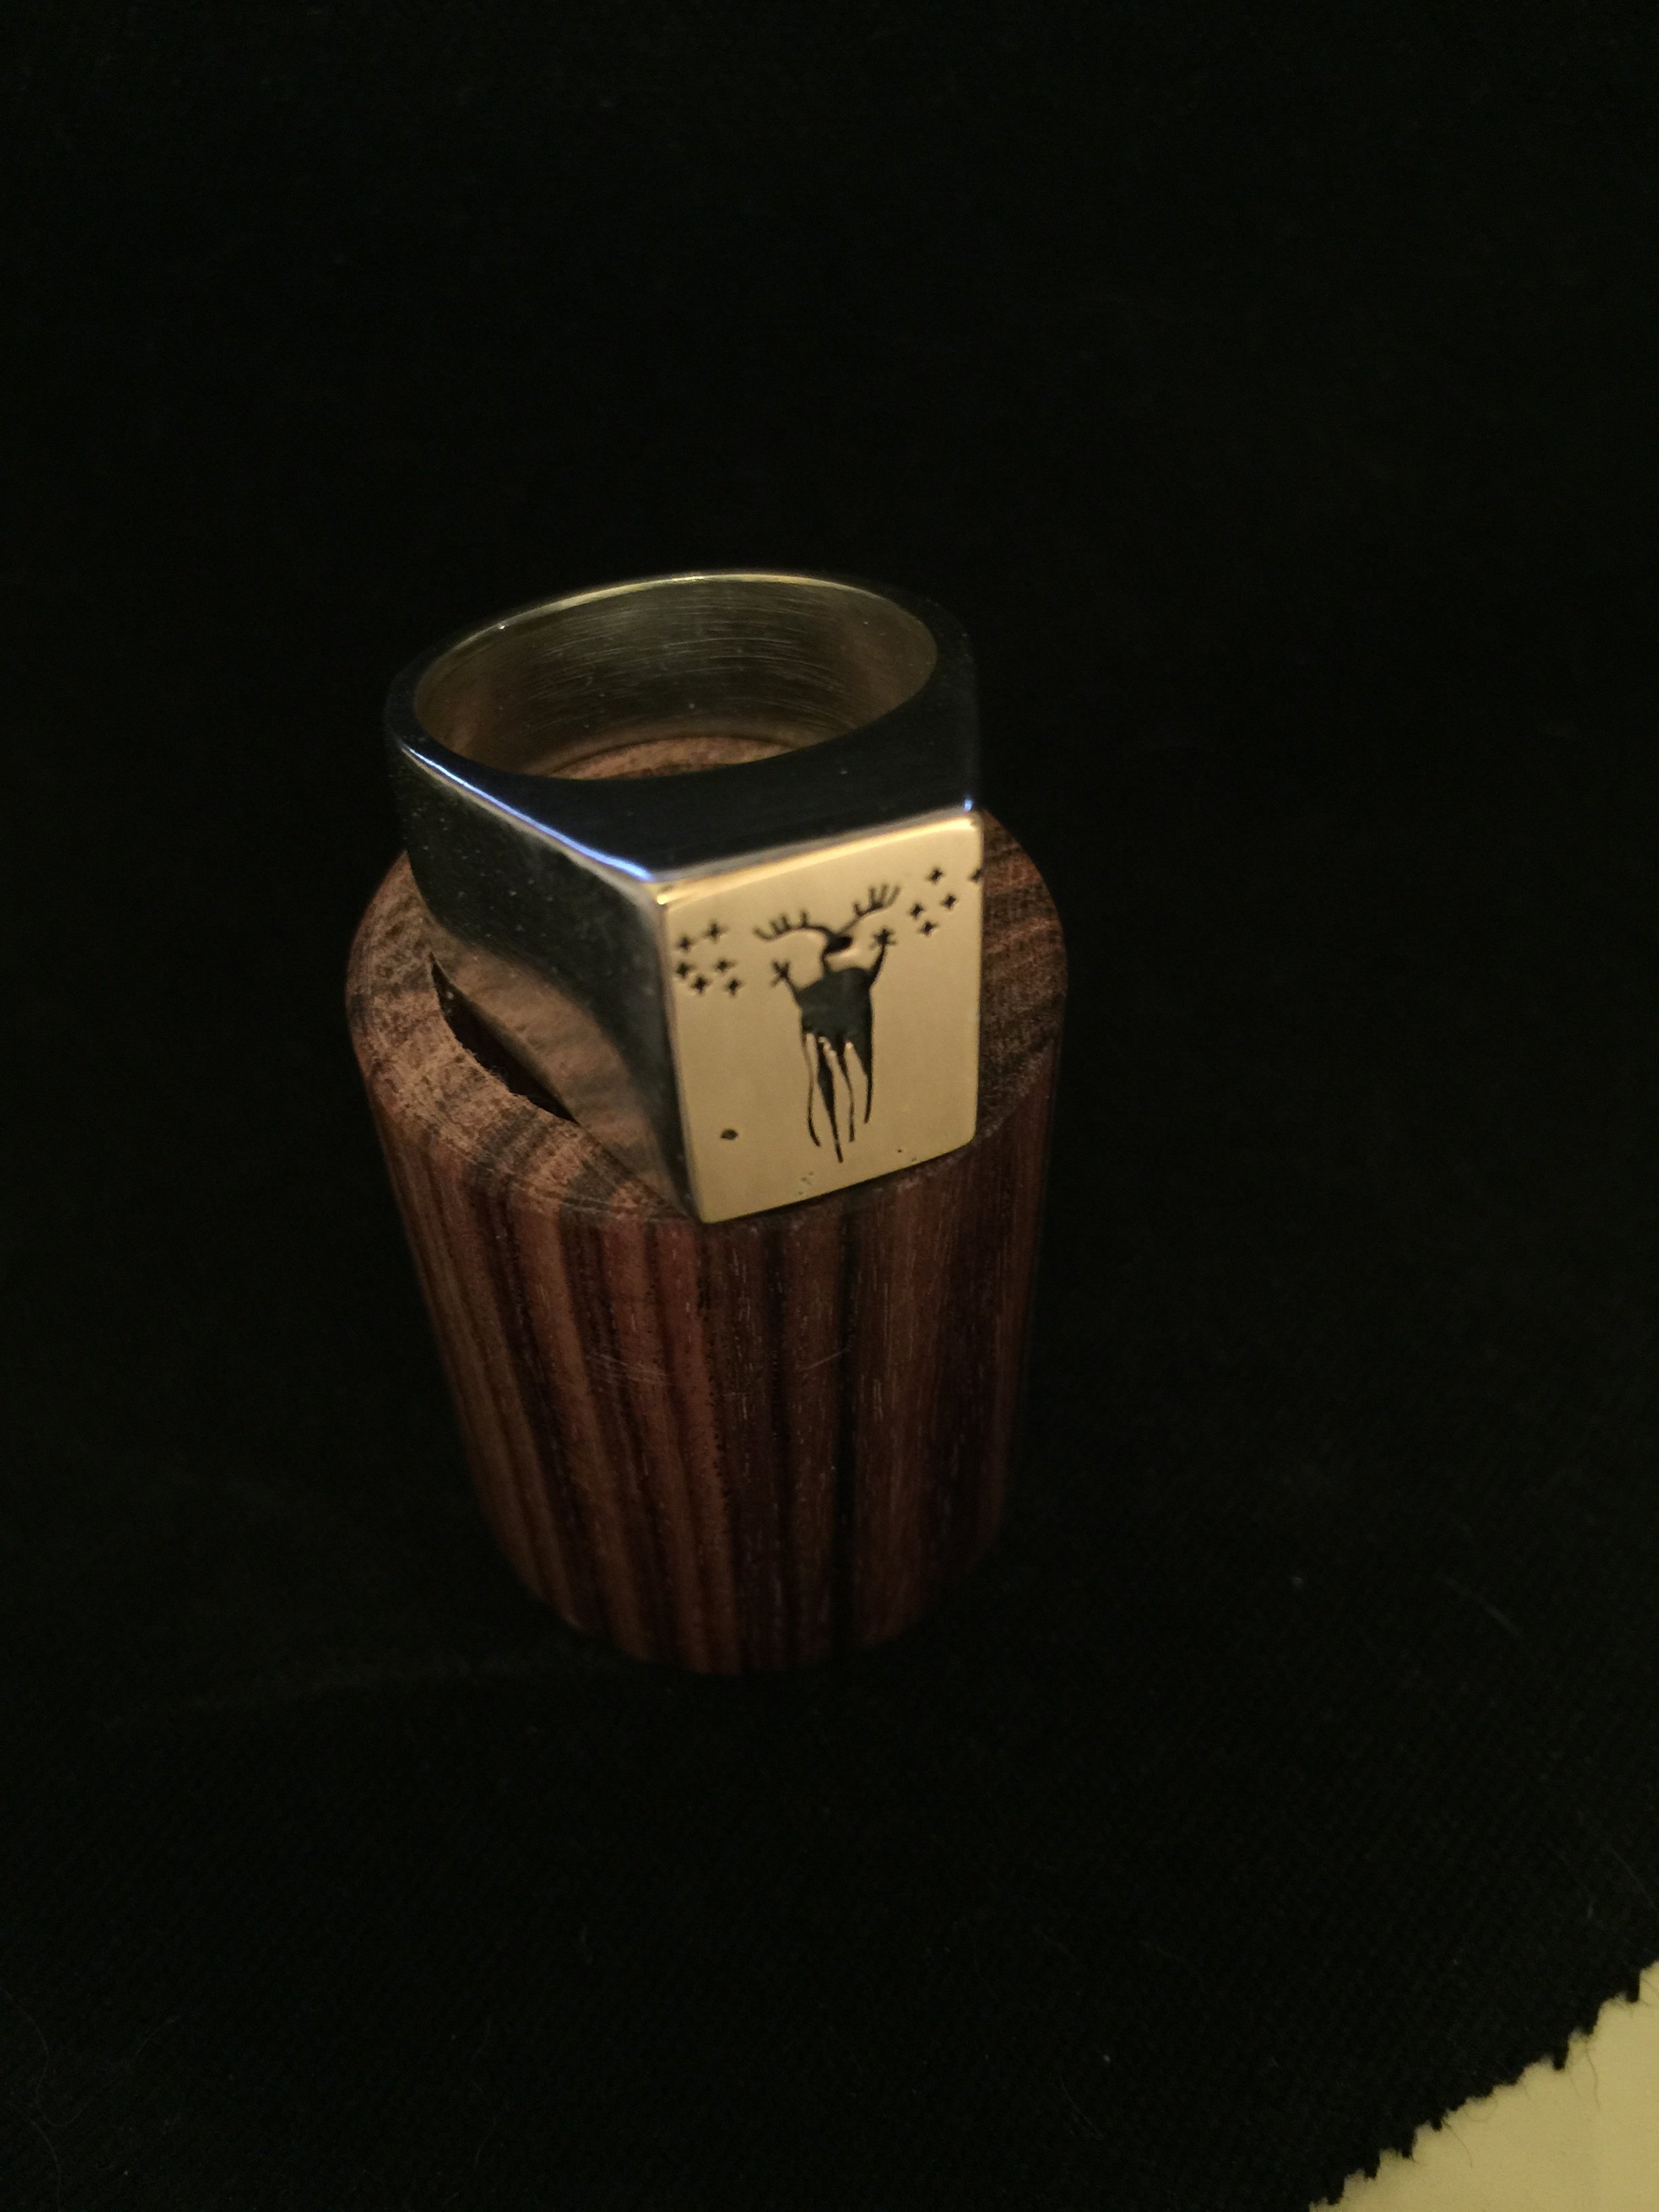
And as a last example, a member of my personal pantheon of shamans, that is, a totally made up character, in14k yellow gold overlaid on sterling silver:
**Shaman #1: Sky**
One of the things I love about overlay is the characters I get to know through the process of realizing them as jewelry.


 <img src="/uploads/db0786/original/2X/d/d9b4c88009995b55936ba8837d9979eb243a9262.jpg" width=“240” height=“320"”>