I am a newer member of Orchid- I have just bought a few new
Peddinhaus hammers- and want to dress the heads and remove the
edging… (Tim McCreight and various other books Finegold and Sietz,
and Oppi’s references have nothing on this either)
I tried searching the archives- several notes on not letting the
heads get too hot- but not on the process to de-edge and return the
faces to polished level… although I understand the process should
not grind the primary working face of the hammer- the edges if not at
the same finish may (and have) marred working surfaces…
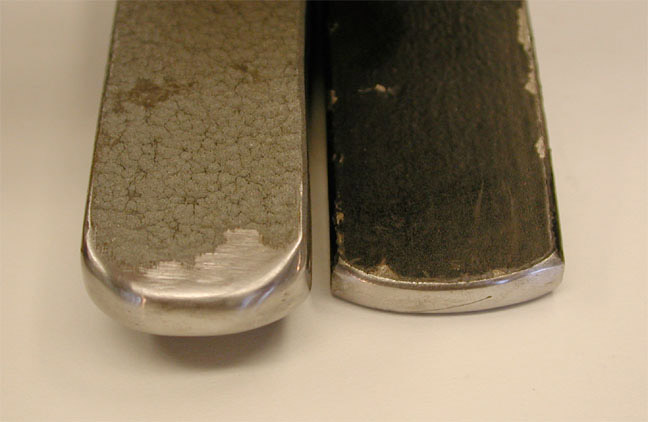
It’s not that hard: just get access to some sort of bench mounted
belt sander, hopefully with a selection of belts. For breaking
edges, I’d probably just use a 220, or perhaps a worn out 220 grit.
You don’t need to chew off a whole lot of metal, just enough to
soften the edges a bit. If you can find one of the generic 'skinny’
benchtop belt sanders, (the ones that use 1x42 belts) those work
well because they have an area high on the belt that isn’t supported
by a steel backplate. That ‘slack’ area will let you get softer
profiles than you would have by grinding against a steel backplate
that forces the belt to cut only flat facets.
To actually dress them, for round faced hammers, I normally cradle
the hammerhead in my left hand, and rotate or spin it about its long
axis, while touching it to the belt at about a 45 degree angle to
start. Doing this high up on the belt where it’s slack helps also
because otherwise the handle gets in the way. There is no one
"official" position or technique. The final goal is to take that
hard, sharp 90 or 45 degree edge on the edge of the face and soften
it out to a nice rounded shape. Any way you can get there is fine,
and “how rounded” is entirely up to you, and what you want the
hammer to do. Since you’re asking this question, I’m guessing you
don’t have anything specific in mind for these hammers, so I’d stay
pretty close to a rounded version of whatever edge they’ve got on
them now. You can always grind more off later.
One handy trick for polishing them is to do the final grind with a
worn-out 220 belt, then polish them with a buffing compound called
"stainless". (I got my last brick from Allcraft.) It’s a weird chalky
white compound that absolutely devours steel, and with the right
buffer will take the edges of a hammer from 220 to a mirror in less
than a minute. Run it on a large (6"+) treated stitched buff, and
you should be fine. Stainless doesn’t do much for precious metals,
but it’s a real lifesaver on steel. I polish my planishing hammers
with it, and I can read in the reflections. Remember to rotate your
directions as you buff, or it’ll dig dragmarks into your steel just
as quickly as it polishes.
I think if you go back and see Finegold and Sietz book in the
chapter on hammers, you will see a very good description about
dressing hammers. It gives the proper porfiles and everything. A good
file, some sandpaper, a polisher with some elbow grease and you will
have some excellent hammer heads. I find that when I buy a new
hammer I remove the head from the handle (usually loose anyways)
and that will allow you to work easier on the hammer faces.
I referred your email to Diane Lawton and Cynthia Eid, both faculty
at Metalwerx. Diane teaches the Beginning Jewelry class and gives the
project of dressing a hammer as one of her projects. This is a good
question and one I hope gets answered.
Hey somebody in Orchid land, I bet this would make a GREAT technical
paper for the Ganoksin Archives. Do us all a great favor and write
this up with pictures.
-k
Karen Christians
M E T A L W E R X
50 Guinan St.
Waltham, MA 02451
Ph. 781/891-3854 Fax 3857 http://www.metalwerx.com/
Jewelry/Metalarts School & Cooperative Studio