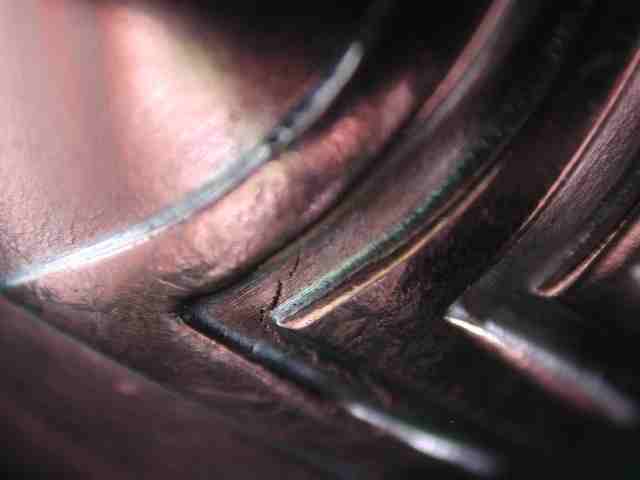
In the process of me learning to make domed cuff bracelets in 16g
copper, the metal seems to be tearing. I am using a copper strip 1
inch wide and 6 inches long which is overlaid with a chevron design
of copper pieces that are hard silver soldered onto the surface.
The strip is put through a hydraulic press with forming die and
urethane to create the cuff shape and the dome. I’m assuming that
the tear, or fissure is the result of inadequate annealing or too
much hydraulic pressure. Tell me if I’m wrong. Hopefully the photo
demonstrates the problem.
Annealing is only a part of the problem. Another piece of the puzzle
is the press, the shape of metal before forming, and condition of
tools used for repousse.
When sheet metal is used to create 3d form, one must manage where and
how metal gets stretched. Press may look like an easy solution, but
it does not give any control how metal is stretched. It creates areas
where amount of deformation exceeded ability of the copper. Plainly
speaking the metal is over-worked. Add to it less than perfect
annealing, tools in so so condition, and you have metal starting to
crumble. All I can suggest is not to draw the complete volume in one
shot. Do it in several steps with annealing in between, and polish
you tools to mirror finish. Very, very important.
Everytime you dome or dapping a metal make sure in the process that
you are annealing the peice until it becomes red and let it cool by
itself No immersing in water and after it cool off continue doming it
or dapping it.
This is the first time I’ve tried the chevron design on a domed cuff
so there are no others to compare. Although, it did occur to me that
the overlay might effect the integrety of the metal underneath.
polish your tools to mirror finish. Very, very important.
Please elaborate on this point, as I don’t fully understand it. When
I read through the archives, and various metalworking books there
are many references to polished tools but I have not found a full
explanation why. If a dap is used in a block it makes sense that the
working head of the dap and the depression in the block must be
formed smoothly so that imperfections are not transfered to the
work; but why the polish. Does polished metal lower the coefficient
of friction? Does a low coefficient of friction produce a better
result, or improve the work flow ? Does a polished tool decrease
galling ? Is there less transfer of metal particles when a polished
tool contacts a work surface ? What are the physics at play ? Does a
polished cutting tool affect the metal work piece differently than a
polished forming tool like a dap or die?
In the book “The Jewelry Engravers Manual” by Hardy and Bowman this
statement is made: " a brilliant cut depends on the brilliance of the
polish" The book goes on to state that the two belly faces of the
graver must be polished, then states “acquiring a high polish on the
face is generally detrimental to good results”. Why would only two
faces polished on a graver be better than three polished faces ?
There was no technical explanation, so I did not fully understand.
Please elaborate on this point, as I don't fully understand it.
When I read through the archives, and various metalworking books
there are many references to polished tools but I have not found a
full explanation why.
I am going to have to go into fundamentals to explain why it is
necessary.
Take a square sheet of copper, let’s say 4 by 4 inches and place one
blow in the center. Hammer of punch - does not matter. Then, using
small metal rod, examine square for sound. What you will find is that
metal structure changed not only where you placed the blow, but whole
square was affected, more towards where the blow is, and less towards
the edges.
Place another blow away from the first one, and examine again. The
pattern will be more complex, and there will be an area between two
blows with distinctly different sound. That is the area where metal
was affected equally with both blows. You will find that even if you
never touched that area, the level of work hardening could approach
the area been stricken. If two blows are close apart, it may
actually exceed it.
Imagine doing it over and over again, all over the metal you are
working with. You will be creating knots of extremely overworked
metal, which no annealing can restore, because micro-fractures
already developed. It is only a matter of time before such metal will
crack.
When tool surface is not hardened and polished to perfection, this
effect is magnified, because of different friction zones of the tool
surface. If you place a blow with such tool, it will pull the metal
from surrounding area differently. That will create a knot or knots,
between different zones of metal flow. So the phenomenon of knots
formation is magnified by the factor of how many different friction
zones your tool has.
In the book "The Jewelry Engravers Manual" by Hardy and Bowman
this statement is made: " a brilliant cut depends on the brilliance
of the polish" The book goes on to state that the two belly faces
of the graver must be polished, then states "acquiring a high
polish on the face is generally detrimental to good results". Why
would only two faces polished on a graver be better than three
polished faces ? There was no technical explanation, so I did not
fully understand.
The answer to engraving question is somewhat similar, but different.
The belly must be polished because different zones of friction
create the same type of knots ( I am only using the term for
convenience ) on the surface of the graver. Steel can be overworked
in exactly the same way. Also graver can become “locally annealed” if
friction is sufficiently high.
The face of a graver is not polished because of impossibility to
maintain cutting edge. This is simply a limitation of technology of
sharpening. An attempt to do so, will result in rounding of cutting
edge and that when graver is starting to slip.
Ok, got home late from a trip and caught a few of the posts related
to the original. I looked at the pic and while I’m not sure I’m
reading it 100% accurately I’m betting that the tears are happening in
the areas of the workpiece that are single layer in thickness.
If so then here’s what’s happening: As you apply the forming
pressure the double thickness areas are not moving nearly as much as
the single thickness areas which is resulting in rapid thinning and
overworking of these areas. Copper work hardens very quickly to begin
with (compared to sterling or most yellow golds) and tears are common
in smithed work.
There is no way the difference in “thickness resistance” can be
mitigated other than annealing more often and reducing the thickness
of the overlay metal which would tend to reduce the stresses on the
thinner areas by allowing more stretch in the double thick parts each
forming round.
When I read through the archives, and various metalworking books
there are many references to polished tools but I have not found a
full explanation why.
Simply put, if you have an unpolished surface on a tool you will
transfer that to the job.
As a blacksmith I keep a high polish on my hammer faces, that way I
don’t transfer extra detail to my work.
If so then here's what's happening: As you apply the forming
pressure the double thickness areas are not moving nearly as much
as the single thickness areas which is resulting in rapid thinning
and overworking of these areas. Copper work hardens very quickly to
begin with (compared to sterling or most yellow golds) and tears
are common in smithed work.
As with an unpolished tool the “working” or hardening of the copper
is uncontrolled. In this case a hydraulic press with properly
polished die is unable to compensate for the varying thickness of
the workpiece; apart from multiple annealing.