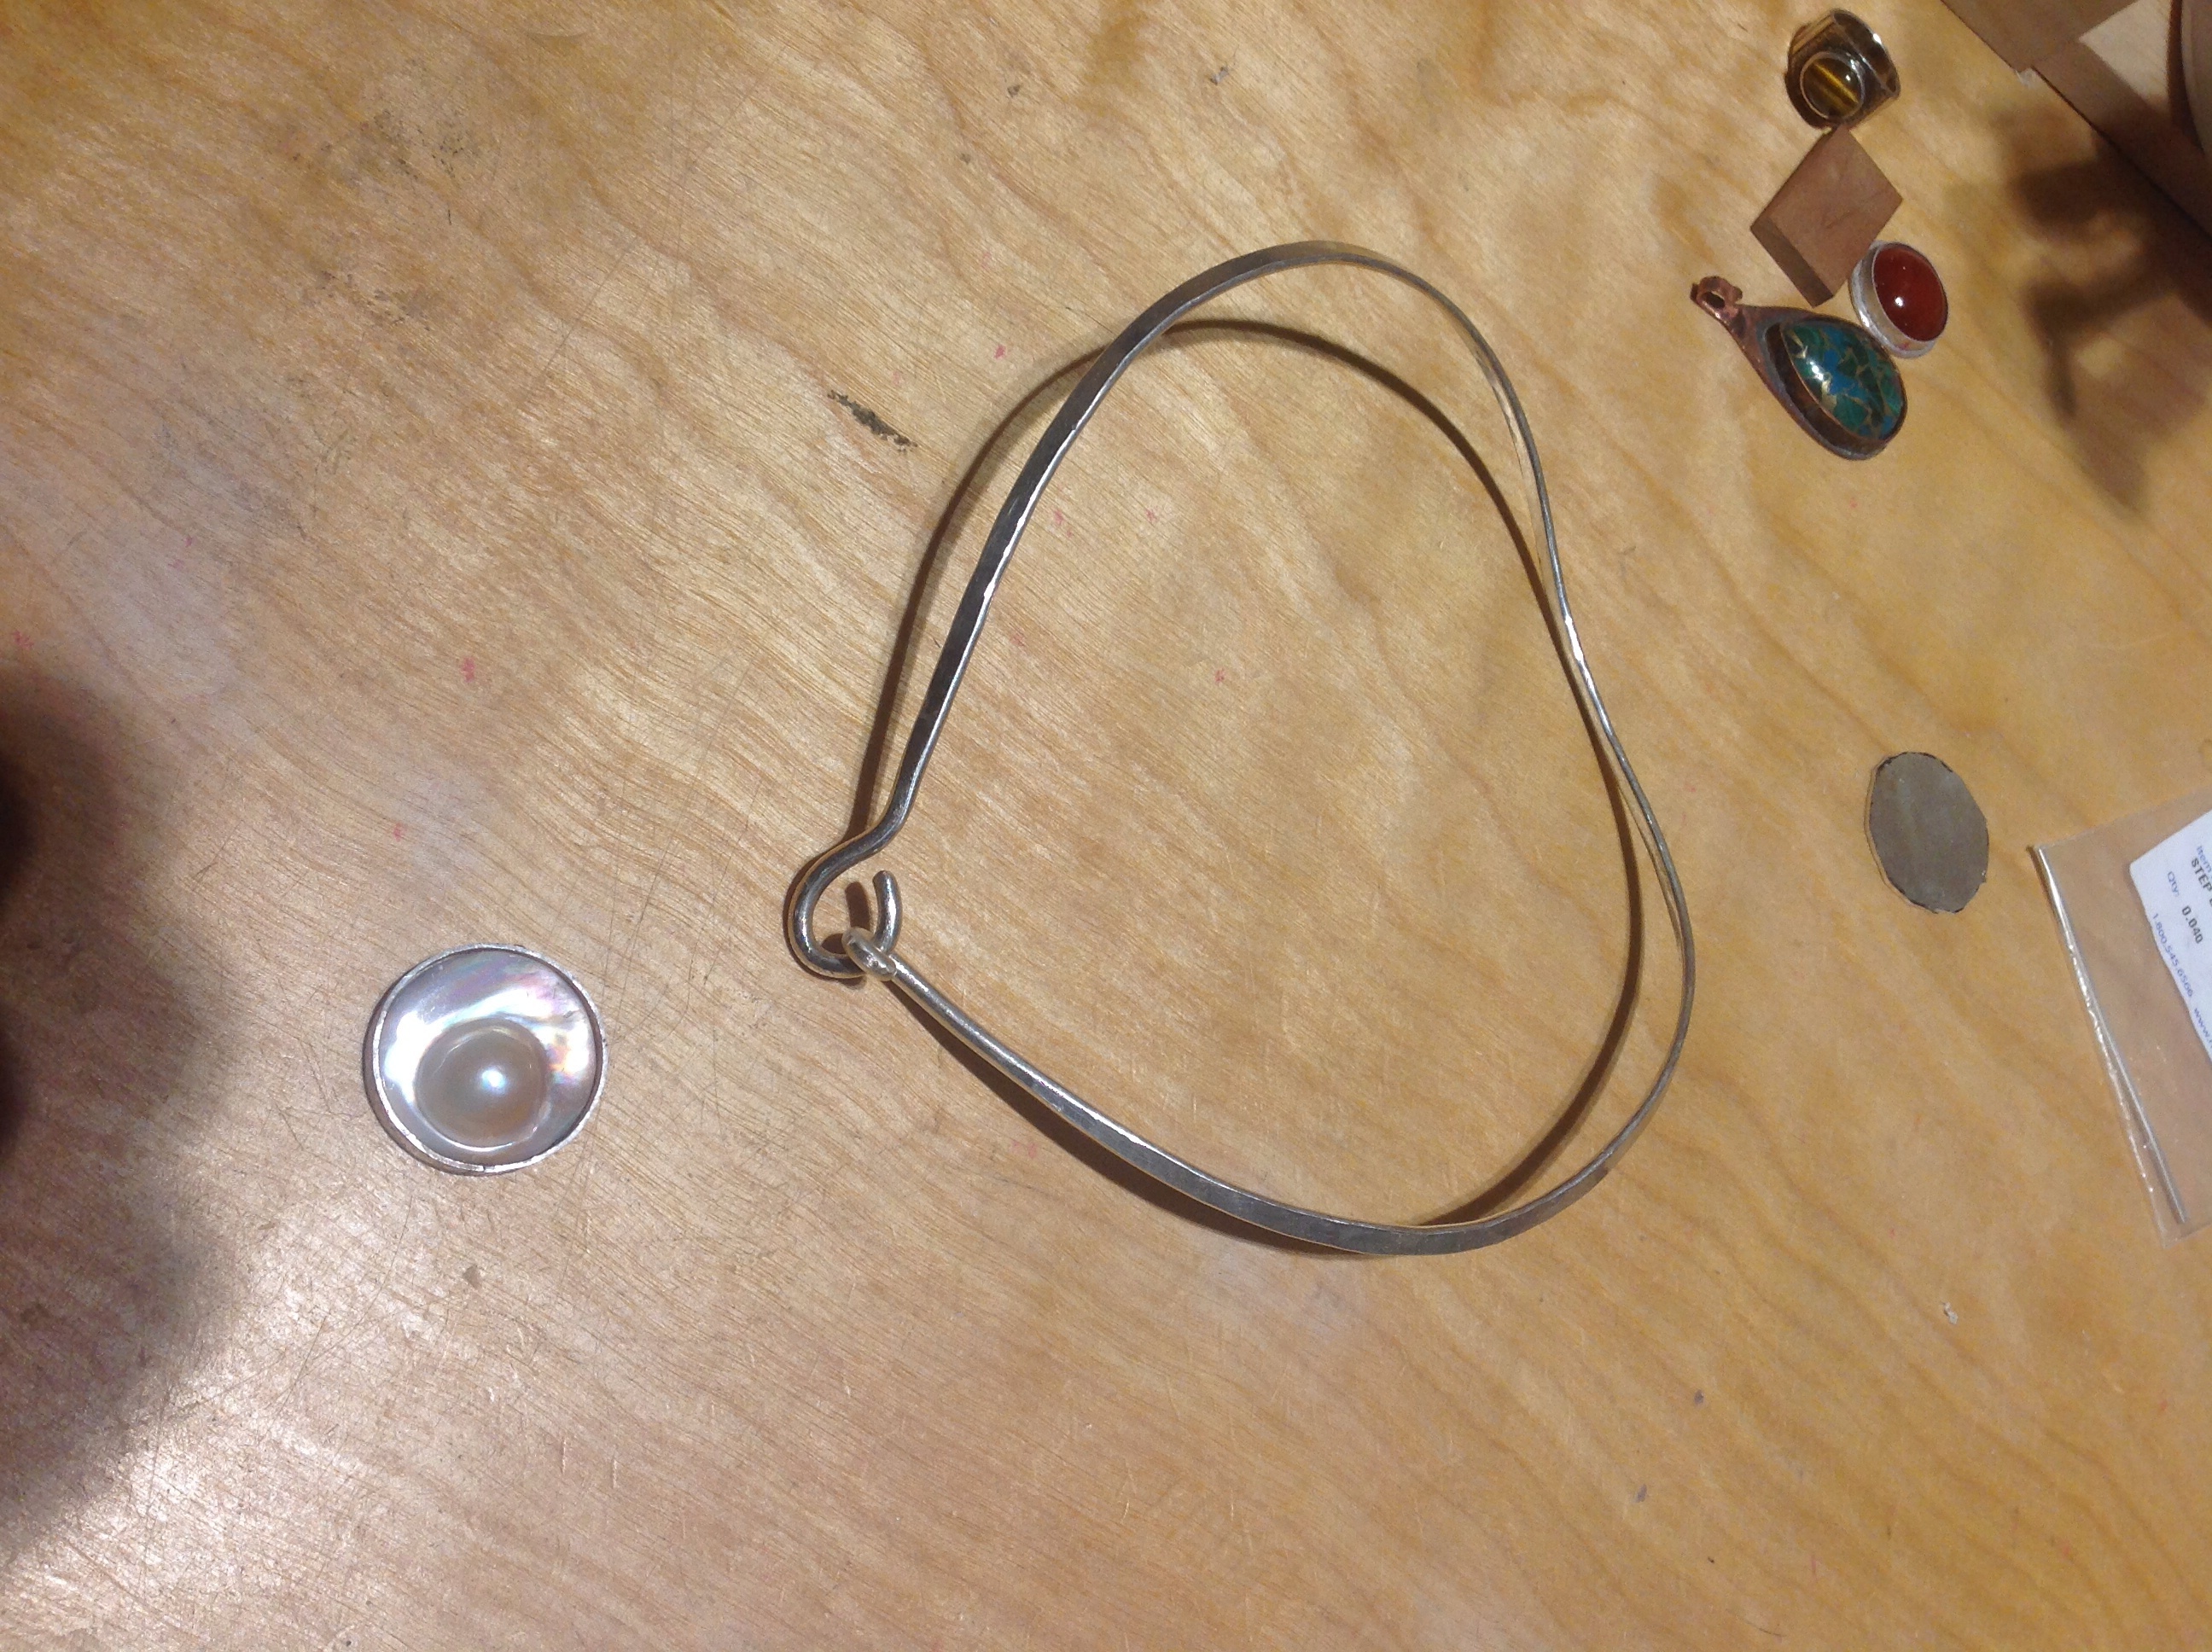
I would like to introduce a topic : forged neck rings.
It is something that I would like to explore and am just at the beginning.
Using 8 ga sterling wire, first on a flat anvil, then transitioning to a
neck mandrill , With a bit of trial and error the fabrication process seems
to work itself out though, It is a learning process to be sure.
It is a fine way for a beginner ( me ) to get a feel for what work harding
of metal is about.
Using my wife as a model, the rings go from the mandrel to her neck and
generally, lay there nicely. But as she moves about, especially if
busy, the ring always seem to shift. I have begun to feel that this is to
be accepted.
Now I’m wondering if adding a pendant would have a stabilizing effect ?
I would very much appreciate any feed back.
Thanks,
Mike
Very cool project. Sorry I don’t have any knowledge on this subject to share. I’ll be watching this thread.
my experience with forging neck rings is that the collarbone is the culprit
in getting them perfect and so far none of my clients will let me hammer
the ring when on the body! I have read of people who take a casting of the
client and then use that for shaping.
Greetings of the marvellous season!
Barbara
@ Barbara: Perhaps some small stakes pinned into the body to keep it in place will suffice 
I use a neck mandrel. Rio carries them.
Rick Copeland
That’s exactly where my journey with jewelry began forty-some years ago, forging collar necklaces. You will find that in order for them to fit without rotating and laying funny, each one will have to be custom fitted to each wearer. I found that forging flat areas where it goes over the collar bone, roughly four and eight o’clock, with a similar flat area forged to lay flat on the back of the neck makes it easier to get the curves to fit right. The flatter areas allow for bending to the proper curve following the shoulder to upper chest contour at the neck / shoulder junction. The closer you can get to a perfect fit in that curve, which may be different on each side, the less rotation and other unwanted movement there will be.
Probably the most effective method I’ve used to minimize the rotating movement when it becomes a problem (some people will have more of a problem with it than others) is to incorporate a “V” sort of shape to the front. The closer it is to circular and the flatter it is when you lay it on a table, the more likely it will be to rotate around the neck.
I also found that creating closed loop collars by having a clasp on the back or front as you have, makes it harder to fit one particular piece to different people, meaning that you’ll have to make them specifically for each individual. An open back won’t necessarily solve that problem entirely, but it will allow a single collar to possibly fit a larger range of people which makes selling them easier and faster. An open back will also reduce the tendency of the necklace to rotate around the neck, mainly because you can get the exact fit more easily.
Don’t expect that a collar that fits a neck mandrel properly will fit a person properly. All a mandrel really does is provide a hard surface for hammering and bending against. Forging is best done on a flat or rounded anvil or horn, while a neck mandrel is useful mainly for shaping the forged piece into its final fitted form. I actually find that an oval bracelet mandrel is better for fitting collars than a neck mandrel as I can more easily focus the desired bend to one spot. No two necks are alike and none of them are the same shape and size as your mandrel. You will sometimes have to go back and forth from the client’s neck to the mandrel many times in the process of properly fitting a collar necklace. It can be a pretty labor intensive, even frustrating process until you get the hang of it.
You won’t find a better set of exercises for learning the art of forging than creating forged wire necklaces. You will have to learn how much the metal lengthens and widens as you forge it and as you learn that, you will learn how to control it and use it. You will learn that forging in a certain direction will cause the metal to curve, from another creates twist so that by slightly changing directions as you forge, you can create an endless variety of graceful shapes. You will also learn how to listen to the metal as you forge, to hear and feel how it changes as it gets closer and closer to needing annealing. As you learn this, you’ll learn how to time your annealing so as to not make the neck wire so hard that it cracks with wear or so soft that it bends out of shape too easily.
There are no hard and fast rules concerning any of this, like forging to half thickness equals X increase in length or anything like that. It is much more of a tactile feeling and a faith in ‘TLAR’ (That Looks About Right) engineering built on experience than anything else.
The short answer to your question about a pendant is no. Adding a pendant will most likely not ease your burden, it will only add to the excitement. A little tip for making forged necklaces really pretty is to leave no part un-forged. Unworked, large gauge round wire looks unfinished and haphazard. At the very least, file some shape into it when forging a specific spot isn’t practical. My rule of thumb always was that if done right, it should be impossible to determine the gauge and shape of the wire used to create the necklace.
Best of luck and have a blast banging out beautiful things. Your wife may find ear plugs helpful. I have a feeling that it’s gonna get kinda noisy in your shop soon.
Dave Phelps
Hello Mike,
I have made several neck wires and have to adjust the fit to the buyer. No mandrel can accommodate the different dips and bumps on each neck. It appears that you’ve used a pretty heavy gauge round wire. May I suggest using a half-round wire. It will lay better and be more comfortable. Also if the piece is to fasten in the back, use a little hook on each end rather than the hook and loop - again less bulk. If the connection is in front, it can be embellished with a set stone or such.
That said, frankly I find that neck wires are not wear-friendly if one is working. They are unique and appropriate for ‘dress-up’ situations when the wearer is not bending over and shifting a lot. You mentioned putting a pendant on the wire. A larger pendant (appropriately sized to the wire gauge) can become a statement piece for the wearer.
Mike, you are making great progress and I hope all this helps,
Judy in Kansas, where the bluebirds flock in to the heated water and are joined by many other species. I maintain a water bar for my feathered friends!!
I made and sold hundreds of similar neckpieces, all forged 8 G round, using only a neck mandrel, flat block, planishing hammer, and leather wrapped forming pliers. They require an immoderate level of finesse, eat up a disproportionate amount of time and material, but sold like hot cakes at shows (at least until the economy went in the ditch), and were an easy piggyback sale on multiple pendants.
A suggestion: The clasp is unnecessary - the virtue of a forged neckpiece (rather than just a bent piece of round or half round wire) is that it can be opened/spread to go around the neck, then springs back to its original shape. The V neckpieces I made used about 1 oz. of 8G; your clasp adds at least a half ounce, also extra fabrication time.
I made both vee shaped and round neckpieces, the former most popular and elegant, but some wanted the pendant to not hang down so low. Two sizes covered about 85% of women, though I have the calibrations for really tiny neck, and their opposite.
It is the case that these pieces are best fitted to customers individually, first for size, then a slight amount of hand bending to get the curvature on the sternum correct, then tweaking the ends behind the neck so they would lay flat.
The really odious part was hand finishing the upper surface. Much hand filing, then hand sanding, then polishing on a wheel. Tumbling would have been a boon, but their light weight saw them just sort of floating around in a bowl tumbler; they wouldn’t fit in my vibratory hoppers; maybe a really big rotating barrel, but that would itself have to be fabricated and this style is problematic as cascading contents tend to get dinged up. Each neckpiece took about an hour start to finish, and only about 15 minutes of this was the forming and forging.
Its a useful technique to master - I also made forged neckpieces that opened in the front with cabs on each end with bent art noveau-esque lines, and multiple wire pieces (even more of a time sink). If you are interested, I can provide length/size calibrations, and the step by step protocol. DALE
I would also be interested in the specs for a forged neck ring. Thank
you for the info e_tillett@charter.net
-----------------------------------------From: "dale repp"
To:
Cc:
[Ganoksin Orchid]
thesilverforge
December 16
I made and sold hundreds of similar neckpieces, all forged 8 G round,
using only a neck mandrel, flat block, planishing hammer, and leather
wrapped forming pliers. They require an immoderate level of finesse,
eat up a disproportionate amount of time and material, but sold like
hot cakes at shows (at least until the economy went in the ditch), and
were an easy piggyback sale on multiple pendants.
A suggestion: The clasp is unnecessary - the virtue of a forged
neckpiece (rather than just a bent piece of round or half round wire)
is that it can be opened/spread to go around the neck, then springs
back to its original shape. The V neckpieces I made used about 1 oz.
of 8G; your clasp adds at least a half ounce, also extra fabrication
time.
I made both vee shaped and round neckpieces, the former most popular
and elegant, but some wanted the pendant to not hang down so low. Two
sizes covered about 85% of women, though I have the calibrations for
really tiny neck, and their opposite.
It is the case that these pieces are best fitted to customers
individually, first for size, then a slight amount of hand bending to
get the curvature on the sternum correct, then tweaking the ends
behind the neck so they would lay flat.
The really odious part was hand finishing the upper surface. Much
hand filing, then hand sanding, then polishing on a wheel. Tumbling
would have been a boon, but their light weight saw them just sort of
floating around in a bowl tumbler; they wouldn’t fit in my vibratory
hoppers; maybe a really big rotating barrel, but that would itself
have to be fabricated and this style is problematic as cascading
contents tend to get dinged up. Each neckpiece took about an hour
start to finish, and only about 15 minutes of this was the forming and
forging.
Its a useful technique to master - I also made forged neckpieces that
opened in the front with cabs on each end with bent art noveau-esque
lines, and multiple wire pieces (even more of a time sink). If you are
interested, I can provide length/size calibrations, and the step by
step protocol. DALE
Visit Topic or reply to this email to respond.  Brought to you by

You are receiving this because you enabled mailing list mode.

To unsubscribe from these emails, click here.
Thank you all for the interesting responses. Will be putting some rings in a gallery tomorrow.
With applying the info that you guys provided and what can I figure out, in a few weeks possibly, should they sell, I will post my experiences.
The gallery that I am working with is a little over an hour away, so individual fittings may not be practical, though, if I was younger and single, what fun, individually, fitting them to long slim necks would be.
Just one more thing, to me a mystery.
I entered my post yesterday and expected to see it as a new topic today, then get the first responses tomorrow.
How did you all receive and answer so soon ?
Thanks again,
Mike
Hi, recently completed the design of a sterling silver and 18k gold torque (neck wire) and it was beautifully forged by Jasper Kegge, the goldsmith with whom I partner. We used a neck mandrel as well. Many women tried on this torque – slender, petite, athletic, Rubenesque – and, believe it or not, it fit them all…draping gently over the collar bone. No one found it an uncomfortable fit! Didn’t realize the challenges until reading this email thread; we were lucky with design and craftsmanship…here’s a photo (Designer: H. Kathleen Childress, Maker: Jasper Kegge).

Thank you! I am also interested in specs. eva.nedergard@gmail.com
Tools: small neckpiece forging mandrel, 4" flat steel block, planishing hammer, pliers - big size - flat one side, curved on the other, leather wrapped.
Straighten 8 G wire - best done with rawhide mallet and flat wood bench, drill twisting this G doesn’t work well.
I made them in 2 styles, 2 sizes. The V shape is most popular, outselling rounds 2:1. These 2 sizes fit about 90% of women, adjust lengths up or down for tiny or huge.
Cut length : Round small 14"
                   round large 15 3/8

                   V small 14 1/2"

                    V large 16"
Instructions from here on are for the V, which is trickier to make.
With magic marker ink, mark center and 2 1/4" in from each end.
Bend V shape over small diameter round stock (bezel mandrel).
With hands and pliers, bend ends so wire lays flat on mandrel shoulders and back of neck. Make sure its symmetrical.
Begin forging at one end, moving to a little past the high point of the shoulder. Repeat on other end.
Lots of correction bending with hands and pliers, both flat- on and edge-on.
Lightly forge each side down to the V bend.
Flip over and forge from back side on the flat block, also lightly over the ends - this will flatten out hammer marks resulting from forging on front side.
The 8 G round wire should now be - uniformly - about 2 1/2 mm thick and 4mm wide. Forging not only widens the wire, but lengthens it as well.
Lots more plier and hand bending, maybe more forging to get the piece identical on each side, and so it lays flat all along the mandrel surface.
This is fairly tricky and takes some practice, might want to practice on brass or copper wire first, since each neckpiece eats up about an ounce of sterling.
Stamp back of piece with your mark and ‘sterling’.
File the ends to blunt domes.
I use a #4 pillar file to clean up the top surface (and any ‘bulges’ along the edges).
Then hand sanding. I do virtually nothing to remove hammer marks from backside - they are not seen when piece is worn, plus provide proof than the piece was not drop forged in one go in some hideous off shore labor camp.
Next I lightly hit it with the fine Japanese rubber 1" wheels sold by RIO - the brown/fine cratex are too coarse and leave scratches too deep to buff out.
Front, back, and edges next polished with Tripoli on 4"or 5" X 1" hard felt wheel.
Wipe, then hit with rouge.
I used to find making these suckers irksome. They take about an hour - only about 15 minutes is needed to shape the piece, the rest is getting the dings out and sanding and polishing.
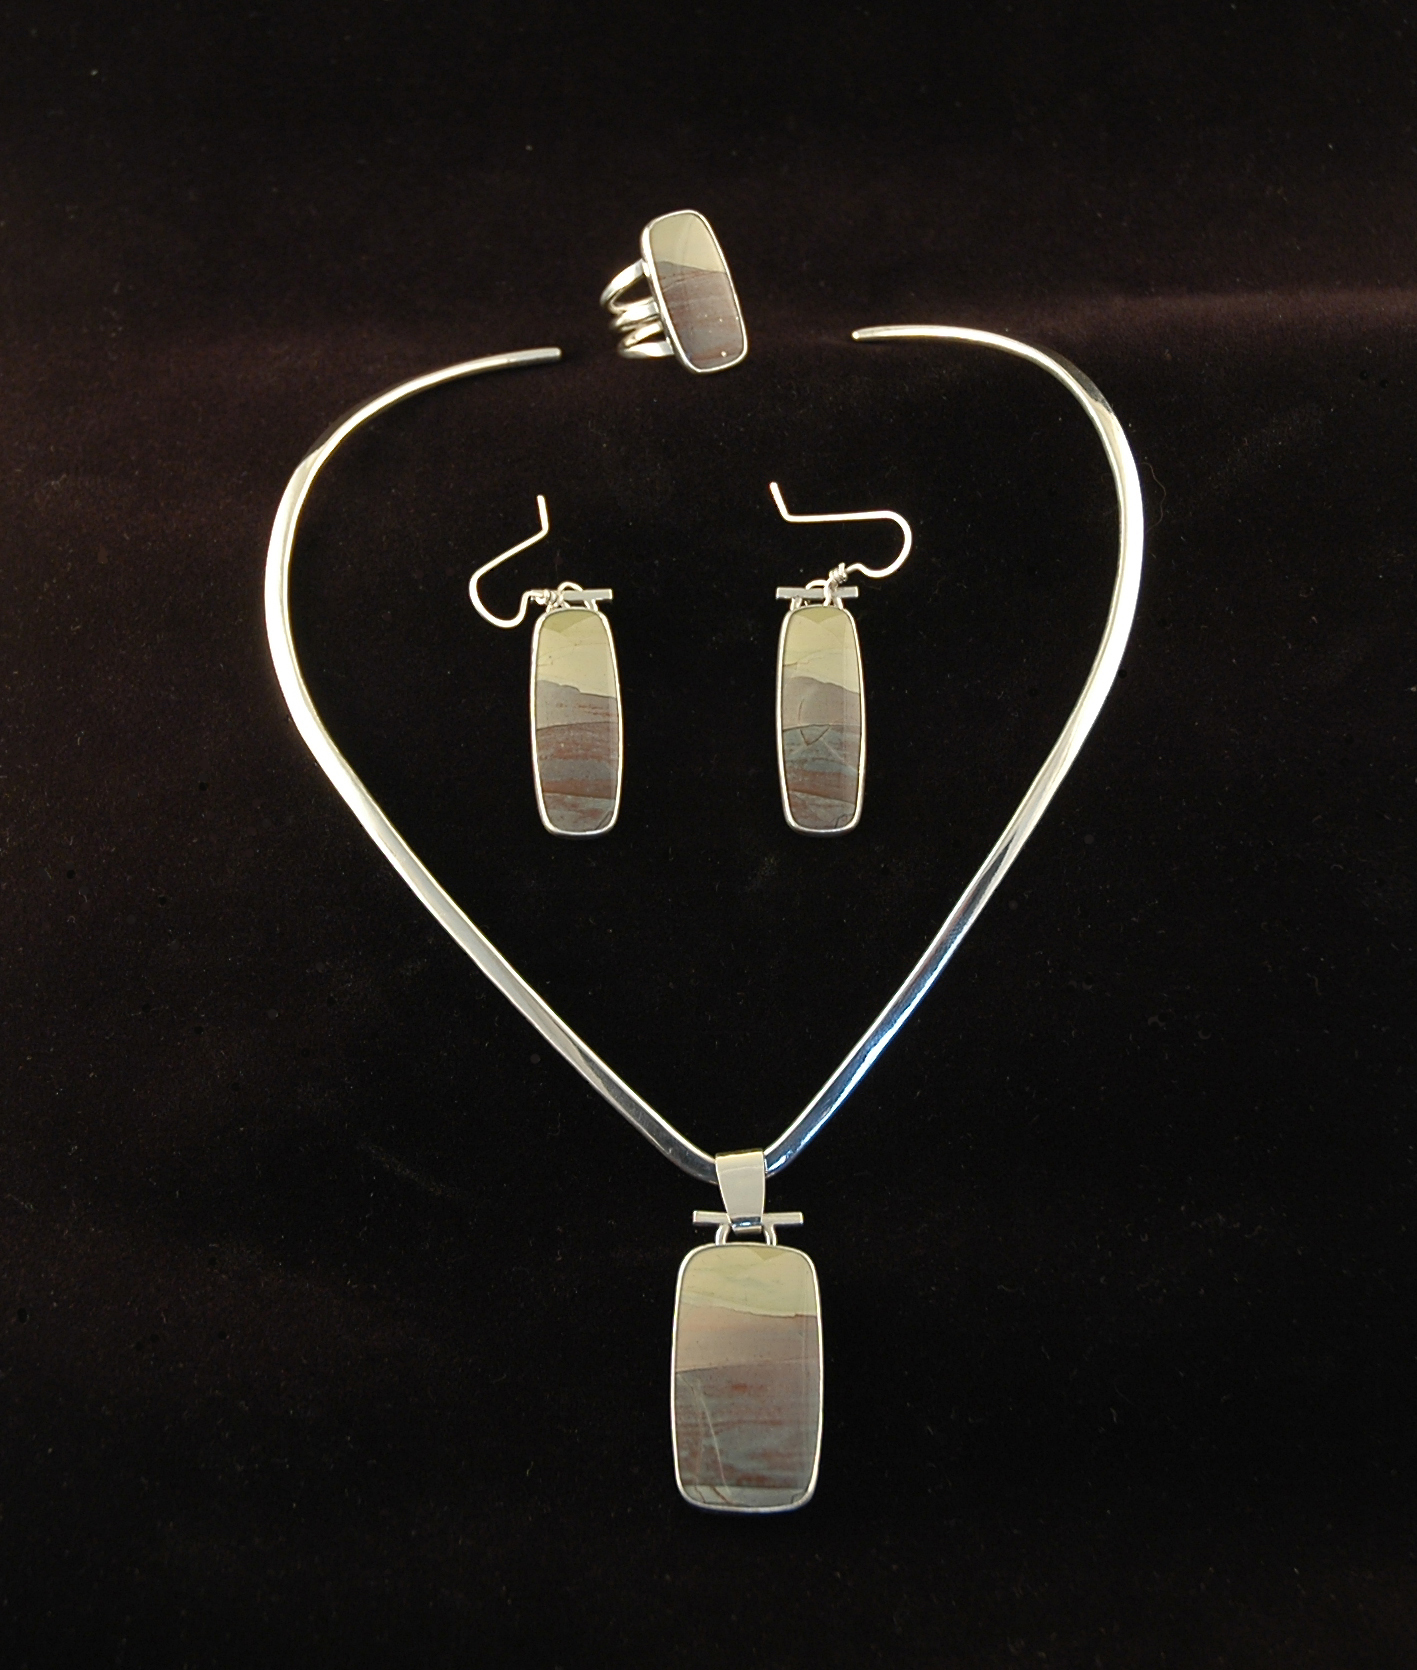
I’ll attach a pix of one of the Vs, the stones are Orsk Jasper.
I sold these things (until I threw in the towel in 2011 and retired) for $80, not real bad but a much lower return on my labor than most other stuff I made.
If this doesn’t go through, or you’ve more questions, let me know…
Thank you so much for sharing your knowledge as it’s very helpful. Your jewelry is beautiful!
Patricia
Silver Forge,
Thanks for sharing methods and end result. I appreciate it.
Thank you so much for sharing.
Thanks so much, Dale, I really appreciate the great information. Also, I love seeing your finished project - beautiful!
I made them years ago ( first time 40+). Mine were open with the gap in the back and a V shape in front. The weight of whatever you were hanging from the V helped to keep the whole thing centered. You still need to fit each one to the neck on which it is to be worn as we are all different. Good luck as you will use a lot of 8 gauge wire.