Carving silver ingot

All,

I’m getting ready to carve my first silver piece ever of out an
ingot (all I’ve dome so far was cast from dirty scrap sterling), and
I’m scared shitless.

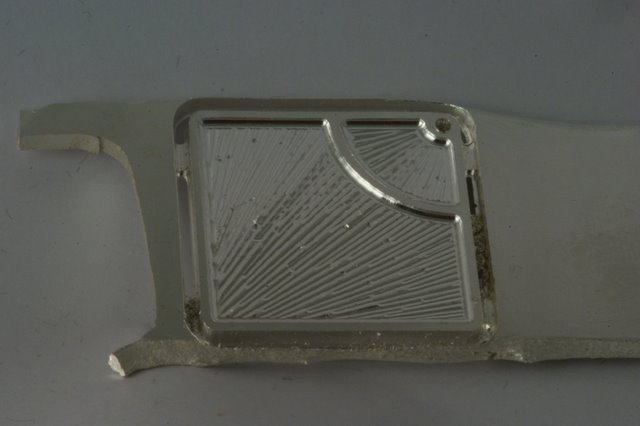
In the next few weeks I hope to CNC mill out some 2D connected
letters from a 1 ounce fine silver (0.999) rectangular ingot, about 1
inch wide by 2 inches long by 3/16" thick. It will probably be less
a little less thick after I use a 1/4 inch wide carbide endmill to
surface off the ingot’s decorations on both sides. Then I’ll likely
use a 0.05 inch wide carbide endmill (I have experience with those
when I carved with bismuth last year) to cut my pattern out.

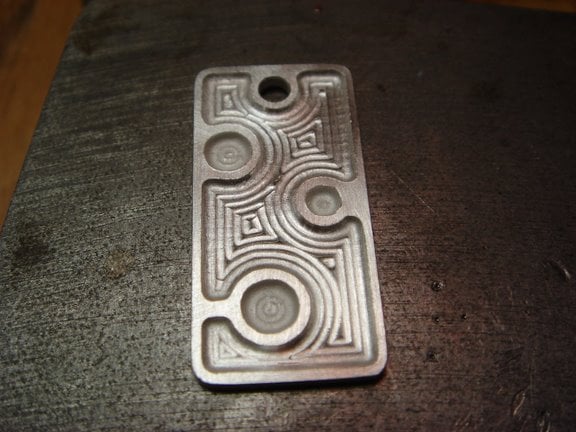
These ingots are readily available from my local coin store in
Arizona and I won’t have to pay extra for fabbing into sheet or
wire. I’ll save the chips for my own castings.

One of the main reasons I chose 0.999 silver is that hopefully I
won’t need to deal with firescale (which seems to be a problem with
copper oxidation), which should hopefully simply how I make my first
few exercises. Using 0.999 will limit me to pendants and
paperweights but I have to start somewhere because I have no master
looking over my shoulder to tell me what I am doing wrong with
sterling.

I have a few questions about ingot silver:

  1. The ingot seems to be really hard and does not scratch easily.
    Does that mean that it has already been work hardened in the process
    of its manufacture, and so my surfacing pass should temper the
    metal? Or do I need to perform manual tempering (hammering) after
    carving out my letters?

  2. I’m not exactly having a firm grasp regarding improving the
    metal’s appearance after my surfacing pass. I have brown compound
    (tripoli?) and yellow compound (polish?) that Thunderbird Jewelry
    Supply recommended apply to my carved silver to make it look nice,
    using a Dremel Ibuff wheel. Alternatively, I have Dremel grinding
    stones, but I am not sure which order to use them? Can someone give
    me some pointers about the right way to polish silver using the
    tools I have on hand?

Thanks,
Andrew Jonathan Fine

P.S. Just please don’t tell me I don’t have any business trying… I
can’t afford to go to school for professional credentials…

Hi Andrew,

Was your ingot cast? Or is it one of those rectangular ones that you
get at the used coin stores? If you cast it yourself, it’s dead soft.
If it’s a commercial one, it’s die-struck, and probably fully hard.
(or at least as hard as fine silver gets, which isn’t saying much.)
Don’t worry, you want it hard for machining. It’ll clear chips
better if it’s hard. (If you’re machining, you want the die struck
ones: much better grain structure.)

I’ve never milled fine silver, but I have lathe turned some smallish
bits. Watch out, it’s very gummy. I’d use flood coolant, and stop
often to see if it isn’t sticking to the cutter, at least to start.
With that little.050" cutter, you’re not going to be able to take
much side-stress from jammed up flutes before it snaps, so really
keep an eye on it.

As far as surfacing the blank to get rid of discolorations, if it’s
just a discoloration, you can polish that off far easier and with
less loss than facing it. If there are structural reasons for facing
the blank, I’d suggest a fly-cutter big enough to do the whole thing
in one pass. Use a very fine feed, and it’ll look like you engine
turned it. Much better than.250" snake trails all over the surface.

For whatever that all’s worth. Let us see how it comes out.

Regards,
Brian Meek.

It will have a learning curve! I think it will cut like copper. Get
some copper buss bar strips and try that until you get that right.
Google : machining silver. also check machining copper you can buy
short lengths of copper to play with from various places such as:

http://www.metalexpress.net

depending on where you live and scrounging ability - you might find
some scrap.

jesse

Hello Andrew,

The fine silver you are using is very, very soft and will require
support, otherwise it will bend. Polishing is accomplished by using
medium emery paper, fine emery paper, brown compound (probably
bobbing compound) and then the yellow stuff (which is most likely
yellow rouge). The cutting tools seem fine, but the silver will seem
chewy compared to your experience with bismuth.You will undoughtedly
raise a small ridge atthe cut edge: not in an ideal situation, but
the real world is never ideal and cutters are never as sharp as the
supplier says they are. When you’ve cut them, an emery stick will
remove any ridges or burs. Have fun.

Tom Arnold.
P.S .e-mail me direct if I can help.

Just please don't tell me I don't have any business trying... 

Go for it, Andrew, and don’t be nervous…

You might find that endmills made for aluminum will give you greatly
better results. They have a much more extreme rake angle.

Your ingots are hard from being struck, presumably. Your machining
operations won’t change that unless you get hot enough to anneal
them. They should further harden them, unless you get the work hot.
Generically: 900F will anneal immediately, 300F for an hour will do
the same - it’s a time/temperature curve, not really a temperature.

You don’t “temper” silver, at least not in the same way as steel.
Work hardened is hard, annealed is soft, and you can have partially
hard or soft.

But there’s no mechanism with carbon and austenite and martensite
and all of that, as there is in steel.

In order to get a mirror finish on any metal, you need to grade your
grits from coarser to finer. You may find that your off-the-machine
finish is pleasing. If it’s fairly clean you may find that 600 grit
(or equivalent) will clean it up enough for tripoli. That’s exactly
why polishing is an art - “What is the surface NOW, and what do we
need to do to get it to THERE?”

That’s up to you… Fine silver is so soft it can be difficult to
polish without losing detail…

Stone grinding wheels are probably a bit rough, though, plus they’ll
quickly load up with metal and become useless…

The ingot will certainly be chilled on the outside and this harder
than the centre. When machining use kerosene as a coolant/lube
otherwise your tools will ball up and slow down the cutting rate and
mar the surface. The polishes you have are certainly a prepolish
rouge [tripoli] and a finish polish but you may need to fine grind
the surface first. grindstones are a bit coarse, I would use 1000
grit wet and dry paper lubed with water or kerosene. Then use your
polishes on a felt wheel for the rouge and leather, lambskin, soft
felt or cloth for the polish.

Nick royall

Andrew - I’ve done a bit of CNC machining on fine silver.

I found it hard to machine cleanly, because it is so soft, and
because the chips tend to weld back onto the parent metal if they get
carried round by the tool. I got decent results in the end, but it
took some experimentation.

I work-hardened my silver with a rolling mill. If you have a choice,
you really want the silver as hard as possible. I would guess your
ingot is cast, and so pretty soft, and you would have trouble
hardening it effectively with a hammer. You should probably just try
it as it is and see how you get on.

I used WD-40 fairly liberally as a cutting lubricant, which reduces
the stickiness of the chips, and then used a little brush to keep
removing the pile of chips from around the cutter. I’m sure flood
coolant would have worked better if I had had it available.

Sterling is a lot less troublesome to machine. I wonder if it might
be worth you getting some thin (and hence cheap) sterling sheet to
experiment with. If you aren’t soldering your machined parts you
won’t have a problem with firescale.

Here are a couple of parts, after machining and before enamelling.

Fine silver:

Sterling:

Good luck!
Richard

All,

Thanks for your responses. Yes, I am using a store bought ingot from
a coin shop. It’s actually cheaper for me than casting grain. I
appreciate the suggestions for sanding and polishing sequences.

So, basically I have to have silver that is faced and polished
before I can even cut the details? Then later, won’t the details also
need to be polished?

Another possibility would be tumble burnishing with stainless steel
shot.

A lot of the PMC people seem to swear by it as a way of getting
something that had just been sintered into saleable shape in minimal
time. Could that work as part of, or in lieu of, the
sanding/polishing process.

A couple years ago I had experimented by turning my CNC into a
robotic sander: basically by mounting a plastic disk (from a Play-Doh
can) onto a mandrel and then using double-sided foam tape to mount
the sandpaper onto the disk.

At 10,000 RPM it worked EXTREMELY nice for sanding off the.25 inch
worm tracks off surfacing Tufa rock. I suppose I could use a series
of robotic sanding and polishing passes. But you’re all right, I need
to find a fly cutter. Unfortunately I only have choices of 1/8th and
1/4 inch collets.

One person said I had to sand along different axes with different
grits. How does the strategy change if I am using sanding wheels
rather than sanding blocks?

A lot of the PMC people seem to swear by it as a way of getting
something that had just been sintered into saleable shape in
minimal time. Could that work as part of, or in lieu of, the
sanding/polishing process. 

This type of burnishing is a final step, not a substitute. The
reason it works for silver clay is that the surface is
textured/polished/finished before the metal clay is fired and all
that is needed is to close up the pores of the metal and give it a
final polish. If there are imperfections in your surface, tumbling
with shot will not remove them, only make them shiny.

Mary Ellin D’Agostino, PhD
www.medacreations.com
Sr. Teacher, PMC Connection
Certified Artisan, PMC Guild

A little water on the emory paper will help keep it from loading
up with silver particles. 

Generally, emory paper won’t take water. If you want to use water
make sure it is labeled Wet and Dry.

Mike DeBurgh, GJG
Henderson, NV

Hi Andrew,

That was me with the changing axes of sanding. (it’s standard
procedure, I’m just the one who thought to mention it.) With a
rotating disk, you’re out of luck. No way to see a difference
between grit 1 and grit 2. Every pass will have the same ‘pattern’.

You could do a couple of passes, stop the disk, and traverse the
table a couple of times to see if that doesn’t give you a consistent
linear pattern, but that sounds like a lot of pain & suffering. I’d
probably just do far more passes than I thought I needed, and call it
good. If you rotate your head 90 degrees, so that you can use the
side of a sanding drum, you can do fully linear robo-sanding, but
you’ve just turned your mill into a light surface grinder. (Know
anybody who has a surface grinder? Trade a few beers for light facing
work?)

As far as polishing before milling, yes, if you have stepped
surfaces, they’ll need to be polished after milling, doing the top
surface first is just a way to minimize the amount of edge
degradation due to polishing. The questions you’re asking tell me
that you’re going to have issues with corners going round on you.
(Not a slam on you, it’s just that you’re clearly a beginner at
polishing, and what you’re trying to do is challenging. Not
impossible, just requiring of forethought.)

Where are you, anyway? (If we know where you are, we may be able to
suggest people to talk to for local help.)

Tumbling will burnish out minute pits, but it probably won’t do much
with fly-cutter marks except make them shiny.

Regards,
Brian Meek.

So, basically I have to have silver that is faced and polished
before I can even cut the details? Then later, won't the details
also need to be polished? 

Andrew, facing off work to true it up is SOP for any machining - you
don’t HAVE to, but life will be miserable if you don’t. Personally,
I wouldn’t polish before cutting details, just face it off.

This whole discussion illustrates the various ways people take to
get to the same end - polishing is an art…

Another possibility would be tumble burnishing with stainless
steel shot. 

As has been said, that just gives you shiny scratches. Tumbling is
good for what it’s good for, which isn’t everything. It’s not a
panacea…

But you're all right, I need to find a fly cutter. Unfortunately I
only have choices of 1/8th and 1/4 inch collets. 

http://www.littlemachineshop.com/ Check it out…

One person said I had to sand along different axes with different
grits. How does the strategy change if I am using sanding wheels
rather than sanding blocks?

Not bad advise, but you don’t HAVE to. What you do have to do is
take away enough material with each grit to have a finer and finer
finish, and sanding in different axes is a good way to see what’s
going on. In something soft like.999 silver, you run the risk of
putting deep scratches with rough abrasives, and then devoting too
much time in removing the scratches you put there. As another also
said, try the 600 grit and up range to start, as long as the work is
clean to begin with. It may take twice as long, but that’s half as
long as chasing 220 grit scratches. It all depends on the condition
of your work to start with…

The problem with using a miller as a surface grinder and lap is
precision.

Each sanding is maybe a 10,000th deeper than the one before, and
final is going to be a millionth… On a machine with a thousandth
increments, that’s hard to get. It wouldn’t hurt to do your first
sanding with it, though - it will be nice and flat, to start… You
could probably do the whole process with a locked spindle and do a
pretty good job of it…

Richard,

Your photo of CNC on fine silver looks absolutely lovely. I can only
hope to do as good when the time comes.

Based on yours and other peoples’ descriptions, I have a feeling that
the fine silver is going to be about as soft as bismuth to cut, or
just a little bit harder.

I had used technically pure (0.999) bismuth ingots that I had casted
myself, which was rather easy to do with my electric melter and a
charcoal grill. I found that in order to eliminate cavitations in my
bismuth ingots, I had to heat the iron molds I was using by burying
them except for the opening in hot charcoal. Then I would pour the
bismuth from my melter into the mold, wait until the bismuth
remelted, and then quickly lift and quench in a bucket of ice.

Crude, but effective.

When I was practicing with the bismuth, I found the metal could
scratch with my fingernail.

I found conventional endmills smaller than about 1/8" to be
completely useless, due to the remelting effect you mentioned.

My 1/4" endmill (my largest) was okay for surfacing. But I’m
following peoples’ advice and investing in a fly cutter and a collet
to fit it in.

I discovered that Vee cutters were good for cutting fine details in
bismuth. So I think I’ll use that as a starting point for fine
silver.

I’ve cut dry in all cases so far, kept my spindle at 10,000 rpm, and
use a slow feed rate. Of course I’ll have to recalibrate again for
feeding my Vee cutters into fine silver.

I am also eager to learn some basic enamelling, and that is indeed
one of the things what I want to do with machined fine silver. The
other thing I want to do is inlay work, which would require me to
learn a new set of skills in order to machine jade, turquoise, or
mother-of-pearl to fit within the inlay pockets.

Beyond pendants and earrings, I want to create some jewellery boxes
lined with velvet and either inlaid or enamelled exteriors. I’d
install a music box in there too. Essentially make a gift fit for any
father’s little princess.

I’d appreciate discussing more about CNC machining on silver offline,
you are evidently someone I need to learn from.

Andrew

All,

This is my present status.

  1. I ordered a fly cutter and a 3/8 inch collet from DeArmond. I got
    my other collets from them and have so far I am very glad that I did.

  2. Rather than turn my spindle 90 degrees (I can’t, I have it braced
    against the wall to minimize vibration!) I do have a removeable Theta
    axis with stepper.

Early on, I had invested in this axis with a rotary table with 4
adjustable jaws, mounted to an adjustable angle mount.

So I could do this: mount my ingot in the rotary table with the angle
mount at zero degrees (parallel to table), and then fly cut my
surface with the 3/8 inch collet. then, I can change to Vee cutters
and carve my details. I’ll try to avoid corners in my detail design.

Next, adjust the angle mount perpendicular to the table, and place a
Dremel sanding drum or Dremel polishing wheel in the 1/8 inch collet.

I can then command my Theta axis to turn 45 degrees for the next
drumor polishing wheel, changing the wheel and abrasive manually.

  1. I visited Thunderbird Jewelry Supply in Gallup NM, as I live in
    the general area.

I asked them how I should polish a machined silver surface. They
said I don’t need to bother with sandpaper if I don’t want to.
Instead, I would use three polishes: (a) One Step (a yellow bar) that
is used to remove firescale and scratches. They suggested using this
instead of 600 grit sandpaper. (b) Tripoli (brown bar) as an
intermediate abrasive, they tell me is equivalent to 800 to 1200 grit
sandpaper. Finally © Zam (green bar) that they say should bring me
to a mirror finish.

  1. In all cases, they suggest I wet the polishing wheel and charge
    the wheel with polish before applying the wheel to the work.

I have no idea how long to takes to polish a couple square inches of
fine silver.

I do know that the process consumes both water and polish. So I
figure I could set up three stations on my table: A piece of polish
anchored in a fixture on the left, a water drip in the center, and
then the silver mounted at the 90 degree position in the rotary table
with angle mount.

My CNC program could start by moving the wheel under the drip, then
moving the wheel so that the left side of the wheel contacts the
polish bar, then moving the wheel so that the right side of the wheel
contacts the silver for one or two wheel thicknesses across the
silver. Then repeat until the entire silver area has been touched…
however many times?

Concerns:

  1. Anyone disagree that rougher polishes can substitute for
    sandpaper?

  2. Will I need to wear a full respirator while supervising my mill?

  3. How much time should I expect a square inch of polishing or
    sanding to take… really?

Anyway, you have a clue as to where I am, if you guys want to try to
find me a local tutor. I know I’m asking a lot of questions, and I
hope Iam not asking too many.

Thanks,
Andrew Jonathan Fine

  1. Anyone disagree that rougher polishes can substitute for
    sandpaper?

I was going to suggest it, too. Academic jewelry people are taught
to overwork everything, for one. Silver is ridiculously easy to
polish - small surfaces, that is.

  1. Will I need to wear a full respirator while supervising my mill?

I wouldn’t. If you get a big cloud of dust, you’re using too much…

  1. How much time should I expect a square inch of polishing or
    sanding to take… really?

5-10 minutes if you’re doing it in any way like it should be done. I
could do it in 2-3 minutes in my shop but we have a polishing
room…

There are procedures to be followed if you want good results, but
it’s just not that difficult…

http://www.donivanandmaggiora.com

I found conventional endmills smaller than about 1/8" to be
completely useless, due to the remelting effect you mentioned. 

Andrew, if you look on the littlemachineshop site I posted before,
and elsewhere, under technical advice or something (I’m on dialup
Sundays - not going to go on the site), there’s a chart for the
angles of cutting tools.

I don’t remember the back rake angles for steels (5deg? 8deg?)
offhand, but I do remember aluminum - it’s 15 degrees. That’s a
knife blade, and it helps greatly in cutting soft metals of all
kinds. The small rake angles of standard tools tend to drag more,
creating pressure and what amounts to spalling. Try it, don’t trust
me. It gives good results and a great finish for the tool…

Hi Andrew:

Oh boy. Sounds like you’re going to have fun. Frankly, I’m not sure
how to evaluate the technical requirements of polishing with a CNC
system. That’s so far from how I normally polish, that I don’t even
have a starting point to work from. If your fly cutter marks are very
fine, you may not need to sand before going to the ‘yellow bar’
(probably bobbing compound), but I’d be surprised. Try it and see. If
you get shiny scratches, go back and start with 400 grit sandpaper,
and go up to 600, and try again.

(I don’t remember if you mentioned it, but they did tell you that
you need a separate buff for each compound, yes?) For really flat
polishing, I’d look into getting some ‘soft’ felt buffs. They won’t
wrap around the corners the way sewn fabric ones will. You’ll still
need fabric for the zam, and for a last pass with the tripoli, after
a first pass on a felt buff. (felt buffs leave a sort of scratchy
surface behind, regardless of compound, but they’re better for flat
things, and slightly more aggressive than fabric buffs.)

I would be very careful to tape plastic bags over every possible
part of your machine that you can. Buffing compounds are kissing
cousins to lapping compounds, and will do nasty things to your ways
and guides if they get in there.

Zam’s a very nice final polish for silver. It’s still slightly
abrasive, but it’s as fine as silver will hold. (You can get silver
to a higher polish with rouge, but it’ll scratch the first time you
look at it, so you may as well stop with Zam.)

As far as respirators, a full face respirator is overkill. The
buffing compounds do have silica in them, and people have become a
tad paranoid about it of late, but frankly, I’d be more worried about
getting it into your guides and ballscrews than about breathing it,
especially if you’re using it wet. (most people don’t use it wet,
btw. It tends to clump.) A shop-vac with nozzle clamped next to the
’downstream’ side of the buff should get most of it. If you’ve got a
full-face respirator, it can’t hurt to use it, but I wouldn’t run
out and get one. Half face with a 5 micron particle cartridge will do
just fine. (That said, you will use safety glasses. I was nearly
blinded once by a lathe tool shattering…as I was standing across
the room, making notes, with the lathe off. The reason I still have
both eyes is that I got in the habit of always wearing glasses
around heavy equipment.)

What kind of machine have you got, and what kinds of freedom does it
have? I’m assuming X/Y on the table, and Z from the head, along with
a table mounted rotary box, correct? Table-top cnc machine, or
bridgeport class? (there are some stunts that I just woudn’t try on
a tabletop mill. Not rigid enough. An NC bridgeport is a whole
different class of beastie.)

Gallup? Hummm… Indian Jeweler’s supply is in Gallup. You might
want to give them a call, to see if they know anybody local who’d be
willing to show you how to buff. Everybody I know is over Santa Fe
way, or points further away.

Regards,
Brian.

Andrew - I am only a tiny step up the learning curve from where you
are, but I’ll be happy to tell you what I can. Feel free to mail me.

Whether you plan to or not, your first few cuts in the silver are
bound to be a bit experimental. You should probably plan to do the
initial surfacing more than once, for example. It might even be worth
designating a lump of your ingot for test cuts. Twenty minutes of
fooling about with it will tell you more than any amount of
discussion. That also mitigates the stress of trying to get the first
cut perfect!

If I was you, I would polish by hand with the Dremel. It doesn’t
take long, but you need to be looking at it to see the process
working. A more automated CNC-based setup might be worth building
later, but there are a lot of variables you want to understand first.

Yes, rougher polishes can substitute for sandpaper, within its
limits. Face your silver, bung a suitable felt in the Dremel, run it
on the yellow polish, and set to with it. You’ll see when it removes
the machining marks, or you’ll get fed up with it obviously not
removing them, and then you can reach for a bit of wet & dry paper.
Which, by the way, I would apply with my thumb, not a CNC machine,
for all the same reasons.

Incidentally, I have never applied polishes wet. I don’t know if
that’s standard practice, but I wouldn’t bother. You also need to
make sure that each of your three polishes goes on its own wheel, and
that you clean your work between polishes, so you don’t get any of
the coarse stuff in the fine passes.

Here are a couple more pictures for you - this is CNC-machined
sterling silver which has been surface-enriched then enamelled:

http://www.jarkman.co.uk/catalog/jewel/rachelwengravedenamel.htm

And this is fine silver enamelled by my wife, Donna:

http://jarkwoman.co.uk/JewelleryPics/Enamelling/LargeCNCPendant.htm

And this is an experimental bit of acrylic-in-acrylic inlay, which
turned out to be extremely easy. Not a great aesthetic success, mind
you, but the actual inlaying worked perfectly. The most awkward bit
is at the design stage, making sure that the shapes of the hollow and
the inlay part respect the cutter radius and width constraints
correctly:

http://tinyurl.com/meeffy

Richard

Yes, rougher polishes can substitute for sandpaper, within its
limits. Face your silver, bung a suitable felt in the Dremel, run
it on the yellow polish, 

I’d say, by way of constuctive criticism, that Richard could get a
better polish on his otherwise lovely pieces - learning never
stops…

But his posting as a whole says the truth - it’s just not that
complicated and there are many ways to get to the same results.
Andrew is just faced with a normal human situation: “I’ve never done
this before…” Big silver - expanses of sheet like belt buckles
or teapots, can be a tial to polish well, but small silver items are
ridiculously easy to polish… Students tend to abuse it and then
clean up the mess they made…Put away the 220 grit sandpaper…

That doesn’t mean one is an expert polisher in a few days, either.
And a caveat about the quote above: agressive abrasives ~combined
with horsepower~ can substitute for sandpaper. It’s a dance between
tooling and compounds…