I just got myself into 3d printing with castable resin and (as many) I am experiencing resin residue which leads to bad casting surface. Nothing major but still I would like to solve this problem.
I have tired increasing temperature but this didnt helped much. So next try would be adding more air.
I have small electric burnout furnace 14x20x16cm. There is one exhaust port on the back. I tried to keep door slightly open but this is still not enough. I know you can drill holes in bottom of kiln but I would like to dont do it if I can.
There is Neycraft Vulcan Venturi furnace which some say works very well for this task. So I would like to modify my kiln to have similar exhaust fan like Neycraft.
Problem is There is no blueprints or pictures of how it is constructed on Neycraft Vulcan. I do not know anyone nearby or any shop who have this furnace so I could look at it in person.
So is there anyone willing to take few pictures of Neycraft Vulcan Venturi exhaust system? I would like to know how it is connected, what is inside fan exhaust duct etc.
Any suggestions and help are welcome
congratulations, you joined the crowd of those who suffer from the results of so-called castable resin and complain about bad casting surface.
Surface defects may be caused by multiple effects. In order to verify your initial guess of resin residue just take a random, reasonably solid pattern with a clear structure. Put it into a new crucible and burn to the burn-out temperature recommended by the resin manufacturer. You may check every 50°C what happens - this will give you some extra insights. If there’s any visible residue at the recommended burn-out temperature, you might want to change to another resin or/and another 3D printer.
If there are no residues, then your problem originates from other causes along the process. These may be (among others):
chemical reaction of the resin with the liquid/fluid of the investment during the setting phase,
swelling of the pattern caused by hydrophilic properties of the resin,
expansion of the pattern without melting during ramp-up temperature,
and many more.
I assume that you are not interested to contribute an academic essay on possible causes and effects. Therefore it is not reasonable to investigate on the causes of chemical reaction, swelling and the like.
A more pragmatic approach would be to use an investment with increased thermal expansion and preferably one with setting expansion as well. By this you can eliminate the effect of intrinsic force generated by pattern expansion. We have developed Invest RP for this purpose and you may contact the smart guys at Stuller for this.
To get back to your inital question to get a better burn-out result, the approach to add air or oxygen, to be precise, will lead to a faster carbonization but the result will be the same as long you have residues.
J. Tyler Teague is savvy with this, and if I’m not mistaken he addressed the procedure of how to increase air ventilation in burn-out kilns either in the MJSA Journal or in this forum. You might contact him for advice if he’s willing to give a helping hand.
All other causes, addressed or not, you don’t want to know and don’t want to solve either but turn to a resin/printer without these troubles.
Sorry, i have forgot to mention about these few things.
Investment is R&R plasticast, benchset for about 3hr after investing.
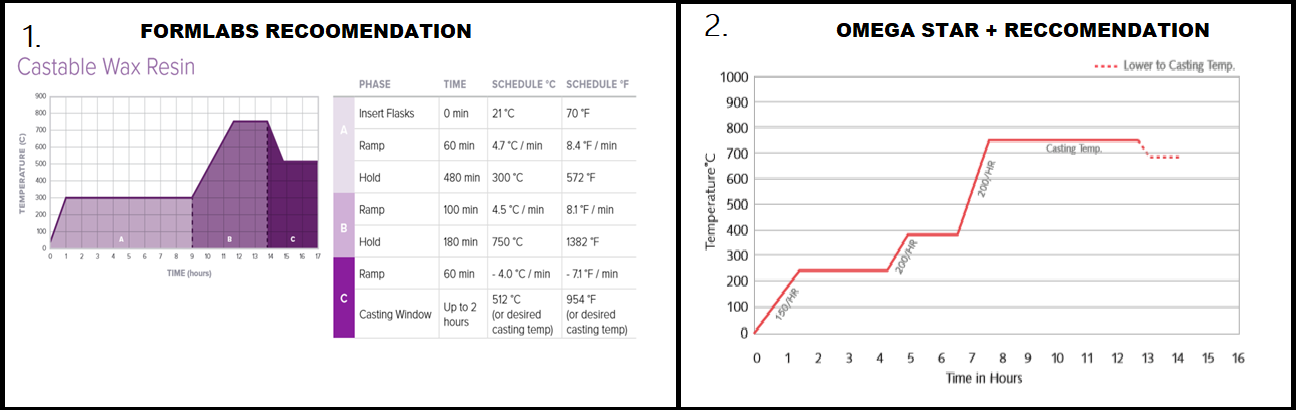
Burnout is very similar to that recomended for plasticast but to be safe I use one provided with resin - which have only longer high-end time(4hr instead of 2)
Flask up to 2"x2" but usualy smaller than that.
Prints are cured rock-solid.
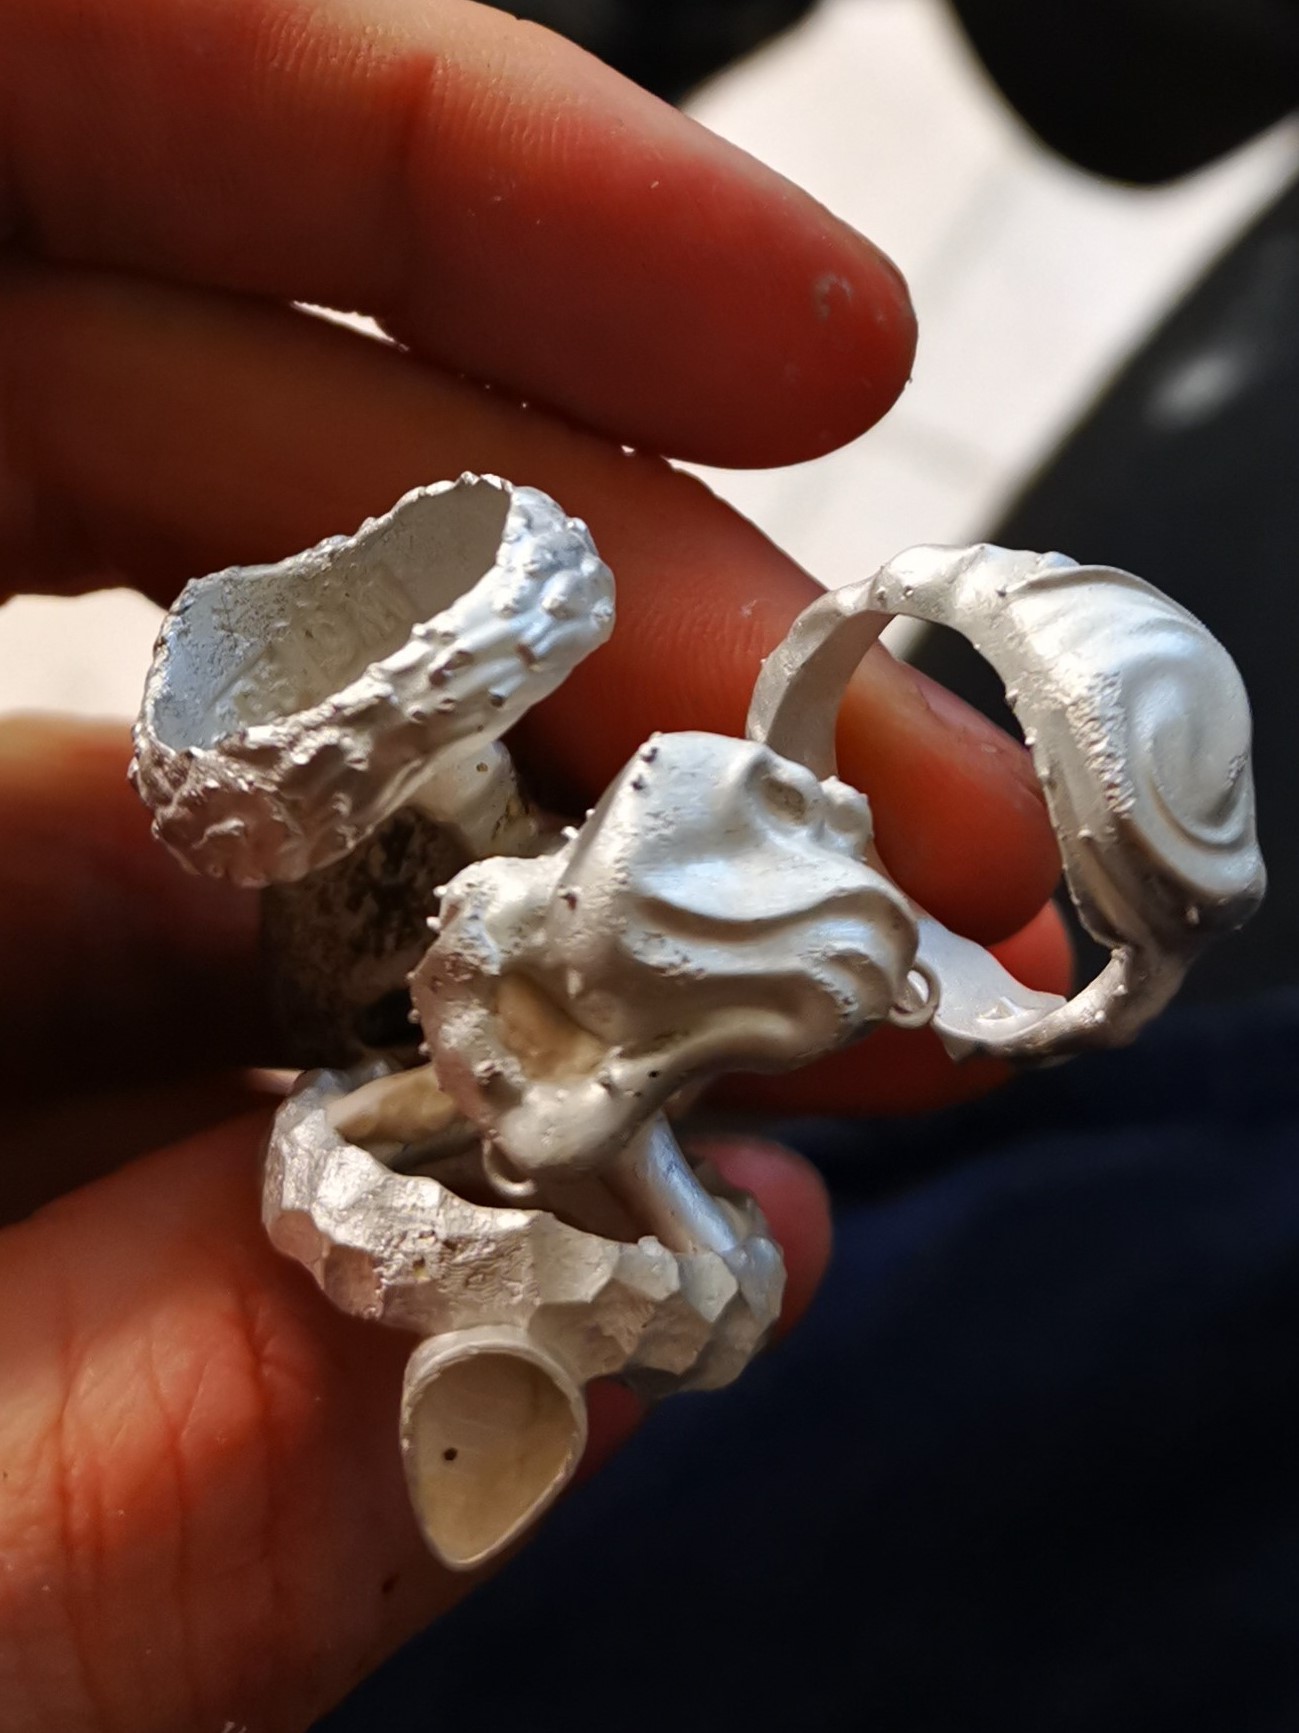
I am sure it is not investment brakedown. For me it looks like residue inside mold - incomplete burnout. Its not major but some very small surface depressions in few places on object.
I have also tried what you say with burning investment without investing it. And it burns clean. But This is somehow different than burnout inside invested flask - reason is airflow, which is drasticly reduced when something is covered with investment.
I know that this resin can be cast without surface defects - but persone who does it have diferent casting setup. Big old burnout kiln and induction centrifugal casting machine.
James Binnion has done the research and published a paper on this. You can find it online for free through the Santa Fe Symposium site. It is in the 2016 catalogue of papers. “ A New Method for Preparing 3-D Printed Acrylic Photo Polymers for Investment Casting.”
Have fun and Make lots of jewelry
Jo Haemer www.timothywgreen.com
I have tried assind steel tubing under the flask and running air with aquarium pump. Didnt noticed any differences in casting. I just bent some steel tube and put in through the door, but I had to make little groove in the insulation - much easier and less destructive than drilling in walls or bottom of the kiln.
With my resin I found out it is not ash or incomplete burnout but investment degradation from melting resin. Using prelonged heating up to 200C for few hrs to remove water and then straight to 700C as fast as possible solved the problem. Of course it works only for one small flask with my klin. Somewhere I have found information that two kiln burnout would work even better. In one kilk you remove water for 2-3hrs and after that you transfer flask to second kiln which is already heated to 700C to remove the resin. But I dont have two kilns so it will not work for me Also I am thinking about chainging resin to bluecast but this intruduces another challange to find working settings for my printer. Or I will just ditch printing alltogheter…
Sounds like a nice solution to the venting! Could you perhaps provide pictures of your steel tubing through the door insulation, would be much appreciated. Im a bit anxious about modifying my precious kiln, and especially taking apart the electronics and drill beneath the muffle!
I too think i have exact the same problem as you had!! Whats the point of going directly from 200 c to 750 c? Burn the resin before it begins to messe with the investsment, but wont there come crackings in the investment instead?
Perhaps you would also provied detailed burnout schedule (c/h etc)?
Im getting decent casts, but not flawless, bit grainy texture and pitted spots here and there occationally…
I am using formlabs castable wax resin and using goldstar omega + burnout program
If its a ash residue problem i should perhaps try with the open loop system or add more venting to my kiln which i am looking into…
However, I tried to burn off three 3d models at reccomended top burnout temp, and I would say they burned out pretty clean with no residue as formlabs also promise with their material.
I read online that the post cure of resin models is very important since uncured resin can interfere with the investment, especially in the vaccum… However my material should be ready directly after printing and rinsing… But will leave in my window shelf for bit UV curing anycase…
If its an investment problem perhaps i should add more investment to harden 38/100 a bit more… I think i have enough worktime to do this… I usually get 2-3 cracks near my sprue buttom, maybe this tells a bit about it not being strong enough, or not proper burnout, even though im following the guidelines of Goldstar.

 Also I am thinking about chainging resin to bluecast but this intruduces another challange to find working settings for my printer. Or I will just ditch printing alltogheter…