Hi There,
Ive been bezel setting my gems for a few months now but im struggling to give the settings that final touch of a bright cut. I’m terrified of scratching the stone and ruining the setting at the last step!
Any advice on graver style and prep to bright cut bezels? and technique of course!
I currently use a Foredom Electric graver
Thanks!
Luke
As I’m a Diamond Setter for only 65 years and now well into tutoring my skills, I have a blog for you to learn about “Bright-Cutting”. Go to https://gerrysdiamondsettingessays.blogspot.com. My blog emphasises Bright-Cutting. My blog teaches all about graver shaping and polishing these tools on Polishing paper. I use Polishing paper rated at about #800 and #1,000 grit.
(Don’t be terrified about you scratching your stone). What I would do is to use your bench-grinder and recut the angle the face of the graver as this will give you a bright-cut on only one side of your cutting tool.
Your Bright-Cutting will be done only on the modified (right side) side of the graver. The left side of the graver will be reshaped as not to touch any facet of the stone.
I use a graver that is only a Onglette #2, a number #1 is too narrow to give you the optimum cut that is needed. The topic that you need is on “Bright-Cutting on an Oval Bezel”. I don’t use any electric tools.
When you get into my blog, here are your answers with 74 photos.
“Angles of the graver face”, December 11-2023 (20 photos).
“Onglette gravers”, September 11-2023 (47 photos).
“Onglette gravers on an Oval Bezel”, September 14-2023 (7 photos).
BTW, I have 385 essays including a total of 8,200 photographs.
I’m hoping that my extensive blog greatly helps you in gemstone setting.
Gerry Lewy (gerrylewy18@gmail.com)
5 Likes
Hi Luke and everyone!!
I found two more essays that I wrote on Bezel Setting.
“Bezel Setting Oval stones”. August 3, 2023 (49 photos).
“Red (Ruby) Bezel Setting” June 20, 2023 (19 photos).
So now you have a total of 142 photos to view and learn.
https://gerrysdiamondsettingessays.blogsot.com (I never charge for my essays).
4 Likes
Hello Gerry,
First, you made me smile. So you have done your good deed for the day. The upside of being an “elder” is [a] if you did not, you now do now not give a flyingwatusi what someone else thinks.
[b] .I attempted to visit this link:
https://gerrysdiamondsettingessays.blogsot.com/
but was greeted with this:
Secure Connection Failed
An error occurred during a connection to gerrysdiamondsettingessays.blogsot.com. PR_END_OF_FILE_ERROR
Error code: PR_END_OF_FILE_ERROR
The page you are trying to view cannot be shown because the authenticity of the received data could not be verified.
Please contact the website owners to inform them of this problem.
Thank you,
Andy
Since Andrew had problems I checked too.
The first link is fine here, the next seem misconfigured or highjacked, it goes straight to a unrelated ad site.
Hi Gerry!
I see the error, there is missing a latter in the link
No “p” in the blogspot.
Thank you for sharing this info. Bright cutting has been a fear of mine too.
1 Like
Your blog is a wealth of great information!!! Thanks for sharing. I love this community so much. Everyone is so supportive and we all share knowledge.
I just use a flat graver and it works great. Just need reps.
1 Like
What Gerry said. He Da Man ! I use super sharp and polished 1/2 onglettes and most importantly oil the gravers while cutting. I have a tendency to have a little “chatter” in my bright cuts,( I’m not nearly as good at bright cutting as Gerry is), so I cut first in one direction and then switch the graver out so that the flat side of the onglette graver, not the curved side, is next to the stone. What ever I am cutting I clamp in a gravers ball so that rather than trying to move the graver I just try to keep it steady and move the piece in the graver ball. I also have some highly polished mini burnishers made from old dental tools in different sizes. After bright cutting I use them, with oil, to smooth out any uneven spots. When done well, (if I am lucky and having a good day), I can just go straight to the buffing motor rather than having to use abrasives. Over abraiding and over polishing metals tends to leave things looking shop worn. I like a nice crisp look. The stones that terrify me most while bright cutting a bezel are soft ones like opals, lapis, turquoise, etc. Those I shamelessly hand over to my husband Timothy W Green.
Jo
3 Likes
All I cut are soft stones and it’s terrifying at times. I really need to try Gerry’s method and the oil sounds like a great idea.
1 Like
Oh, Jo! I agree with you that Gerry is Da Man, but I think that you are Da Woman, too. Thanks for your play by play on how you do it, the mini burnishers is an interesting idea…but please, don’t stop and either get Da Other Man, Timothy W Green, to chime in about soft stones and graver cutting or describe his techniques yourself! I think I have an idea of what he does to avoid scratching the stones where he bright cuts the bezel top, but I want to hear it from the expert himself! Thanks again for all the knowledge you share! -royjohn
1 Like
Oh! I forgot to add that one shouldn’t use the mini burnishers on soft stones.
And as so far as Tim’s take on this when I asked him he said “Well I just do it carefully.” He is really good with gravers. We both worked with an elderly Belgian engraver Jerome Verjdegen. Both Tim and our former student Allison Daggett took engraving lessons with him. So they both have really great engraving skills. I have found that the hardest part of using gravers is learning how to shape, temper, and sharpen them. I am totally jealous of my friends who have power hones.
Jo
2 Likes
Jo…I too crave a power hone. Since I use Lindsay gravers, following is what I want.
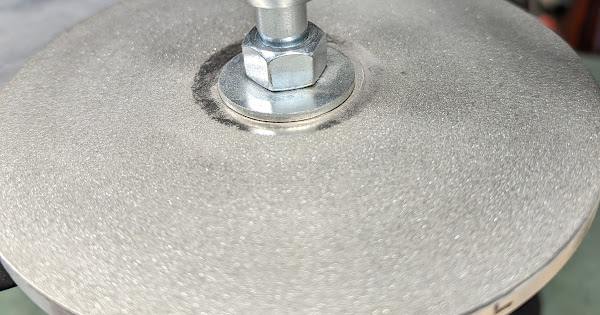
My current solution uses a common drill press, 1/2" bolt, some 1/2" nuts and two 1/2" washers that I have ground to be tapered to one side and a couple lapidary diamond disc with different grits and a 1/2" hole. I assemble the disc grit side up on the bolt with a tapered washer on each side of the disc. Mount the disc in the drill press and then run it to see how much run out it has. You can then vary the orientation of the tapered washers to dial out the run out. I only use this for course grinding and then do the rest with Lindsay sharpening templates and diamond stones. Following may be a couple pictures of my drill press hone…Rob
2 Likes
Sorry, I forgot to mention the step where you cut off the head of the bolts before assembling the disc on what is now an arbor…Rob

