Brass Solder Melting Problem

Sorry this is long, but felt I needed to add my mental state for
full impact.

Today I cut out a dog brooch. It’s out of 24g red brass. It has two
layers. Bottom is full and the top is partially cut out (to be
filled in later with resin). So I sanded them, cleaned them with
alcohol and then fluxed them good. I took my yellow solder (from Rio)
and sanded it, cleaned it and pounded it thinner (as per some
recommendation I read in a book). Then I cut my solder and added them
to my piece. I put the two pieces together and added a little binding
wire to keep them from floating apart during soldering. So I take my
smiths little torch propane/oxygen setup and began my soldering. I
heated the metal on the bottom (full piece) for quite awhile. Moved
to the top and heated the cut out piece. Then went back to the
bottom. This back and forth went on for awhile. The top turned
cherry red, BUT the solder didn’t melt. I then put it on a charcoal
block hoping it would retain some heat on the bottom to help me.
Still no luck. Enough pieces melted to stick the 2 parts together but
not enough to really solder the thing. I also partially melt the dogs
ear on top. Then I took a break to swear and eat a peanut butter
sandwich.

Thusly fortified with some of the essential food groups I decided to
pickle my brooch and reflux and try again. After pulling it out of
the pickle, I notice it looked rusty. I’m thinking it looked that way
before pickling but hey I was too busy swearing. :-). I try heating
again and it doesn’t budge. I think to myself perhaps that solder
doesn’t work well. I have had a few times it didn’t melt. But others
it did just fine. I look in the Rio catalog and notice the melting
point is medium-high for this solder. So I decided to cut out the
design again and try silver low solder thinking this will fix my
problem. 3 saw blades later (did I mention this was a 3-saw-blade
project?) I have my new dog. Top and bottom. I once again I do the
right thing. Dog: Sand, clean, flux. Solder: sand, clean, pound flux.
This time I use low temp silver. I heat and I heat. Some of it does
melt this time. But I still have little hold outs. I also try upping
the heat on my smiths little torch. I increase propane and oxygen
alternately until the flame looks bigger (thinking all this time
that I really need to find some more literature on this torch. It
came with woefully little. I guess this torch isn’t for those of us
just learning the ropes). The flame cuts out repeatedly when moving
from the top to the bottom and visa versa. Much swearing as I relight
and readjust. I wonder if this is a not enough 02 psi problem?
Apparently the torch still isn’t hot enough. I stop. Decide enough is
enough. I notice that the red rusty powder is on the brass again. I
look through the archives and read something about brass depletion
and copper left behind. Guess this is what is happening. Guessing
it’s because the flux runs out before the marathon torch session
does. I take some high grit paper and proceed to get most of it off.
It’s now in the pickling pot. I’m thinking it’s time for a nice glass
of Shiraz (thank you Australia).

What is going on here and what can I do to fix it? This is a great
brooch and I know I’m going to get lots of call for it, but if I
can’t solder it, it’s a problem.

Thanks
Lisa Fowler
LL Fowler Designs
Fort Collins, CO 80526
USA
@LisaF
Hi, Lisa,

You didn’t say how large your brooch is or what gauge metal, but I
think probably the Smith Little torch isn’t producing enough heat.
With copper and brass, the copper oxidizes very quickly, and the
oxides keep solder from flowing. It is important with these metals
to heat fast, get in, melt the solder and get out before you get too
much oxidation. Do you have/can you get a larger tip for your torch?
I’m not sure this is a good idea-- others will probably be able to
comment-- but I have used such torches with the tip removed
altogether to get a larger flame.

The “rusty” copper plating can be removed with a mixture of hot
pickle with an equal amount of ordinary peroxide from the drug
store-- called bright dip.

I suggest you try making your design out of silver and see how that
goes. Silver is actually a lot easier to work with than copper or
brass. If you are not using paste flux, that may also help.

One other solution for difficult soldering operations (though this
doesn’t sound as though it should be that bad) is to provide a
second source of heat. A trinket kiln such as the “ultralite” on
page 438 of the Rio catalog is terrific for bringing an assembly up
to close to soldering temperatures from below, so the job can just
be finished off from above with a torch. This has been a life-saver
for me when soldering a bezel onto a large, heavy backing.

Good luck!
Noel

Dog: Sand, clean, flux. Solder: sand, clean, pound flux. 

Clean the solder after hammering it. It may be picking up oil which
is preventing the solder flowing.

The little torch may not be the best torch for this sort of
soldering. The whole piece needs to come up to soldering temperature
at the same time. This means a larger bushier flame and not a little
pointy although hot flame.

When this topic has come up here before, some people have
recommended buying new solder from a different source.

You might buy a cheap propane only torch, with a bigger flame. That
might do the trick. Also, the Little Torch can be turned up to have a
much larger, hotter flame that you might think. A friend came over to
borrow my torch to solder a baby spoon together and put a 3 inch
flame using a #5 tip on my Little Torch.

Otherwise, and it’s hard to tell from email, but otherwise, I would
have to guess that it could be a heating problem. If your piece is
large and your flame is small – and a very common problem with new
solder-ers is un even heating.

Elaine

Elaine Luther
Metalsmith, Certified PMC Instructor
http://www.CreativeTextureTools.com
Hard to Find Tools for Metal Clay

Lisa,

I’m betting you need a larger torch. I’ve had dozens of students
over the years who’ve bought that particular torch - not knowing it’s
limitations. They do make a “rosebud” tip for it, that may be of some
help… but in the long run, if you intend to make larger pieces such
as brooches - I’ll bet you’ll be happier with a real silversmiths
torch. Smith makes one.

Brian P. Marshall
Stockton Jewelry Arts School
Stockton, CA USA
209-477-0550
instructor@jewelryartschool.com
jewelryartschool@aol.com

Lisa,

I hope I can help you a bit with your soldering problem. My students
sometimes do very similar projects, soldering sheets of silver or
brass together, and I think I can throw some light on your problem.
First, get yourself a bigger torch. You are going to want a flame
that is large and bushy, not a tiny sharp flame that torch of yours
is putting out. A Prestolite torch, or acytelene torch with the
largest tip they sell at a welding supply store works just great for
these types of jobs.

Run the pressure up to the max safe pressure on the regulator. Next,
I would try soldering your top (pattern) sheet to the oversize bottom
sheet by making sure they are both dead flat, and putting them on top
of a suspended heavy steel screen. Put both sheets together, and then
flux with a good borax paste flux when they are together. Don’t apply
flux to each piece and assemble. After these two sheets are coated
with flux, dry the flux with a soft flame until it is dry. Be sure
you have adequate ventilation, as this creates fumes. This is a great
time to apply cut squares of solder to the back sheet, placing them
along the outer edge of the top sheet. (I prefer sheet solder rather
than wire solder) Hopefully you have remembered to cut the back sheet
larger than the top sheet, to allow for a lip to place the solder
on. With the torch in one hand, and a solder pick in the other, start
heating the sheets from beneath the screen with a continuous
circular motion, heating as evenly as possible to avoid warping.

Your soldering pick can be used to push wayward solder chips back
against the edge of the top sheet. Brass is a "dirty " metal, and
will oxydize quickly, so don’t be timid with the flame. As the sheets
reach soldering temperature, the solder should flow between the
sheets, and the capillary action of the solder will fill the minute
space between the two sheets. I would not try to “sweat” the two
together by pre-melting solder on the back of one of the sheets. In
my experience, they will never lay as flat as they will if you keep
them flat to start with, and bring the solder in from the edges.

Binding wire is a mixed blessing. It can be quite helpful on
occasions, or it can nearly destroy some pieces. Use care or you can
solder it on to your piece quite easily.

After pickling, check to see if you have a continuous seam around
all edges, and if you have gaps or pinholes, tap the two together
with a soft mallet to seat the two a little closer, and reflux
/solder as before. When you are satisfied your two sheets are
soldered perfectly, then use a jeweler’s saw to cut out your bottom
sheet to match the top. File, sand, etc.

I would stay away from high temperature solders, as they require so
much heat to melt, you can heat-warp or melt your sheets just trying
to get the solder to melt.

Hope this helps…
Jay Whaley UCSD Craft Center

Hi Lisa,

I think your main problem is not enough CONSISTENT heat. I would
suggest that you use an acetylene torch with a larger nozel than the
Smith “little” torch. It has that name for a reason. It puts out
"little" heat. Brass has a high tolerance for heat and won’t melt
with a little abuse with the torch in fact, I’ve found it seems to
welcome it. It does build up a substantially higher level of
firescale than silver so you’ll want to make sure it’s well cleaned
and fluxed prior to soldering. And unfortunately, unless someone has
that I’m unaware of, it’s difficult not to copper plate
it while it’s in your pickle. It’s prone to it.

You’re probably better off trying to polish it without putting it in
the pickle. A good rouge works well with brass. If all else fails,
rivet it. It’s a great look and requires no soldering (except a pin
backing which should be soldered prior to riveting…less
metal=less heat=faster and cleaner soldering.)

Good luck! I hope this helps,

Polly Spencer
Mary Amalia Jewelry
148 High St.
Portland, Me. 04101
207-772-1285
@Polly_Spencer

I still am looking for a few more people who would like to share a
house during the gem show. please email me for

Hi Lisa,

It sounds like you are having some soldering problems. I am a
goldsmith with 44 years experience so what I say works OK. I have
been using a little torch on an oxy / propane set up for twenty
years now, if you look at my gallery on orchid you will see that I
make all sizes of items and the torch works fine. When I am starting
a project I make patterns in copper and brass, just to make sure that
my ideas will work before I commit them to gold. I would hazard a
guess that you were sold brass wire as solder. I do not know of a
yellow solder for brass that work well, unless you want to use gold
solders. Stick to using silver solders. Here is my method for
soldering copper and brass. First clean off all fire scale ( the rust
like substance you mention), you can use abrasive paper or I use a
fibre glass brush. Make sure you keep all surfaces clean before
soldering, I use a borax flux as this forms a shield on the metal
when heated and stops firescale developing, if I was soldering two
layers together, I will make a sandwich of the layers with small
pieces of solder between the layers, I hold the layers together with
small home made clamps, made from stainless steel bent in a U shape.
Heat gently with a soft full flame, heating the whole item as evenly
as possible, and when the metals reach the solder melting point the
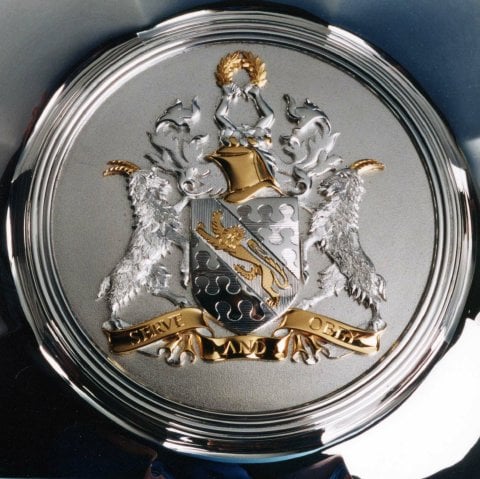
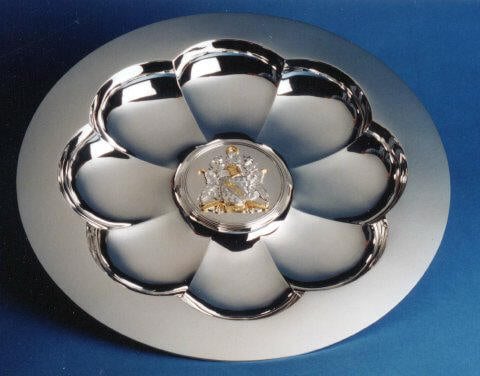
sandwich closes as the solder runs. I recently made a silver crest
using this method of multi layering, for a silversmith friend to
mount in a bowl he had made.

Here is are some photos.

I hope this is of some help and encouragement to you, please contact
me direct if I can be of any further assistance.


Regards James

1 Like

Lisa,

Although I don’t do much with red brass, I have found it useful to
"pre-melt" solder on one surface before cleaning, re-fluxing and
putting them together. This is especially useful when one piece is
much larger than the other. By “pre-melt” I mean just kind of
puddling the solder or letting it start to flow, and quickly
removing the flame. I work mostly in silver, but it should work on
any metal.

Good luck!
Sherry Terao

It’s easy to get rid of the pink by adding hydrogen peroxide from
the drugstore to some pickle. It makes a short lived strong pickle
that removes the copper. Don’t leave it too long as it will etch the
solder joints.

marilyn

Hello all,

I’ve been using the little torch for years and I’ve soldered items
as large as Western style belt buckles. That’s about as big as it
gets in the wearable jewelry trade, except for maybe neck cuffs.
I’ve also fabricated and soldered large heavy cuff bracelets with
this torch – noproblemo. If you look at the fuel properties chart in
our catalog or in most suppliers catalogs you’ll see a very
noticeable difference in temperature from ambient air torches (big
bushy flame) to oxygen fuel gas torches. The trick is using the
right torch tip and line PSI settings for the project at hand. A
number 7 little torch tip can do much more than you might think. One
other note, I learned soldering with acetylene air systems, the good
old presto light system. You can solder anything if your preparation
is good and you are determined enough.

Brass is nasty stuff to solder so, as has been mentioned, getting in
and generating heat quickly is key to success. Also use a barrier
flux to protect the metal, either boric acid and denatured alcohol,
prip’s or the magic flame diluted down with denatured alcohol. You’d
be surprised how well the brass looks when using a barrier flux
compared to none at all.

By the way I always use my left hand to hold my torch and dominant
hand to hold my solder pick or tweezers. I also try and teach my
students the same method, however, everyone is different and what
works for me does not necessarily mean it works for everyone else.

Hope this helps.

Thackeray Taylor
Rio Grande Technical support
Teaching beginning soldering and intermediate soldering classes
800-545-6566 ex 13903

Brass gets VERY dirty, VERY quickly when soldering.

Kathy

Brass gets VERY dirty, VERY quickly when soldering.

Gosh, Kathy, I don’t understand this. I work in brass all the time.
I don’t think it gets any “dirtier” (what exactly do you mean by
this?) any more quickly than silver, copper, or nickel-silver. Of
course it should be fluxed and heated quickly, as several others have
observed.

What is really difficult about brass is finding suitable solders,
that is, ones that are a good color match for brass and have
different melting temperatures (and, of course, that flow well). I am
jealous of the range of silver solders (high, medium, low) that
exist.

Judy Bjorkman