Beginning engraving?

Hello,

I am a student jeweller and would like the benefit of some advice. I am interested in starting some engraving projects…but need advice on tools.
What do I need to start?

I have been watching some videos and it looks interesting. I live in the U.K. And from what I can gather the tools have different names in the U.K. And the USA.
The videos tend to be American, but I will be shopping in the U.K…so thus I am confused.

I don’t want to buy any electrical device as engraving may not be for me…so what do I need to buy…a couple of scorpers to start with handles…what size and shape? Wax bowl? I also don’t want to be burdened with a huge outlay, so what is a good starting kit? Then if I really enjoy it, I can buy further tools.

Thanks for your help in advance,
Ursula

Hello Ursula, I am a retired UK goldsmith, when I started to learn engraving I started with a square graver, like this one from Cookson;http://www.cooksongold.com/Jewellery-Tools/Gravers-Square-2.5mm-prcode-999-BBM the important thing to learn is how to sharpen the graver. I can recommend this book; Engraving on Precious Metals, by A Brittain, see; https://www.amazon.co.uk/d/Books/Engraving-Precious-Metals-Brittain/0719800226 this book will guide you through all aspects of learning engraving the old way.

The photos show my practice copper sheets from my apprentice days. Also one of my picture engravings from those early days.


Good Luck,
James

2 Likes

Ursula
First of all the word… “scoopers” is not
a common word over in North America. But I am familiar with is. The word over here is “gravers”,
I think the most basic selection would an Onglette
#1 & #2… as these are slightly barrel-shaped in their design. These would just be the very basic
in your immediate needs. The next graver
would be a Flat-shaped, as opposed to the
Onglette that I mentioned. These Flat gravers
are 1.4 mm’s in width, I prefer a number 40!
These three will be your good & close friends
for many years to come!
I know of some tool suppliers, but if you
want names, contact me off-line! I don’t want to
cause tool supplier problems, but I would
like to help a fellow Englishman.
"gerrylewy18@gmail.com"
On Ganoksin we are all here to help!
T.T.F.N.!!
Gerry! from my Toronto IPhone
(-5 GMT)

Hi Ursula,

We have been shipping orders to UK.
Trying out engraving doesn’t have to be expensive.
Check out the thread “Inexpensive way to give it a try”.
Inexpensive way to give it a try - Engraving Forum.com - The Internet's Largest and Fastest Growing Engraving Community It is inspirational to see what Lucie is doing engraving the large plates of maps for reproducing engraved prints. In this thread you’ll read I was sharpening a graver and sending it free with a simple handle for a few to help them get started. If you’d like, email your mailing address in UK and I’ll sharpen and send one along with a piece of copper plate for you to practice on. Steve@LindsayEngraving.com

Concerning hand engraving terminology www.EngravingGlossary.com should be helpful.

Engraving can become addicting! lol! My father, Frank W. Lindsay is a watchmaker & jeweler. He started learning gun engraving when I was a kid in 9th grade in 1973. We worked at learning it together. I kept with it through high school and college. Since 1980 it has been my living.

College for me was at a machine tool tech school and so I have been making my engraving tools through time for my own engraving work and later for others. These tools are on the site: www.AirGraver.com

We do have manual engraving tools on the website. To find them click here:

and at the menu at the top of the page click “Manual Operated Engraving Tools”. There are several sets there that include the Lindsay template sharpener. If you order something from the site, see the note about the free graver beads. They have two uses, 1: they can be used for identifying graver on your bench, and 2: used as a length gauge for resharpening. I’ll attach a couple pictures about them. Also they are talked about in this thread: Fast Resharpening Video - Engraving Forum.com - The Internet's Largest and Fastest Growing Engraving Community

There is a chart at the bottom of this page link with the pros & cons of the various graver steels:
www.airgraver.com/graver-blanks.htm
Prices of the graver blanks are also there:
HHS graver blanks $6 ea., M42 graver blanks $10 ea. and Carbalt™ $15ea.

Stuller also carries the Lindsay template sharpener, templates and graver blanks. So look for them there too.

I have been using the 116 degree Universal point for 95% of my engraving. It is a $23 template. There is a flat/knife template also $23 for making any width flat, or you can take it further all the way to a knife edge, and then place a heel on it to make a very tiny flat that can be used for undercutting gold inlays.

We ship international. To figure shipping cost. Click on the “add to cart” buttons on the website and then in the checkout select your country and it will figure shipping automatically. Metal Engraving Tools Overview Prices Ordering Overseas orders for the AirGravers are shipped by FedEx International. It is usually a 2 to 4 day service.

Here are various links to graver sharpening information that may be helpful:

Benefits of the Lindsay graver point geometry
www.AirGraver.com/graver_point_geometry.htm
Sharpener instruction page
www.EngravingSchool.com/private/Lindsay%20Sharpener.htm
Sharpener length gauge distances

Using an inexpensive drill press for a power hone

Video - New power hone & process of sharpening a new blank using a hone

Video - Quick resharpening:

Engraver Tim Wells made a video of the process with the diamond bench stones

Onglette Template

11 hours of engraving videos thread:

Basic cutting video tutorials:
www.EngravingSchool.com/private/tut1.htm
www.EngravingSchool.com/private/cut-together.htm
www.EngravingSchool.com/private/designs.htm

Best Regards, Steve
Steve Lindsay Engraving and Tools

www.EngravingClasses.com

www.EngravingGlossary.com

1 Like

I was going to recommend that you check with Steve Lindsay. He has pretty much everything you’ll need to decide if learning engraving is a journey you really want to pursue. He’s a great guy and really knows his stuff. His tools are absolutely top notch and he’s very helpful.

Another source that you will no doubt become familiar with is GRS. They also have many tools and are extremely helpful. They offer all kinds of classes and clinics, one or more of which may be just the kind of experience you need to decide if engraving is for you before making an investment in tools you may not use. You can get a catalog with a phone call to (800) 835-3519 or you can look at their website, grstools.com. Personally, when it comes to air powered hand pieces though, the Lindsay Airgraver Classic is my favorite. I have both the GRS Gravermax and Lindsay systems, and there really isn’t any comparison.

There are many different disciplines involved in engraving. Most people tend to want to run before they can walk and begin at the wrong place, trying to actually cut metal with no real knowledge of any of the other disciplines. The most important tool for an aspiring engraver to master is the pencil. My dad used to say “If you can’t draw it, you can’t cut it” and no truer words were ever spoken. In engraving circles as in many other artistic endeavors, it’s frowned on to copy other people’s designs and claim the engraving as your own work. If you want to earn a solid reputation from your fellow engravers, you must be able to design your own work.

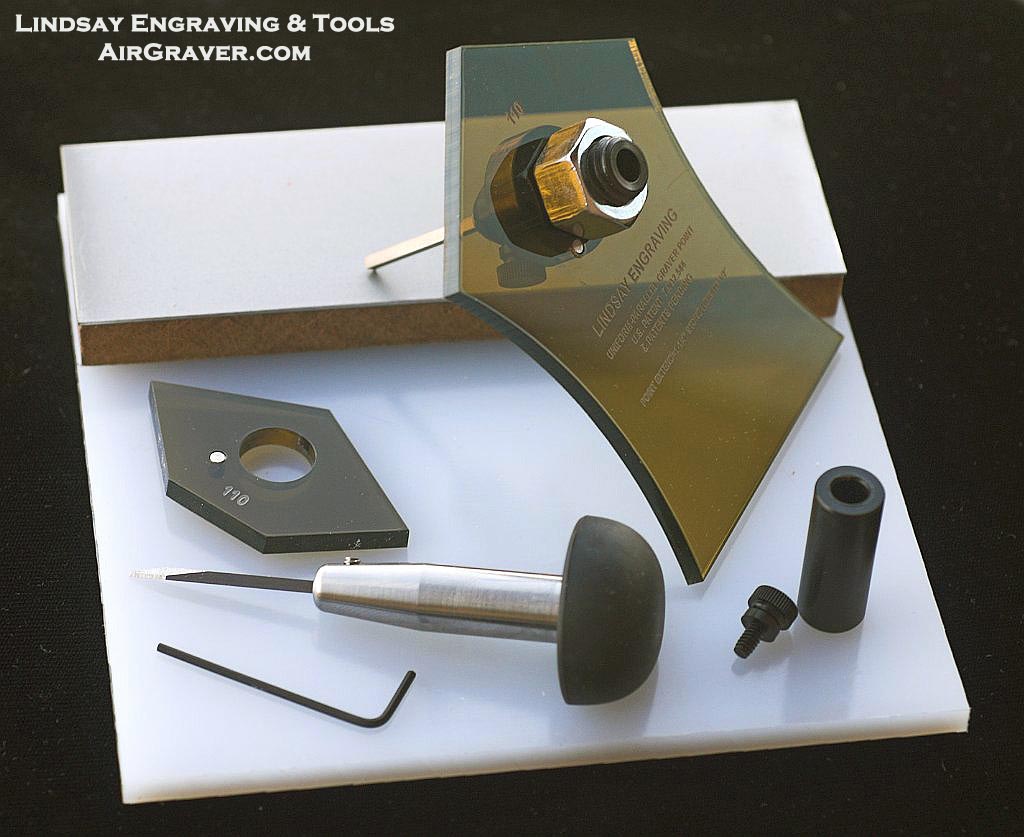
The next most important and under-valued skill is graver preparation and sharpening. Square gravers are the most used shape in lettering and decorative engraving. They are made from square blanks and I would say that shaping and sharpening the blanks using the Lindsay sharpening system is the easiest way to go. It cuts the learning curve from months or even years to a few hours.

Other gravers you might find useful later on when your portfolio and skill level increases beyond the basics include the flat bottom graver known as a “Scorper” or “Square Scorper” on your side of the pond, the round bottom “Dotter” and the “Lozenge” which is a “diamond” shaped, nearly square graver (more tall than wide) which can be sharpened like a square script graver or shaped with a flat belly ground on the bottom and used as scorper. The lozenge scorper is useful when clean and sharp sloped sides are desired on the sides of a straight or wide cut rather than the square sided cut produced by a standard flat graver or square scorper, which can end up a little ragged.

Another graver style that is very useful in jewelry engraving is the line graver sometimes called a “Liner” or a “Stitch” graver as the old-schoolers call it. The numbering system sounds confusing but it really isn’t. The first number refers to the number or width of the graver, the second shows the number of lines it produces. Liners are commonly used for producing florentine finishes (a sort of cross-hatched pattern) as well as providing for a quick method of filling in background or filling wide lines on lettering styles like Old English.

An onglette graver, sometimes called a “knife graver” or “knife edge”, is a very steeply ground graver style similar in shape to a knife blade. It is mostly used for stone setting, although it is useful in engraving for undercutting for inlay work. The old school, Old English term for an onglette graver is a “Spitzsticker”.

An engraver’s block is almost a necessity for holding the work, but an inexpensive method that is useful for holding practice plates is to make a round wooden disk about five inches in diameter and about 1 1/2 inches thick. Drill four holes on a flat side and use the heads of flat screws to hold the plate. The disk is supported on a sandbag or similar heavy pillow so that it can be turned by the free hand. A flat, round shape, slightly larger than the wooden disk is best, if available. Round leather, lead shot filled pads for working with platters and plates are ideal for this purpose. They used to be carried by engraving and jewelry supply companies, but I haven’t seen one for sale in many years. A Google or Ebay search might turn one up. Contrary to popular thought, the graver isn’t pushed into the work, the work is turned into the graver. The hand and wrist holding the graver remains fixed, using only twist to control line width

A few books that you might find helpful and that should be in your library if you want to find out exactly what’s involved in artistic jewelry engraving and lettering:

“The Art of Engraving” by James B. Meek. If you only get one book, this is the one.
“Engraving on Precious Metals” by A. Brittain and P. Morton
“The Jewelry Engraver’s Manual” by R. Allen and John J. Bowman.

These three books are kind of old school. The last two are actually text books from the 1950’s, so they are a little short on new technologies. But it sounds like that’s more what you are looking for than power assisted engraving. Engraving as an art-form has been around for centuries if not millennia, but air-powered tools and high-tech sharpening tools have only been with us for a few decades. Old-school tools and techniques still work just fine, they just take longer to figure out and master.

For learning how to use a pencil for designing scrolls and other decorative work:

“Advanced Drawing of Scrolls” by Ron Smith is an absolute treasure. This is more than just a how-to book of scroll design and construction. Through several short essays, Ron Smith delves into his life-long journey of engraving, how to price your work, how to market your skills and even the history and philosophy of engraving design as an art form of it’s very own. This is a wonderful book even if all you want to do with engraving is apppreciate the art of others.

I hope this is at least a little helpful. Learning engraving is not easy or quick, it’s the pursuit and journey of a lifetime. The disciplines are many and the learning curves are steep. But if you have some persistence (stubborness?) and aren’t prone to quitting at the first hardship, it can provide you with never-ending challenge and personal satisfaction.

Dave Phelps

1 Like

David
Your response is so worthy of saving &
then printing.
I spend many hours explaining setting but then I say I can teach you what I know but one I can’t teach is my 58 years of experience
This skill is never learned in a 3, or a 5-day program
This take months or multiple of YEARS!
I was asked to teach bead-setting in a
3-day program. Many of the mature
students couldn’t even put the graver
into their handle. I was then blamed for not
teaching well!
Gerry! from my Toronto IPhone
(-5 GMT)

Thanks for your reply to my question. I will sit down with the Cookson catalogue and try to figure it all out.

I do appreciate how you have taken the time to answer my Delimma and given your advice very succinctly.

Regards,
Ursula

Dear Dave,

Thank you for your very considered answer to my question. It is wonderfully useful. I hadn’t realised I was opening such a can of worms…and like all students I want to run before I can walk. I will sit down and study several books and I will try to get the ones you suggest. This has been my failsafe method when I have an idea to try something new (for me). I have collected a lot of books on Jewellery making, so I will check what I have first and look to your references as well. Always remembering to start small, make a design, transfer it to the metal and then see how I get on.

You have been very generous with your advice and knowledge, so thank you yet again.
Warm regards,
Ursula

Hi Dave,

I really liked your careful advice post for Ursula. Very well thought out. But I did see one little problem: Onglette gravers (scorpers) are very seriously not knife gravers. The whole thing that makes them so useful is that they’re not knife shaped. Knife gravers are a pure “V” shape. Straight walls all the way to a pointed belly. Onglettes look like knives, but if you look at them point-on, you can see that the 'V" is curved out slightly. So it’s ever-so-slightly convex. That’s the core part of what makes a spit-stick so useful. Spitsticks have a funny grind, they’re not sharpened like a normal graver. You sharpen them so the face is at an angle to one side or the other, such that the spitstick cuts with its side rather than the very bottom-most point. (sort of like a skew chisel in woodworking) The critical thing about the slightly curved side walls is that they allow you to choose where on the side the thing is cutting, just by rolling your wrist. With a knife, you’re either cutting only at the point, or all along the flat side face. With a curved onglette, you can choose which spot on the curve is making contact, and control where the cut is happening by rolling your wrist. If that makes any sense. They’re incredibly useful for cleaning up stone settings and all sorts of other tasks. I use my favorite one for anything up to cleaning up solder, or trimming the inside face of bezels once they’re rubbed down.
One of the absolutely most useful gravers to have around, for all sorts of tasks.

Regards,
Brian

Hi Ursula,
Ted here, a silver smith , not a jeweller, down in S Dorset.
I have followed this thread with interest, and have a somewhat different take on engraving that you aught to consider, before you spend a lot of time and effort exploring it as a medium in this applied art game, thats how I see jewellery making!
Do you see engraving as an addition to the main bulk of your
future work? or as an end in itself?
Down here there have been several artisans who just specialised in the engraving of other folks work, being an end in itself.
Of as other jewelers around here, not many I may add, who add just a few extra details to what is otherwise a completed design.
So some folk decide thats what they want to do,
otheres like myself dont do any atall, devoting my time to thansforming the raw metal into an object that speaks for itself without any additional decoration.
Id be interested what your thoughts on this are.
Ted.

What were you thinking when you agreed to do a 3-day workshop on bead setting for beginners???

I truly expected they would have some previous knowledge of using a graver.
I was not involved in the registration or I would have insisted this be the
case…mistakes do happen, agree?

*Gerry Lewy. *
Toronto, Ontario.
Canada.

If I had one word of advice to any one picking up a graver it is this…
Preparation. It’s ALL about the prep.
It will need to be shortened to your hand size. Then you will need to grind away a bunch of the metal near the cutting surface.
Polish the snot out of the belly of the graver and sharpen it to surgical scalpel sharpness.
The better the polish and the sharper the cutting surface the prettier and easier it cuts.
There should be some tutorials here on this. Most likely by Gerry Lewy.
If not let me know and I’ll make it happen.
Have fun and make lots of jewelry.
Jo Haemer
www.timothywgreen.com

ACK! Remind me to never teach there.
XO-Jo

Regarding engraving, it pays to know all you can, and to practice all you
can. I have not put in the time to become a real engraver, but I deeply
respect those who have done so.
The latest issue of Lapidary Journal’s Art jewelry magazine shows some
beautiful work done by Kit Carson. He studied for 2 years with an engraver
early in his career, and still goes back for more training every so often.
I do a little just to set off stones, once in a while. If I were younger
and still had good eyesight I would do more. So if you like it and feel
that it is something to pursue, get some training and practice a LOT.

Noralie Katsu

Thanks for the advice. I plan to put in some practice…and hopefully learn what to do.

Regards
Ursula

Thank you Ted for your advice.

I think at the moment my ideas are to use engraving as an enhancement to metal designs…I am hoping to raise a bowl and use engraving to decorate it on the outside. Just a small silver bowl (958) and perhaps some other borders for jewellery, perhaps a Greek key border. I do like all the Arabian swirly bits on things. Engraving a piece and then perhaps adding layers of wire over the design, building up ridges…no doubt a lot of my ideas will not be feasible, but I would like to have a try.

I am probably too old to start a career in engraving, but I want to understand how to do it. Use my time to take a chance and try my hand , have a go at something new…I met with failure trying out Argentium as an example. There’s no such thing as a free lunch, and there is no easy way to learn without actually trying to make something.

At the moment I want to explore all kinds of different aspects to silversmithing. I have tried my hand at Mokume Gane - once very successfully, and once it was an abject failure! It slid apart…probably because I was getting it too hot!! (Torch firing not kiln firing) I like the idea of KemBoo(?) But it is all a learning curve, and I want to have a go.