Hi everyone, I keep seeing basket settings made by hand on some of my jewelry Facebook pages where the faceted stone is resting on the top ring of the basket and the prongs are just folded over and I can see no evidence of a seat cut in the prongs. Is this really a legitimate way to do a basket setting? I feel like the edges that are in contact with that top ring would be very vulnerable to chipping. When I make basket settings, the stone rests entirely in the seats cut into the prongs. Thanks for clarifying this for me.
By having the stone resting on what I would call the under bezel, it is less likely to move in the setting. The length of the prong is reduced, there by making it less likely to bend. When the stone sits solely in the prongs and it is bumped, there is a greater chance of having the prong move and the stone loosen or come out. This is particularly true of emerald cut stones.
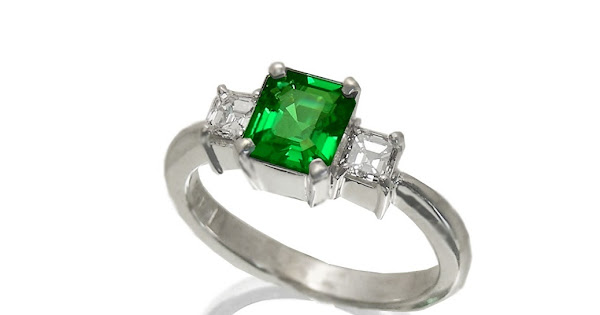
This is my handmade setting of an emerald cut Tsavorite and diamond ring showing the stones resting on the under bezel
Most stones are not the same shape as the burrs used to cut the seats in the prongs. Most setting burrs mimic the shapes of diamonds. Most colored gems differ greatly with no one contour, making it harder to set it properly. Using traditional setting burrs, on colored gems makes it more difficult to match the shape of the gem, and can cause the gems to come loose or even break due to pinching.
Over the years my setting has evolved. I used to cut seats with a heart burr or sitting burrs, now, for basket setting, I’ll use a round ball burr, using different sizes depending where I’m at in the process. I’ll start by using a larger ball burr to shape the under bezel to match the contour of the gem’s pavilion. I will then shape the individual prongs, using a ball burr that more closely matches the size of the prong. I try to shape the prong like this:
By having the prong cut in this manner, it enables the prong to bend more closely matching the shape of the gem without pinching. I’ll often per bend the prong where I feel it should bend to match the stone.
The next step for me, would be bringing the prongs to the gemstone. I do this by moving the prong side to side, while advancing toward the stone. This will strength the prong by work harding it. If you push the prong directly toward the stone, it has a tendency to spring back, and there is a greater chance of breaking the stone from using greater force in trying to move the prong toward the stone. Of course one’s always checking to make sure the stone is level in the setting. Since the prongs aren’t notched from a setting burr, they can be move to take in the contour of the gem.
I feel it’s important that the shape of the tip of the prong is done correctly( see above). Many jewelers leave way too much metal that can create problems.
Tjones
Goldsmith
TJones…thanks for that explanation. Very useful. Bernie, I think you are also asking about the fit in the top of the underbezel. It is usual to taper the inside edge of the top of the underbezel to match the angle of the stone. There would not be a sharp edge against the facets.
Vera
When I’m attempting to set a stone in that kind of setting. I ALWAYS CARVE an angle with my bud-shaped bur, why? I want the Pavillion of the stone to match the angle of the “basket”, (as you name it).
There should not be any sharp edges cutting into the under-section (Pavillion) of your stone. Simple as that!!!
If not, do you really want a broken stone when that stone is squeezed in between the claws to the metal, while it’s being set? This will happen 80% of the time, this setting process is like an “Insurance Policy”. ( I’d rather be safe, than sorry!!! )
My apologies, if I’m repeating this important setting process. Gerry Lewy!
One can never be reminded of this enough. Thank you

