I still enjoy the ‘look’ of a Bright-Cut ‘inside’ of the "Vee-shaped"
claws. When I file at a 45-degree angle on the outside of the vee-metal,
you just don’t see basically a flat surface of the claw. All the sides seem
to blend into together, but the structure is still there! It is almost like
the claw/prongs are invisible…Gerry!
Gerry Lewy
Toronto, Ontario.
Canada!
1 Like
Gerry- Drives me crazy to see V caps unfinished. Just squished and buffed.
Plier marks and all. Ack!
Jo
I have to agree, that without the graver cuts on the inside faces, a V corner just looks like a slightly rounded prong with a rough notch in it.
When, and after I set the Princess stone, I enter a new phase of setting.
I call this sculpturing the “Vee” shape claw/prong, or being totally
creative.
I have never in my 55 years of Diamond Setting a Princess stone have I
entered this process by leaving it alone. I Bright-Cut the inside edges
till they shine, I use a Flat #40 graver & start the cutting from the edge
of the claw until
I get into the junction of the two inner sides. I cut at an angle of 45
Degrees!
Now on the outside, I file again, at a 45 Degree angle to meet the tip of
the claw. In all honesty, I could spend 5-10 minutes for all 4 claws,
during this process. When all of this is done I have literally transformed
a big-hunk of ugly metal into a shimmering almost invisible claw tip. From
above, you can’t see the tip of the claws, as the two top edges seem to
join each other & vanish. This alone, is a craft & skill taught to me 45
years by very own teacher! When I saw this process till completion, I knew
we both were onto a good thing in transforming metal into something of
absolute beauty. BTW, after all of this is done, I use a Pumice wheel of
#180 grit and clean up any file marks…everywhere!!! Then using a
#1,000grit Flat-Faced Pumice wheel & oh my gosh…what a ring to be proud
of!!!
I gave a Princess stone to one of Toronto’s best setter, (I was busy that
day) he didn’t do anything like what I am now proposing to you now. He just
gave it a very high polish…and good-bye!
Gerry Lewy
Toronto, Ontario.
Canada!
Ihave been thinking about the last few posts in this thread, and I am not sure if we agree or disagree about the way to finish corner prongs and V prongs on rectangular and pear shaped gemstones.
As a jeweler specializing in repairs for over 40 years, I want to “see some meat”, enough metal holding a gemstone that I have reason to expect the setting to last for years of wear, and I shudder in horror at some of the nearly non existent prongs that I am regularly seeing these days on brand new rings.
There is a balance between function and form. A prong should be crisp and clean, with a finely polished edge on the inside edge against the stone, but also it needs to be substantial enough that the ring can survive for a decade or longer, in normal use without requiring repair.
I want to see metal above, and protecting the fragile corner, but not bulky lumps, or sharp “catchy” edges.
Gerry- I have a drawer full of travers but I live and die by my 42 flat. The only graver that compares is my 38 flat. I polish their bellies til I can see myself in them.
Oh and a very very wicked sharp knife edge graver. The bottom is so sharp I wrap all but a little bit on the cutting edge in blue painter’s tape. The blade is so thin that I couldn’t prepare And shape the blade without loosing the temper. Thankfully an old master engraver taught me how to draw straw.
1 Like
"Draw straw’, I like that.
At Bowman, it was not just the hand engraving students who learned how to make, harden and temper gravers. I never heard that term but it certainly is apt.
1 Like
Hello Shawna,
I have modified a crucible holder to take crucibles round or square from about 45mm to 70mm. It’s a standard holder with the addition of a car exhaust valve which is spring-loaded to apply some pressure. Also, quite important, is the adjustment screw is well away from the heat.
Here’s a pic with a 45mm crucible:
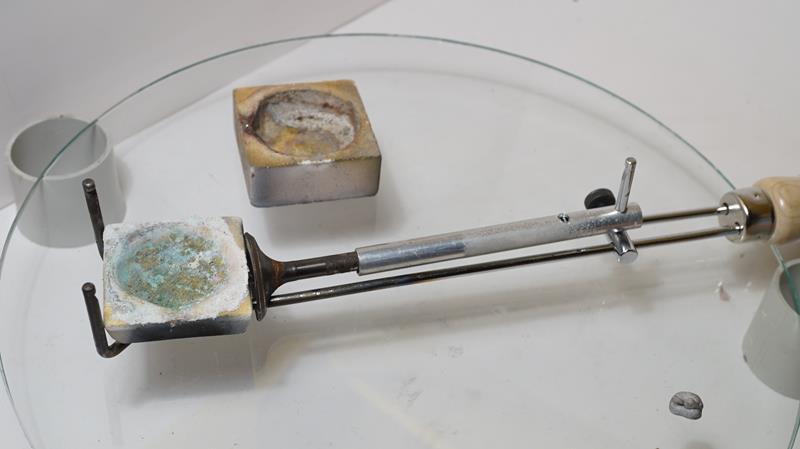
and a 50mm crucible:
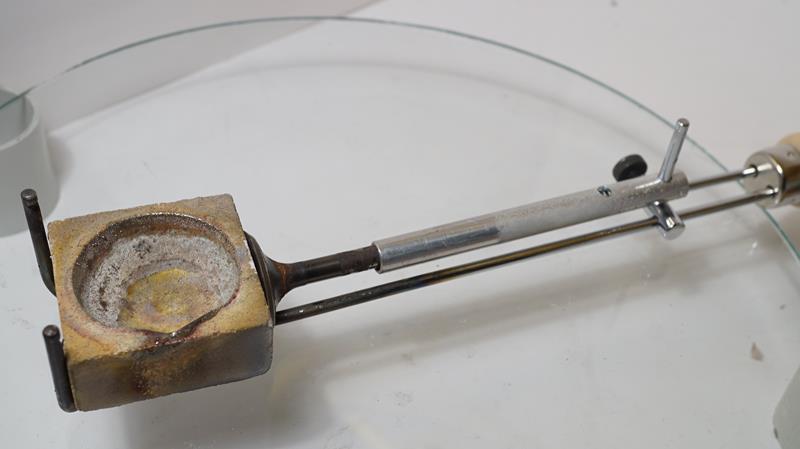
It’s based on this one that I saw someone using:
and I liked that, but couldn’t find a supplier. So I adapted one that I could buy here.
Brian
I’d love that info to be sent to me as well if I could!
I actually found a pair of bent needle nosed pliers that sounds much like what you described that you had made amongst my tools! So why is it good for wire? I assume you grasp the end of the wire using the groove - but why?
What differences does it have and does it make to use that over, say, nylon pliers or flat needle noses? What advantage does the groove gripping the end of the wire do for what sorts of tasks?
Trying to think of where I would find that useful and just coming up blank.
1 Like
Pin Vises! A set of 4 different sized ones is very inexpensive, and can easily hold wire of any size while you’re working with it, without maring the wire a bit.
–Jay Whaley


2 Likes