Advice for scaling up production in rural Malawi, Africa

Great Job and keep up the good work.

I would like to help your project in anyway I can , I am starting a Jewelry community called CLOXEY (website) , This I think would be an ideal opportunity for you to showcase your jewelry to retail jewelers all over the world.

I dont charge any commissions on sales or start up fees , Its a free service right now.

wishing you all the best

2 Likes

Since you have a modicum of access to electricity, I might suggest a rotary tumbler and assorted stainless steel shot. This will go a long way to decreasing or removing additional finishing time for scratches that are not deeper than 320 grit. It will also work harden and planish the surface adding to durability and tarnish resistance. Since you are using mild steel dies I am sure you have come to notice the burring that occurs with wear. I saw mention of case hardening and that would probably help a bit. If you could get a steel with a higher carbon content to use for the dies it would help a lot. Mild steel will usually be 1015 to 1030 which is .15 to .3% carbon content. A flat spring steel would be ideal but may not be available close enough to you (I know, relative term considering your distance from the city). If you could find something in the .5 to 1.0% carbon content it will last far longer and give cleaner cuts over its life. Also, die cuts work better when the metal being cut has a good amount of hardness, so avoid annealing to get better cuts.

Keep up the good work. I am sure many more will chime in after me.

1 Like

You know Aggie, funny enough I did start going down this route by working with a welder in the city to construct a bicycle pedal powered grinding/polishing machine. We had some designs sketched up and were starting to source parts when our business received a grant for solar power. Had a hard time justifying spending a few weeks on said project when I could pick up a bench grinder, albeit a large one, for $50 and get on with life haha

That being said, we do have a bench grinder, but have thought about investing in a couple flex shafts. We are having a hard time justifying the costs though if they are just for using a smaller grinding wheel. Do you find you use a flexshaft a lot for sanding as well or is it too difficult seeing as how most of our pieces are flat sheet? We have a few belt sanders for sale locally but the only belts available are in the 60 and 80 grit range.

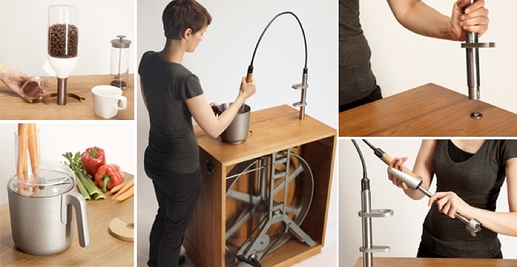
But my dream of a treadle powered flex shaft type machine that can connect to multiple different tools is not dead! Just on pause until time allows me to tinker around with it. You guys ever seen the R2B2 treadle powered kitchen gadget? Think this but for a flexshaft.

1 Like

Elliot, thanks so much for taking the time to reply with so much useful information and tips, really appreciate it! A few questions/comments for you:

Fantastic point you make, rookie mistake on my end when getting the benches built. I have noticed since I sit at the bench most days as well that it puts a bit of a strain on the ol neck/back.
Do you think just cutting down the legs on our chairs/ each person has a custom cut chair for their height will be ok or will that complicate the matter of correct posture more by having a short chair?

Love this design! Our staff are a bunch of chatty Cathys all day long so I think the communal bench would really benefit their social butterfly tendencies. I’ll keep this one in mind for when we (hopefully) expand the workshop.

This is so helpful, seriously. I messed around with case hardening the mild steel by heating it and quenching in used motor oil, read that somewhere on the internet, but it seemed to just barely penetrate the surface and not make a noticeable difference. I’ll save this one and give it a go in the near future. I’ll let you know how it goes when I get a chance in the coming weeks to try it.

I read about using borax cones, but just plain ol powdered borax will do? You just have to make a past similar to handy flux out of it?

We do in fact have a local charcoal guy, I’ll place a custom order with him for large pieces. You think they will need some sort of compression to stay together, or just shape them roughly and they will be good to go?

We’re hoping with the arrival of a rotary tumbler soon to eliminate a bit of sanding. I’m thinking to punch, grind, file, rough sand up to 400 then, solder, pickle, then chuck it in the tumbler with plastic abrasive media. Sound kosher to you?

Very cool pedal powered lathe idea! Been looking at the old Singer sewing machines that are around here just dreaming up ideas of how they can me modified to use for our purposed. That guy really went all out, re-inspired me to not give up on using that resource.

:rofl: :joy: Have you been here before?! Haha, there are a few guys around that I would be worried about being tempted to come try to snag the alcohol if they caught wind we had 96% in the shop! I’ll keep my eye out for acetone next time I’m at the hardware market.

We initially started with bigger pieces, but we weren’t happy with the amount of tarnishing/fingerprints that showed up on larger pieces. The tarnish wasn’t an all over even one, it would show up more spotty, so we have strayed away from large flat surfaces more these days.

Thanks again Elliot for all the advice and time, can’t thank you enough!

1 Like

@fbroz, cheers for the info!

Funny enough, I reached out to Tim McCreight about that project and he showed interest in coming out to Malawi to visit our workshop, but then Covid happened and the world went on pause :unamused:

Never heard of MEST before but looks cool indeed. Would love to get your pals contact info, never know where these things can lead!

40 years?! I bow down to your knowledge. Honestly, any advice/tips on improving workflow and production speed is what I’m after so whatever you got on that front, bring it.

Always looking for retail outlets, we have about 20 or 25 stores now but always looking for more!

I’ll reach out to MJSA for sure, would love to get our team featured in there!

@royjohn, thanks for the info!

Do you mean hand sand up to 400 grit and then move on to the tumbler for the rest? And yes I agree about the vibratory tumbler, but can only find rotary ones on the continent, so hopefully we can make it work!

So if we are trying to achieve a matte finish, we would in this case probably use steel shot, then a quick wipe with steel wool. Would this negate the tarnish resistance the steel shot planishing action imparted? Also, you’re saying we could just hand sand up to 320 or so and throw it in with steel shot straight after that to remove smaller scratches?

The brass sheet we use comes dead soft. Any advice on how to harden brass sheet? I’ve never heat-hardened before if you know this process?

1 Like

Hi Kyle,
– Bench height, cutting down the chairs’ legs would work depending on how tall each jeweler is. You don’t want to sit for long periods of time with your knees bent more than 90°. Taller jewelers would experience quite a lot of discomfort in sitting on very short chairs.
Better would be to add another bench top at the appropriate height. Something that sits on the existing top, rather than rebuilding the entire bench. If you do that think about adding bench pins and arm rests to the top.

– Borax, yes just plain powdered borax ground with water to a thin paste.

– Charcoal, the density of the charcoal will depend on what sort of wood it is made from. Even relatively soft woods will give usable blocks without needing compression, though they will not last as long. To keep the blocks from breaking apart after repeated use bind them around their perimeters with binding wire.

– Tumbling for clean up. You can get quite a nice surface by going through several grits of abrasive media in a tumbler, but that’s not my area of expertise. Others can give you better advice on those processes.

– Larger pieces tarnishing. You should think about lacquering on larger pieces. There are several companies in the US and Europe that make lacquers specifically formulated for protecting brass and other copper alloys. While these don’t hold up on rings or anything that gets extensive wear, on a large pendant or necklace, which would likely not be worn every day, they should protect the brass for a long time.
There are also high-tech clear platings which will last years. Now that you’ve got electricity that could be something to investigate, though importing the supplies might be economically prohibitive. And the chemicals themselves may raise your prices too much.

– Heat hardening brass. The technical term for this is precipitation hardening. Most of the brasses jewelers work with will not harden via heat treatment. There was a nice discussion about this some years ago on Ganoksin. Read all the way to the bottom.

For simple brass like you’re probably using, best to work harden it by rolling it. Get your sheet a bit thicker than you need and then roll it down to the thickness you want. This will work harden it significantly. How much you’ll have to thin it to get the desired hardness without it cracking in the mill may require some experimentation.

– Cleanliness of the tools. When working with non-ferrous metals any dents, dings, or surface irregularities in the tools will show up on the work. It is important to keep the working surfaces of hammers, anvils, and bench blocks smooth and polished so that the work is not marred by the tools themselves.

Hey Kyle

You are getting some great advise from some very knowledgeable jewelers.

I do not do much mass production work but I do a lot of pre-finish work with flex shafts going all the way to final finish. I find this much safer that my polishing unit and with a optvisor while working I can see what I am working on. Note I always wear a 3M respirator as the work is in right in your face and if I was not wearing a optivisor I would be wearing safety glasses. I like to use a slotted mandrel with 800 grit emery to clean up all kinds of projects before polish. Don’t know what your solar power output is but my flex shafts are rated 1.7-2.0 amps at 110v.

I do use a Magnetic tumbler to brighten up castings. I don’t know if that would work for you as it will not remove any tooling marks.

FYI Rio Grande is a sponsor for Tool Box and Ganosin and Suller is also a Gansosin sponsor.

I will PM you contact info for my pal.

Cheers
Franz

2 Likes

Seriously great info guys, really appreciate it. I’ll look into making some of these improvements and keep ya’ll updated.

Just inquired about a flex shaft from South Africa to see about getting one up here as well.

Cheers for taking the time to give me so much advice!

A couple of things that would help you -

  1. If you could apply some kind of texture to your material, you wouldn’t have the finger printing problems. Texture can come from patterns in steel or hammers or rocks or even etching.
  2. when you punch your dies, if you cut the dies with an angled die, you won’t have the extra stuff hanging down that takes so much time to remove. Information on cutting dies is easily found in the book by Susan Kingsley - Hydraulic die forming for artists. It is back in print. Or if you aren’t cutting your own dies, Dar Shelton at www.sheltech.net does a fantastic job. The dies from him are hardened and last pretty much forever. If you cut your own, you do not have to harden them, they just don’t last as long. You can also make simple 3-d shapes with the information from the book.
  3. when I run production, I clean and smooth the pieces with an abrasive media in a vibratory tumbler. The abrasive can be in shaped media or even pumice mixed in with some plastic media. This leaves a slightly satin finish that takes patinas very well because it leaves a bit of “tooth” on the surface. The same media can also remove patina from the raised surfaces while leaving patina in recessed areas.
  4. You can get a very nice shiny surface after using the abrasive media in the vibratory tumbler, by running your pieces in steel in a rotary tumbler.
  5. If you would like more detailed information, I’m available to help. My email is judy at marstal dot com.
  6. Specifically I can help with times, kind of media and abrasive, surface texturing, etc.
2 Likes

I have a blog that would be so very useful for you. Although it is mostly geared for gemstone setting, there are many aspects of my blog where jewellery would be quite useful. Go to “gerrysdiamondsettingessays.blogspot.com”.
There are here 127 essays, where no matter where you live, these will be so very helpful. These topics range from how to sprue wax rings to the main ‘tree’ to how to set stones in wax. The reading time could be in excess of 2-3 months, to read all of these topics, word for word!.
Very soon, I will be starting to give an 8-week setting course of 1.5 hours setting session. But this is not official until the class is given the ‘green light’ sometime this week.
This is all on “Zoom”, I suggest this for everyone, including you! I wish well in your learning!

2 Likes

@judyh Cheers for the tips. We are making our own dies on an angle, we actually have a copy of Susan Kingsley’s book in the workshop that we brought over a couple years back with us, it is so helpful! We might revisit our angles as we are still getting some burs, but then again that might be from only having dead soft sheet brass, we’ll play around with hardening it in the rolling mill to see if that helps.

I’ll send you a message to pick your brain about our specific tumbling setup to see what we can improve/try out, thanks for the offer!

@gerrylewy18 I will check this out in the next day or two. We have a long term goal of getting into stone setting with gems from a local mine, so will be very useful. Cheers!

1 Like

Yewomalawi, like so many of the others here, I am impressed with what you are doing! I have been making and enjoying brass jewelry for over 40 years, so maybe I can offer a few ideas.

To cut down on your grinding time, I highly recommend the Cratex rubber abrasive wheels (available from Rio Grande and probably elsewhere). I use the 4" X 1/2" wheels, set up in a drill which is fixed upside down in a drill holder ( you could probably make your own holder – just make sure it holds the drill tightly). I use Coarse, Fine, and Extra-Fine grit wheels. File off any burs on your brass piece, then smooth the edges (or anywhere else) with the Cratex wheel(s). I go directly from there to my tumble-polisher, for a shiny finish. Or, if I want a matte finish I use my vibratory tumbler.

I never lacquer anything, but prefer to “oxidize” my pieces, using Jax Black (this stuff can be used for a long time). I dip the piece into the Jax Black until it has just turned black, then remove and rinse twice in water (if you leave it in the Jax too long, the “color” will flake off). Then I hand-rub the piece with damp pumice, removing the black where I want, and leaving it in the recesses of the design (or wherever I want it). This works well for me, and the whole process seems to help the brass not tarnish too rapidly – if it does, I rub it with a silver-polishing cloth, or with 4/0 steel wool. When a customer buys a ring, I suggest that they wear it through everything (dish-washing, showering, etc.) and they will likely never have to polish it, and it may not leave any marks on the skin beneath the ring. If there is no black in the recesses, some brass jewelry can be quickly cleaned in a commercial jewelry cleaner called Tarn-X – dip, rinse, dry (and do not EVER soak anything in Tarn-X). If you wish, I can e-mail you the list I give my customers of suggestions for cleaning base metal jewelry.

This brings up another suggestion – can you branch out into using additional base metals like copper and nickel-silver? They allow for nice contrasts in color, and copper can be fire-oxidized to a permanent red/gold/etc. color. Nickel-silver, if polished, looks almost like sterling, and can be soldered with silver solder.

With regard to cleaning off the oxidation from heating brass, the vinegar/H202 is good, but if you have access to nitric acid, I recommend that (assuming you don’t have children around your workshop). I dilute it by half, with water, and put the brass pieces in-- in seconds, the oxidation is gone, and the brass has a wonderful gold, matte finish. Rinse very well in a baking soda solution and in water, and dry. I have used this system for years, and have never had any problems with it. Of course, I do not allow anyone near that part of my work area unless I am with them.

If you branch out into different styles of jewelry, 20-gauge brass is certainly thicker than needed. When I make pins, I usually use 26-gauge metal sheet.

Well, I could go on and on. Please contact me if you have any questions or comments. One other thing-- do you ever have anyone that comes to the USA? I would like to get rid of most of my jewelry-making books (this would be about 60 of them, very miscellaneous) and would be happy to give them to you, if you can arrange to take them to Malawi. I would not be willing to box and mail them to you.

All the best, and congratulations on what you are doing!

Judy Bjorkman, Owego, NY (LenandJudy@stny.rr.com)
3 Likes

Thank you for sharing what you are doing - so inspiring! - and the beautiful space you have created with your artisans. No advice from me either - just glad you’re here. :slight_smile:

1 Like

@Judy_Bjorkman I’ll look into the Cratex wheels, been looking for a good quick option for obtaining a nice smooth edge on the sheet brass, this might work if I can source it of course.

I’ll definitely look into finding nitric acid. Will this get rid of the copper surface or just the excess flux and black crud from soldering? The vinegar/H202 does work okay, but results can vary in a production environment as the H202 becomes less and less effective the longer we have it mixed up and exposed to light.

Regarding your books, what a kind offer Judy. I would be thrilled to have so many resources to share with our team. My partner Maddy and I bounce back between the states and Malawi so we could haul them over next time we visit the states. I’ll message you here shortly. Cheers!

@nataliehanson Thank you for the encouraging words, glad to be here as well!

Kyle, sorry to be so slow responding! Nitric acid will not do a good job of getting rid of excess flux and black oxidation — that must be removed in the pickle, ahead of time. The nitric acid gets rid of the red copper (oxide) surface, and exposes the lovely gold of the brass. As for effectiveness, the dilute HNO3 does last longer (and works a lot faster) than what you are presently using. But after a time, it too becomes less effective, and you must add more acid (very carefully!). At a certain point, it becomes very dark blue-green and it may be hard to see whatever you are bright-dipping. Then you may want to start with a new dilute solution. Getting rid of the weakened nitric acid must be done carefully. There are several options for this — perhaps someone here can recite them. If not, I’ll look them up.

I’m in the process of boxing up my jewelry-making books and would be happy to mail them to North Carolina, when the time is right, and when I have an address for you! There are some of my books which I am not giving up — e.g., Tim McCreight, The Complete Metalsmith Charles Lewton-Brain’s book on Fold-Forming, and a huge book on the jewelry of Alexander Calder.

All the best, Judy Bjorkman

No worries Judy!

Found one chemical supplier here in Malawi that shows they have nitric acid, waiting to hear back. Their website shows they have “Nitric Acid 55%”. Is this the same percentage you use or close to it?

As for disposal of used nitric acid, any precaution and recommendations are welcome. While using it for bright dipping, do you use any sort of respirator or PPE?

With regards to the books, I don’t blame you for keeping on to those, we have a copy of The Complete Metalsmith in our workshop and I too wouldn’t let it go! Due to flight restrictions and cancellations at the moment, it looks like we won’t return stateside until May. We do have a friend that does our distribution that could receive them for us and hold on to them until we return though. Let me know if that is ok for you and I’ll private message you the information.

Thanks so much Judy!

1 Like

Kyle, I really don’t recall what % my nitric acid is. I looked on the bottle I have, and it doesn’t say (BTW, the bottle is stored inside a plastic pail, which is sitting in a plastic dishpan, underneath a table where no one else goes! I think that 55% would be fine for jewelry use and would still need to be diluted. On Wikipedia, it says:
“Commercially available nitric acid is an azeotrope with water at a concentration of 68% HNO3. This solution has a boiling temperature of 120.5 °C at 1 atm. It is known as “concentrated nitric acid”. Pure concentrated nitric acid is a colourless liquid at room temperature.”

As for disposal of used HNO3, I can’t find my comments on it (at the moment), but will send anything useful, when I find it! I recommend your looking on Google for the safe disposal of used nitric acid. They talk there about further dilution with water and then flushing it down the drain(!), but I don’t know if the septic system(s) in Malawi would be up to that. I prefer going in the direction of neutralizing the acid with sodium bicarbonate. Buy some pH strips, in any case.

When using the bright-dip, yes, great care is needed. Nasty fumes come off the solution (even if you’re not using it — I store mine in a glass pie-plate, covered with a glass top, labeled “Warning: Nitric Acid"). It fumes more, when you put the brass into it — you do NOT want to breathe any of this!! I stand up-wind of a little fan, when I’m working (but I only do occasional small things, and I’m working in a large room with a high ceiling and in warm weather have windows open). For more frequent use, you would need to work out a better system — a hood for withdrawing fumes from soldering and bright-dipping would be good. Wearing rubber gloves may be helpful — getting the acid on your skin will turn it yellow, a sign that greater care needs to be taken! I do not use rubber gloves for this; I handle the jewelry piece with steel tweezers with pointed tips, to withdraw the piece of jewelry and to place it into my solution of sodium bicarbonate to neutralize the piece for further work. I have only once in about 40 years gotten a little patch of yellow skin. But I try to work rather slowly around the acid. My own diluted acid is presently quite weak, so I bought a little cheap timer to remind myself that, say, 3 minutes may be long enough for the jewelry to be sitting in it (sometimes it’s not—I really need to get around to adding a little more acid). If your diluted acid is fresh, its action works in seconds. I do not have a good suggestion for, say, a fume mask. I have one for hard-soldering, but don’t know if it’s appropriate for nitric acid fumes, and I didn’t have much luck on a quick check of Google.

I have another thought — I have several old notebooks of things I copied off of Orchid/Ganoksin in its early days (around 2000 and after), before it became limited mainly to gold-and silver-smiths who work for a living. Folks who worked with base metals for fun or profit used to have good discussions there. If you’d be interested in my sending along those 3-ring binders, they’re yours! A few sample topics (mostly only paragraphs long): citric acid; testing amber; using toothpaste to clean metal; drilling glass; jump ring maker; boric acid; Pripps flux; etching; home-made light box [and many, many more]. You could just throw out what you don’t find useful.

I would be happy to send any boxes to your friend who does distribution, to hold them for you.

All the best,
Judy Bjorkman

1 Like

The non lab version of neutralizing acid is baking soda. Put your acid solution into a large preferably glass container like a bowl. Add the baking soda a little at a time. It will bubble a lot at first so go slow adding the BS. As it neutralizes, the bubbling will slow down. Swirl the bowl carefully to make sure it mixes up, or use the steel tweezer to mix it periodically. Once it no longer bubbles it will be fine. You could put it down a drain, but I’d let to evaporate the watery part off and take the dried remainder to a place that deals with chemical waste. There wont be much waste. Problem is older sewers probably even in Africa used copper. The acid if it was done be everyone would eventually (years) weaken some spots. It also depending on where the drain processes the waste. Err on the side of being responsible and treat it by not dumping it down the drain.

1 Like

Thanks, Aggie! I seem to remember some discussion related to dumping the leftover waste (in small quantities) on soil where the nitrogen would be helpful. But of course I can’t find it at the moment…

Judy Bjorkman

1 Like

WOW WOW WOW! You are an inspiration.
Now I have a question: what do you have in the way of air filters/protection for everyone’s lungs? I understand that electricity comes at a premium so having solar power is excellent. This is a huge issue right now for me because of the fires that have been burning here on the Left Coast. I don’t have any suggestions but just want to make sure that you have something to help your lungs stay healthy.