We have discussions going back to 97 with people sharing thoughts on media. How about an update?
If you work to a mirror finish, does a tumbler fit into your routine? What steps does it take the place of? When do you use it. What is your favorite media, shot or ceramic? Does anyone use red buff?
1 Like
You can take a look at Judy Hoch’s book Tumble Finishing for Handmade Jewelry, Mass Finishing on a Small Scale. There is lots of good information in her book and I think that I read that it is in review. In the early 90s I was doing a lot of shows and looking for a way to polish my jewelry that didn’t include standing in front of my polishing hood for hours. I also worked a full time job. After sending samples of my work to Rio, I bought a large vibratory flow through tumbler and three grades of media that were to take me from just fabricated to high polish. A high polish had always been my standard and still is. With a lot of preparation so that I was presenting a consistent finish, I could get to an acceptable finish on smaller pieces, but my signature heavy bracelets with lots of flats surrounded by very regular low spots still needed to spend time on the wheel. There was always a spot or two that needed to be touched up. Once on the wheel, I just polished them like I did before I bought the tumbler. Fast forward many years and I retired and started making more jewelry. I bought three smaller vibratory flow through tumblers, one for each media, and I do use them on occasion, usually to dull an already highly polished piece so that I can transfer a design to it to be engraved. I have recently tried to use the coarse media to remove flashing from pieces of Niobium, but have found that Fabriluster on a wheel does a quicker and better job . I also have a 6 quart SS shot tumbler that I use a lot. I have a recently electroformed piece in it right now to see what kind of finish it will create on raw electroformed copper. My shop is full of tools. Some I use all the time, some occasionally and some rarely. Used rarely is what I would say about my tumblers with the exception of the SS shot tumbler. You might say that I have a tumbler museum. This is mainly because I still need to get a high polish first, even if I then texture the piece, and I have never really been able to get it reliably with a tumbler. I accept that I may be doing something wrong, but I am obsessive about my finish and just find it easier to polish using 6" wheels…Rob
1 Like
I love this…“You might day that I have a tumbler museum”
We have what I call a tool museum. Two people both totally unrepentant tool junkies. No one here to say “Uh sweetheart. Do we really need another”(fill in the tool of choice here)? It’s a sickness I tell you:-)
Jo
1 Like
Jo…I too suffer from tool envy. I have been making jewelry long enough for my shop to be considered a stop on the Jordan Historical Museum’s village crawl. Maybe I will tell my boys that, when I am gone, they can donate my shop to the museum. They can set it up right next to Dr. Fidler’s old village dentist office with drills that were turned with leather belts on pulleys. Everyone my age remembers it with horror. I consider the sale of a piece of jewelry to be one more opportunity to buy another tool. You never know if it is going to work out until you own it. I have had a lot of fun buying tools and making jewelry for the last nearly fifty years and hope to continue to do so for a long time to come…Rob
1 Like
Hi Sharon,
I have worked to a mirror finish on flat/ domed pieces…but only in sterling silver…so I can only speak to that…
Based on my personal struggles, I have concluded the following:
it starts with the metal…sterling silver sheet is not perfect…it has surface and subsurface defects that are often not apparent until finishing has begun…which can be mentally exhausting…
I spent literally years trying to find the perfect supplier/ fabrication process…without success…
…as well as years trying to figure out what I was doing wrong…as I was shifting thru various finishing processes…hand finishing, using a polishing cabinet…flex shaft…large barrel tumblers…vibratory tumblers…magnetic tumblers…most available medias, compounds, buff styles, wheels, etc…I do now have a fine collection of tools…but they were not my answer…
ie: was it circulating debris from my mass finishing media that was getting embedded?..was it from contaminated buffs, buffing compounds, stations…was it from compound debris suspended in my ultrasonic…?..etc…
two main things were occurring:
-
a tiny grit that appeared embedded in the surface…it was hiding just under the surface,but now it was revealed…and when hit with the pre-polish buff, comet tails and drag lines would occur on the surrounding metal…because the surrounding metal was softer than the inclusion…the inclusion was harder than the sterling silver, and would not buff off/ out…it needs to be sanded off with emery, especially if you want to maintain a flat surface, which is a whole nuther thing…
-
a tiny pit…a pinprick hole…imagine a water well built in the desert sand, lined in brick…you sweep away the sand, but the brick shaft remains…the composition of this shaft is also harder than the sterling silver…so, again, comet tails and drag lines would occur
I found the most plausible explanation of what was occurring and why. from a few different sources:
-from a person who previously worked at tiffany and dealt with large, flat mirror finished objects, and explained what I was experiencing…
-in the Brephol book, which explains it in a technical fashion.
here is my un-technical layman’s explanation…sheet is formed from ingots…ingots are formed from molten metal…as the metal cools, stuff happens, and stuff migrates to the surface…(think copper oxides, etc)
in the past, the metal was “planed”…the top surface was sanded/ ground away, to remove most of this stuff, which had migrated to the top…
nowadays, the process takes place in a controlled environment that is supposed to prevent this stuff from occurring and migrating toward the surface…however, In my experience, it does not prevent it from happening…people will (and have) argued with me on this, but, if the stuff is there, it is there…I cannot un-see it…I even went so far as to inquire if dust was getting rolled into the sheet…
so, the result is sterling silver that appears to have a pristine surface…perhaps a few inclusions or defects on the surface…perhaps you try to finish down below the defects…perhaps you work around the defect…
but, after that, while finishing, you reveal more defects that were lying in wait, just below the surface…subsurface defects…
the solution was given to me numerous times…by orchidians…but I did not embrace it at the time…they were advising what they do/ how they finish…but they were not telling me why it was happening…which is where my mind was stuck at the time…I was searching for the answer of “why”…so I fought it…in my head…
their solution answer was simple, and the correct one…for my needs: sand the pieces first before moving to pre-polish, and polish…I thought I was doing that…I was sanding first…but, I wasn’t sanding enough
I needed to patiently and progressively move thru the grits of emery paper…by doing this, i would also be moving thru the top layer of stuff, and getting to metal without the stuff.
my personal opinion is that the stuff is there, but its occurrance is random…and you need to get rid of it if you want a flat mirror finish…
so, buy thicker metal and sand down the surface…
move from 320 grit/ 400/ 600/ 800/ 1000/ 1200/ 1500/ 2000/ 2500
also, it is when you get to the finer grits that the inclusions and pits, unfortunately, 1) become more apparent, or 2) are revealed thru metal removal…
I was told by many people to consider that a flat, mirror finish on sterling silver 1) “does not pay”, and 2) will not hold up after a few minutes of handling…
just a little walk thru my memory lane…
p.s. I was trying to find the info in the Brephol book…to no avail…but! I did read that the bubbles that appear on sterling silver sheet, are from internal gas moving the the surface after annealing!)
anyone with more clarity, please jump in!
Julie
Hi again,
Ok, I finally found the reference to what I call the inclusions and pits, and surface bubbles, in the Brephol book- “The Theory and practice of Goldsmithing”, on Page 37, under the paragraph “Oxygen”.
it basically says that the the CuO2 parts form hard bodies, and project above the surface and are not abraded off, or do break off and leave pits behind. Because the surrounding metal cannot be reached by the polishing tool, they leave behind “comma” silver…I call them comet tails…
This helped me understand the “what” of what was happening.
Speaking to others about fabrication practices of mass produced sterling silver sheet helped me understand the “why” of what was happening…
The Brephol book, the Theory and Practice of goldsmithing is excellent and I highly recommend it:
Julie
This probably won’t be of interest to most of you (I am not at your kind of skill level). I use my tumbler a lot, with steel shot. Recently I was tumbling some bronze & copper for longer than usual and I think it was getting sort of coated with the steel, but I had some copper & bronze casting grain on hand & used that instead, which seemed to solve that problem. Cheerio, Sue
1 Like
What problem were you solving? The casting grain is the same hardness as that of which you were tumbling and nowhere near as hard as the stainless steel shot. If I had to guess, you were getting some sort of sludge on the pieces that you were tumbling and the extra grain just diluted the sludge enough so that it was worn away by the shot. That all being said, this is how we learn. You have a problem, try to fix it and, one way or the other, learn from the experience. I would love to have a $1 for every time I screwed something up, because, even if I had $10 for every time I didn’t screw up, I would still be far ahead in terms of the money I made screwing up. What I learned screwing up would, however, be invaluable. Keep on doing what you are doing and don’t worry about your skill level. Ask questions when you have them and offer answers when you can. Good luck…Rob
There was just kind of a sheen on the copper & bronze pieces that I didn’t normally get, and since it was silvery gray I figured it was from the shot. I have tumbled copper in the steel since then which was fine, so I think it was just in there too long the other times, though maybe it is something else. Everything was pickled and rinsed before it went in. Occasionally I will do a load of silver that doesn’t get nice & bright - no idea why, I just pickle it again & then it’s fine.
I’m fine with screwing up :-), I do it all the time. Everything I’ve learned has either been experimenting or the University of YouTube, my alma mater. I’m so thankful for the jewelers who share their expertise. Now & then I’ll read about something that one “can’t do”, and think, well, I do that, so yes, you can. Sometimes there are benefits to never having had a proper education at this, and it’s fine for what I do (selling in markets and a couple of retailers, and it’s my full time job), but at some point I’d like to take it to the next level (I consider myself an advanced beginner). For now I have to muddle through with my butane torch & push the limits of that until I can afford to rent studio space & have a real torch. Cheerio, Sue
Sue…I admire anyone who makes their living at making and selling their art jewelry. Every piece is a part of you. When you make a sale, it’s like selling one of your kids and you hope that they go to a good home. As a result, I am not very good at selling my work, so I have to rely on others to do it for me. I too am an experiential learner. In other words I am self taught, with the exception of what my father taught me early on. I know that I could have accelerated my learning curve by going to school, but life got in the way and I have been forced to learn one screw up or success at a time. Resources like Orchid and the internet have been a lot of help to me and it appears to you too. I am not sure what you mean by the next level and I really don’t need to know. As an artist, you are a visual thinker, so envision what that might look like and what you need to do to get to that level and make a plan. Be open, however, to the possibility that some new thing might come along and distract you. You will have to decide if you want to go down another rabbit hole or stay on your course. I keep going down rabbit holes. Luckily I can and I keep having fun learning new things, screwing up and having some success along the way. For me this is a journey with no clear end in sight. So I just buckle up and keep my eyes open. Lots of luck…Rob
2 Likes
By next level - I have lots of ideas which I can’t execute, mostly because of not having the right tools (and skills, yet, but first I need the tools, plus more money I guess, I love playing with gold but for now it’s all recycled and in modest quantities). I have achieved a reasonable balance between the bread & butter that pays the bills, yet is true to my style, and making things which stretch me and excite the artist in me. Those ones, there is a small twinge when I sell them, though they usually go to someone who truly appreciates their unique nature, so I know they are going to a good home. I’d love it if a suitcase full of money fell out of the sky and allowed me to focus full time on special pieces, but one does have to pay the bills. Cheerio, Sue
1 Like
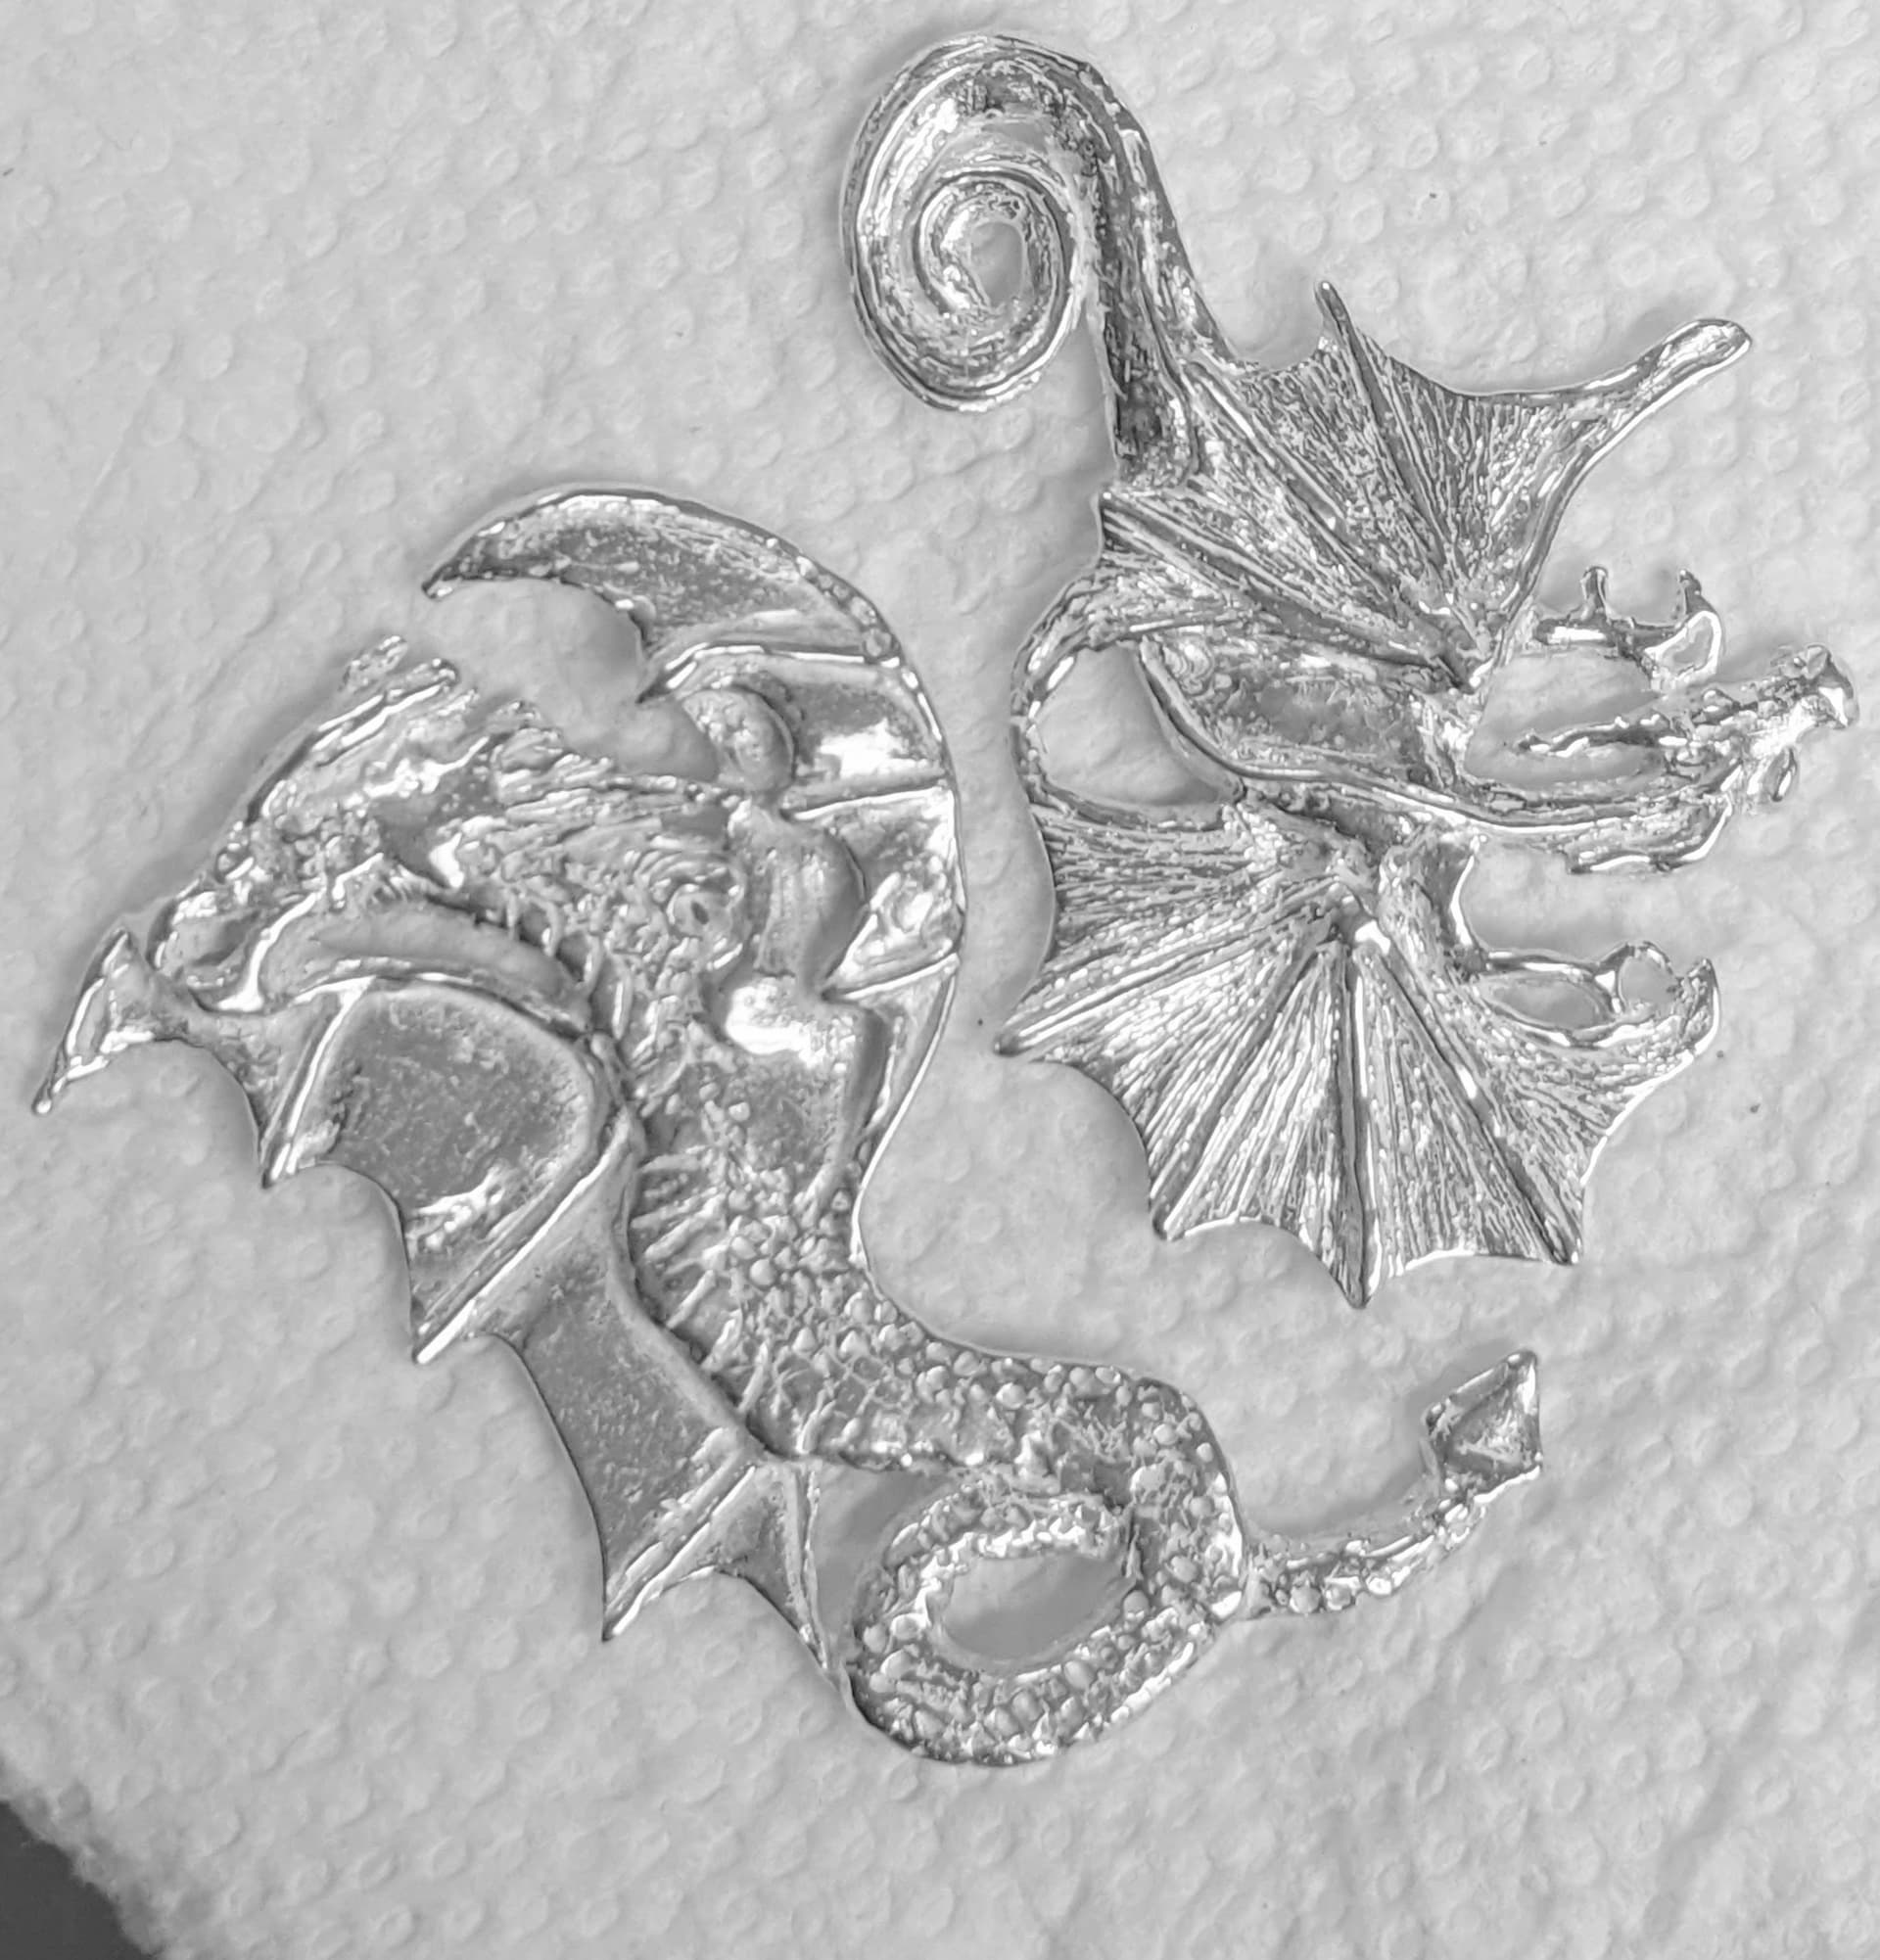
to update, I am asking specifically to solve a short term problem but also to see if a tumbler is something useful to add to my tool kit (any excuse to buy a new tool.) So for the first part of the question, what I am trying to fix is investment in an intentional texture of dimples 1mm in diameter on two cast pieces of sterling that are small. If I media blast, I will loose a lot of the detail. I don’t cast myself (any more) when I did, the investment came out a lot easier than this stuff. In this case rotary tools are going to be a huge PIA. I don’t have a tumbler, I was just wondering if the tumbler- maybe with some fine media would help with the stuck investment problem. the second part of the question is for long term- Asking if using a tumbler really saves any steps, since many people say they sand first and then still polish after they tumble. If I can figure out how to add a photo of the pieces, I will
.
1 Like
Hi Rob,
Thanks for your time in answering my question. You can see a photo and what I was asking for in the reply to my original comment. The chalky white on the ribs of the wings is the easiest place to see it, but the nightmare will be the scales. Any suggestions you have would be most welcome.
Hi Sharon,
Ok, so you are interested in removing the investment from the small crevices…i did a quick search in the forum and got a few suggestions you might also look into
toothbrush and hot wayer
ultrasonic
steamer
magnetic pin finisher
julie
Hi Sharon,
here are a few intetesting post for you to check out:
shoot, i cannot get the link to paste…search “removing investment removal”
…vinegar!
i think the water, solution is best hot…beaker of solution in ultrasonic, steamer are both hot…
julie
Thanks, The ultrasonic was a bust, toothbrush as well. I have to find someone with a steamer that would let me blast the piece. Or someone with a magnetic pin tumbler. Thanks again for taking the time to answer.
1 Like
I think that a magnetic pin polisher would do the trick. It is recommended for pieces with textures and detail.
Sharon…I don’t cast, other than ingots and Delft clay, so I can’t help you with this problem. You might find out what kind of investment your casting house uses. I am sure that there are people who cast that can help you with this problem. Good luck…Rob
Hi,
on a related note…is it normal to get pieces back from the cadter with investment still on it?…I do not recall experiencing that…’
Julie
First of all you might consider using a different casting shop. Any decent caster returns castings free of investment debris. That said a good ultrasonic and a steamer should take care of this issue. Sometimes we use a toothbrush as well. A tumbler would simply pound the investment into the metal. Before tumbling we always thoroughly clean the pieces first.
-Jo
1 Like