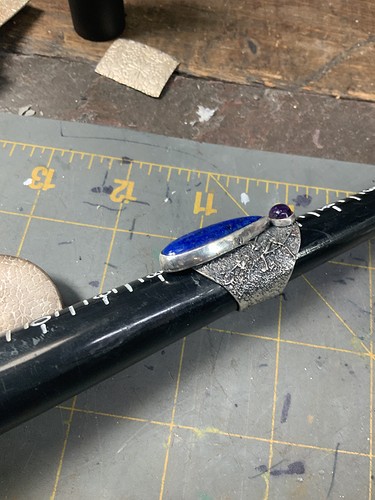
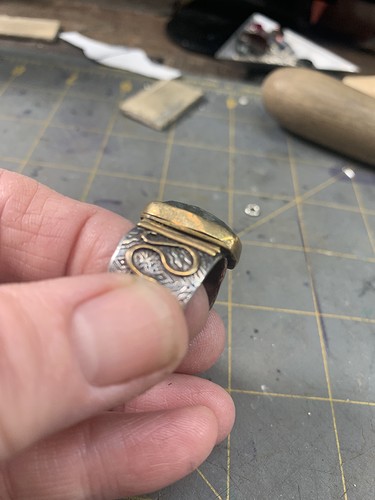
I use 24 gauge silver for my bezels. I solder them, sand them, polish them but when I solder them onto the back plate, A line between the bezel and the back plate appears.What’s going on? It certainly wasn’t like that when I set up the solder on the back plate. I Appreciate any insight as to what I am doing wrong
By “a line” do you mean:
A) A slight indentation, which might indicate you have polished away a bit of the softer solder. If so, maybe do more prep work with fine abbraisives, working across, rather than along the length of the seam, and leave as little buffing as possible to do at this joint, also trying not to buff too aggresively parallel to the seam.
or,
B) A dark line. This might indicate a lower temperature solder that has begun to oxidize.
Just random thoughts. I do not do a great deal of work in Sterling Silver, but I have experienced both issues in the past.
Thanks, I think your first suggestion is right maybe some of the Solder was polished off. Will try to send pictures, I will try to sand Vertically.
Rinddoctor makes several good suggestions. You might hold back a bit on finishing the bezel prior to soldering to the back plate except for the bottom surface where it contacts the back plate. Each subsequent soldering operation can pull solder out of a previously soldered joint. This may cause the solder in your bezel end joint to pull out, especially if it has been thinned by finishing before you solder the bezel to the back plate. This same polishing may be rounding and thinning the edge of the bezel that you solder to the back plate. That seam may not be filling up with solder enough to leave a smooth edge. Again, do file and sand the bottom of the bezel so that there are no gaps between the bezel and the back plate. Use lots of fluz too. Be sure to anneal the bezel before you solder so that it doesn’t move or distort when you heat it to solder the bezel to the back plate. If you don’t, you may find that your stone doesn’t fit. It could also be, as ringdoctor suggested, color contrast if you use too low a melting point solder. Try hard solder for the bezel end to end and then medium for the bezel to back plate. There is a lot going on when you do this type of operation. We had a lively discussion about bezels not too long ago. You might go back and look at it for more ideas. Good luck…Rob
I just saw your pictures. Looks like you polished off the solder and the joint opened up. Try a thicker bezel material. We have also discussed how to move thick bezels during several previous conversations…Rob
Rob you are always a wealth of information. I never knew about a annealing the bezel, before attaching it to whatever it’s going to be on. Also I will stop polishing till I solder on the next piece. I’ll take a gander on the past information on bezels.
I would use flux not fluz, sorry.
Rob is right.
Now that I see the images it appears as if solder may have either flowed out of the joint during subsequent soldering, or there were pockets in your joint that were not fully joined, and solder had only partially filled this joint.
I would try a little heavier bezel material, as suggested, then make sure you get a good joint here with no gaps at all, and that it is fully soldered.
I then would not be too aggressive in my pre finishing, if there is going to be more torch work.
Knowledge comes from experience and experience comes from making mistakes. I have made a lot of mistakes. At almost 72, none of my kids or grandkids want to learn the bench, so I try to pass on what I know to anyone who does. Having worked for 39 years as a teacher and school administrator, I am comfortable answering questions, but I am also secure in asking them. Don’t be shy about asking questions or sharing what you know.
I suspect you are using too few and too large paillons and the solder never flowed all round the joint.
Use many more tiny paillons, set them against the inside of the joint, heat from the bottom, and make sure that you see the bright solder line all the way round.
I keep seeing mentions of heavier bezel material. I’ve been using the pre-fab bezel strip that’s I think 28ga and while I’ve become comfortable with it and reliably get it attached all the way around, I’m intrigued by the idea of thicker stock.
Am I correct that the reason a thicker bezel can attach more securely to the backplate is more surface area in contact? Would this also mean that I’d need to use more solder to attach it than I would for the same bezel in thin stock?
FWIW that’s what really did the trick for me on getting bezels securely attached every time- wire or sheet solder NOT paste, and use more than seems necessary. I add as much as I think it should need and then add about 15-20% extra! As long as my joint is good any excess stays inside the bezel and can be ground away a/o hidden under an opaque stone later.
You can make a bezel out of any material that you can form to fit the stone you want to set. Since I cut most of my own stones, each bezel I make is unique to that stone in several ways. It has to be tall enough to be able to be rolled or moved over the stone to hold it securely in place. The width, or in my case, heaviness, is usually more of a design decision. While once the heavy bezel is moved over the stone it is likely to be more securely held than a rolled over bezel, I just like the looks of a wider bezel as it goes with the design of most of my jewelry. My bezels start out to be a 1 - 1.5 mm thick piece of rectangular wire that I have rolled to be the right height for the stone. I might start with round or square wire. Square works better, but it usually comes from my scrap pile, so I take what I can get. The finished size is obviously something less than 1 - 1.5 mm. The bezel is assembled in the usual way making sure to anneal the entire bezel after it has been shaped to the stone and then reshaped after annealing to fine tune the shape. Finish the inside of the bezel end joint but not the outside. Level the bottom where it is soldered to the back plate. Flux, add pallions to the inside. Use a lot of flux and many smaller pallions rather than a few bigger ones. Heat and pull the solder through the joint to the outside looking for a flash of silver around the outside of the joint. Do this as quickly as you can without causing heat damage or pulling solder out of the bezel end joint. I did that just yesterday and need to start over. You can flush finish the bezel to back plate joint but , if you can, leave a little finishing for later as you don’t want to pull solder out of that joint with subsequent soldering or finishing operations. This all depends a bit on the design. I have taken lately to leaving a small edge of back plate outside of this joint on pendants and earrings as it makes a nice design element and also helps to secure the piece in whatever you secure the piece in to set the stone. Setting a stone in a heavy bezel is, for me, a hammer and pusher or punch operation. I slowly work my way around the bezel first at opposite locations carefully pushing bezel material against the stone with different shaped and sized brass and steel punches or pushers being careful not to hit the stone. The finished edge needs to be touched up with a file or abrasive wheel being careful not to damage the stone. Jo Hamer made a good suggestion some time ago to dull one edge of a triangular file so that you can file closely to the edge of the bezel, but not damage the stone. I carefully use a SC wheel and then a pumice wheel when I get closer to the stone. You can put tape over the stone or just protect it with you finger. Contour the bezel to whatever shape fits your design. If I am setting a softer stone that can be polished with ZAM, I may actually shape the bezel and finish polish the stone at the same time on my lapidary equipment and then polish both the stone and the bezel together. We have had a couple good bezel discussions lately. There is a lot to a successful bezel and many ways to screw them up and I have found most of them. Good luck…Rob
Wow, thank you all, yes I used to be guilty of doing a shitty job soldering my bezel to my back plate. I am strong on that now. Honestly think from what I’ve read that my problem is my solder is Leaching out when I solder. I am using a .40m bezel, and would love to work with something Heavier. Love the convenience of buying strip silver. I have a difficult time cutting a bezel straight from sheet silver. I end up having to do a lot of standing to get it Straight. And sometimes I just have to cut another piece. Also I set with a hammer and a rocker, I would love to use my hammer piece, but I’m frightened to use it on bezels. So I guess really what I need to do is just jump in the cold water, and give it a go. I also like the look of a thicker bezel.You guys are amazing, thank you, Christina
the setting on the next piece.
I seldom use a hammer and punch to close bezels, any longer, but for some jobs it is still the best tool.
I usually do such setting work with the handpiece for my GraverMax.
You need to be able to see exactly when metal.

