Hello Ted,
I’m not sure what the burnout temperature is, it’s done overnight without any student participation. The kiln is held a 800 degrees Fahrenheit (about 426.6 Celsius) to keep the flasks hot when we begin to cast. I’m on a semester break right now, but I’ll check with my instructor to see what her burnout schedule is.
Thank you for your feedback.
D
A couple of further thoughts,
for the beginner enameller, a hot plate kiln is really enough.
as to what temp they reach?
If the enamel is made to fuse at 450 /500C,
and it does that , then it is reaching that temp.
A proper kiln is great if you want to do advanced enamelling, ie clear translucent on gold and silver.
I started out in 1968 by wanting to do enamelling , and set out to replicate the standard set by Faberge’ on his Easter eggs. Schauer in Vienna supplied his enamels and I spent time there researching. And yes, i did get the results the same as he did.
Ill try to scan in some old photos of this work.
But after 7 yrs I stopped concentrating on enamels as my other metalwork had taken over.
But Ive still have everything and will combine enamels with my minting work this year as its my 50th…
Ted
Just a really old sweat!
Dorset UK.
Thanks for the thoughts, Ted. I hope you have time to scan in the photos. It sounds awesome and I’d love to see what you did. 
Morning Erica,
Heres the scans, 3 rings 2 brooches and 1 pendant.
A joint project with a designer friend Edward Tuson. Lost touch with him since I did the enamelling for him. Using fine gold under the enamel, and 18ct white and yellow gold for the rest… Plus the diamonds.
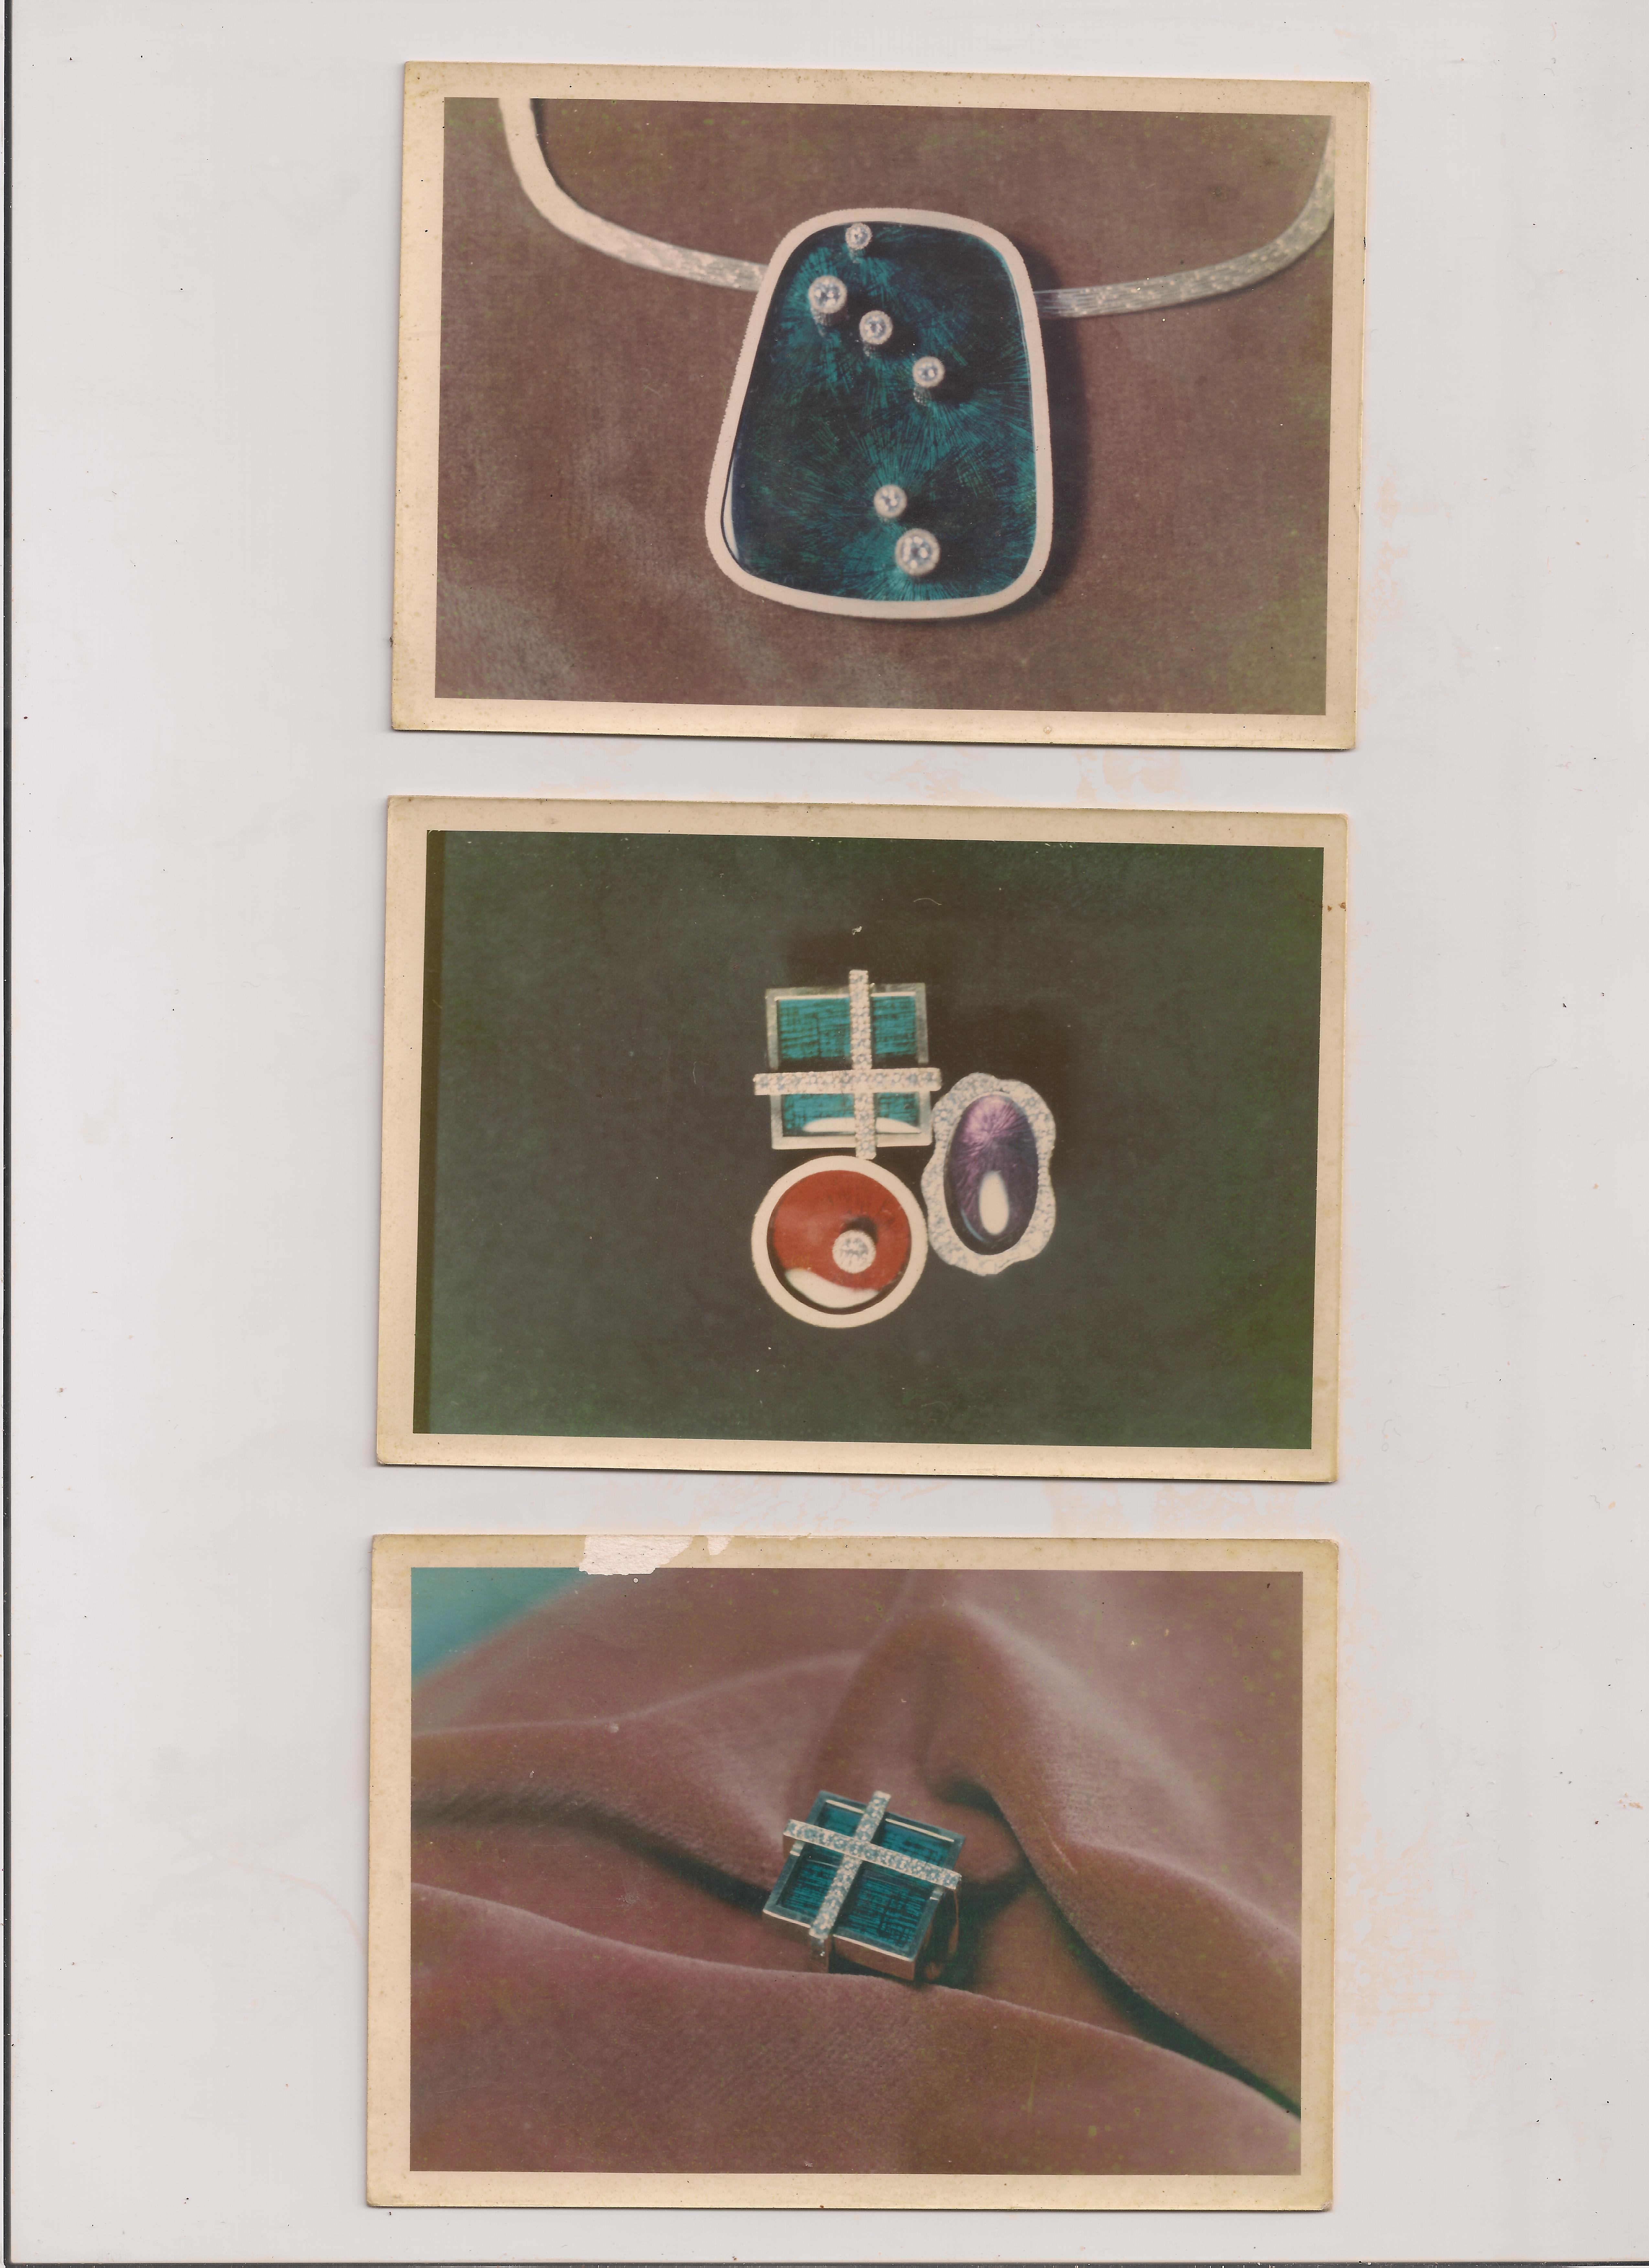
The red enamel is based on a gold formula, and the purple and turquoise on other oxides. mineral oxides.

The lime green enamel is a mixture of uranium and copper oxides. all are 1/8 in thick deep pools
of enamel. Set from the underneath .
Many more made but all sold and no pics.
Enamels came from Schauer. Et cie, in Vienna. There no longer selling to our trade.
enjoy.
Ted
These are beautiful pieces!
Good morningTed,
These are beautiful pieces! I especially love the colors on the pendant. Absolutely stunning! Thank you for sharing!
Hi Dee,
I’ve never had an issue with using my kiln for more than one purpose, but that doesn’t mean anything more than my experience is positive. I’ve never seen any soot or other contaminates accumulate inside my kiln, my understanding of the burnout process is that the wax is vaporized and completely removed. The inside of my kiln is just as white and clean as the day I got it. I use floor tiles designed for the kiln rather than the bare kiln floor, and I would recommend them for any use, mainly because the fiber muffle is fragile.
It might be helpful to understand that the Neycraft furnaces are different from other types of kilns in that the heating elements are embedded in the one-piece fiber muffle, so the walls of the furnace is where the heat comes from. There are no exposed elements, no seams and no bricks. That may be why they stay so clean.
As to maintaining a specific temperature with the non-controlled Neycraft kiln, the dial will let you control the rate of climb and the top temperature, but it’s a rheostat rather than a thermostat. In other words, it isn’t connected to the thermocouple. With a bit of experimentation, you can learn how to adjust the rheostat to reach and hold a certain temperature, but you will need to monitor it to maintain a specific temperature. If you want to ‘set and forget’, you will probably need a controller of some type.
Here is a pair of cloisonne earrings that one of the guys here made using the Neycraft that I use primarily for wax burnouts.

Hope this is helpful.
Dave
3 Likes
Dave,
Thank you very much for your response, it was very helpful. I’m going to visit the Neycraft website and checkout the different kilns that are available.
Dee
I need more help with the kiln. We had chosen the Paragon SC2 kiln, then spoke further about the situation and decided that eventually, we will want it for casting as well. This opens it up to a more advanced kiln. We would only want to burn out small items like rings and small pendants, so the flasks we would use wouldn’t need to be too large. I would imagine 5-6 small flasks at a time in there would be what we would need.The only two casting classes I ever had were big industrial-like kilns for college. We don’t need anything that large. We hold small classes at Halstead with 4-5 employees at a time. Are there any suggestions for a small sized kiln that would cover casting too? Any suggestions are really appreciated.
All those decisions to allow for organic growth in the studio require looking at things that will fit into the kiln. When you look at building a tree for casting, you lose space to the button, and 1/4" + on each side of the diameter and 3/8" top, in addition to circulating air space inside the kiln. If you have kiln stands / architecture beneath your flasks (great for wax drainage on burnout) then you have an additional inch or so of height. All this sits in the overall envelope of the kiln interior. It really doesn’t take very long to in many instances need 5.5" tall + flasks. Good air circulation is key to the kiln functioning properly for burnouts.
All of those factors directed me towards a slightly taller interior, which has been a great, practical choice.
I previously mentioned a Satellite j-200 and it’s interior dimension: 8.5" × 12" ×12". That little extra height is a lifesaver. I’m sure there are other competitive manufacturers with similar envelopes.
Eileen
I’ve had neycraft kilns for over 25 years as well and would second Dave’s good recommendation. Mostly use the Vulcan the last 10 years. I burn out during the day but still like the controller because I get precise ramp up and down and hold times. I don’t have to think about it, just remember to cast. 
Hi Eileen,
Thank you for the information. This is exactly the size we need, I believe. I have a few more questions. How long have you had yours? Do you run yours all night during the burnout? Do you have a programmable controller on it?

![]()

![]()
Erica
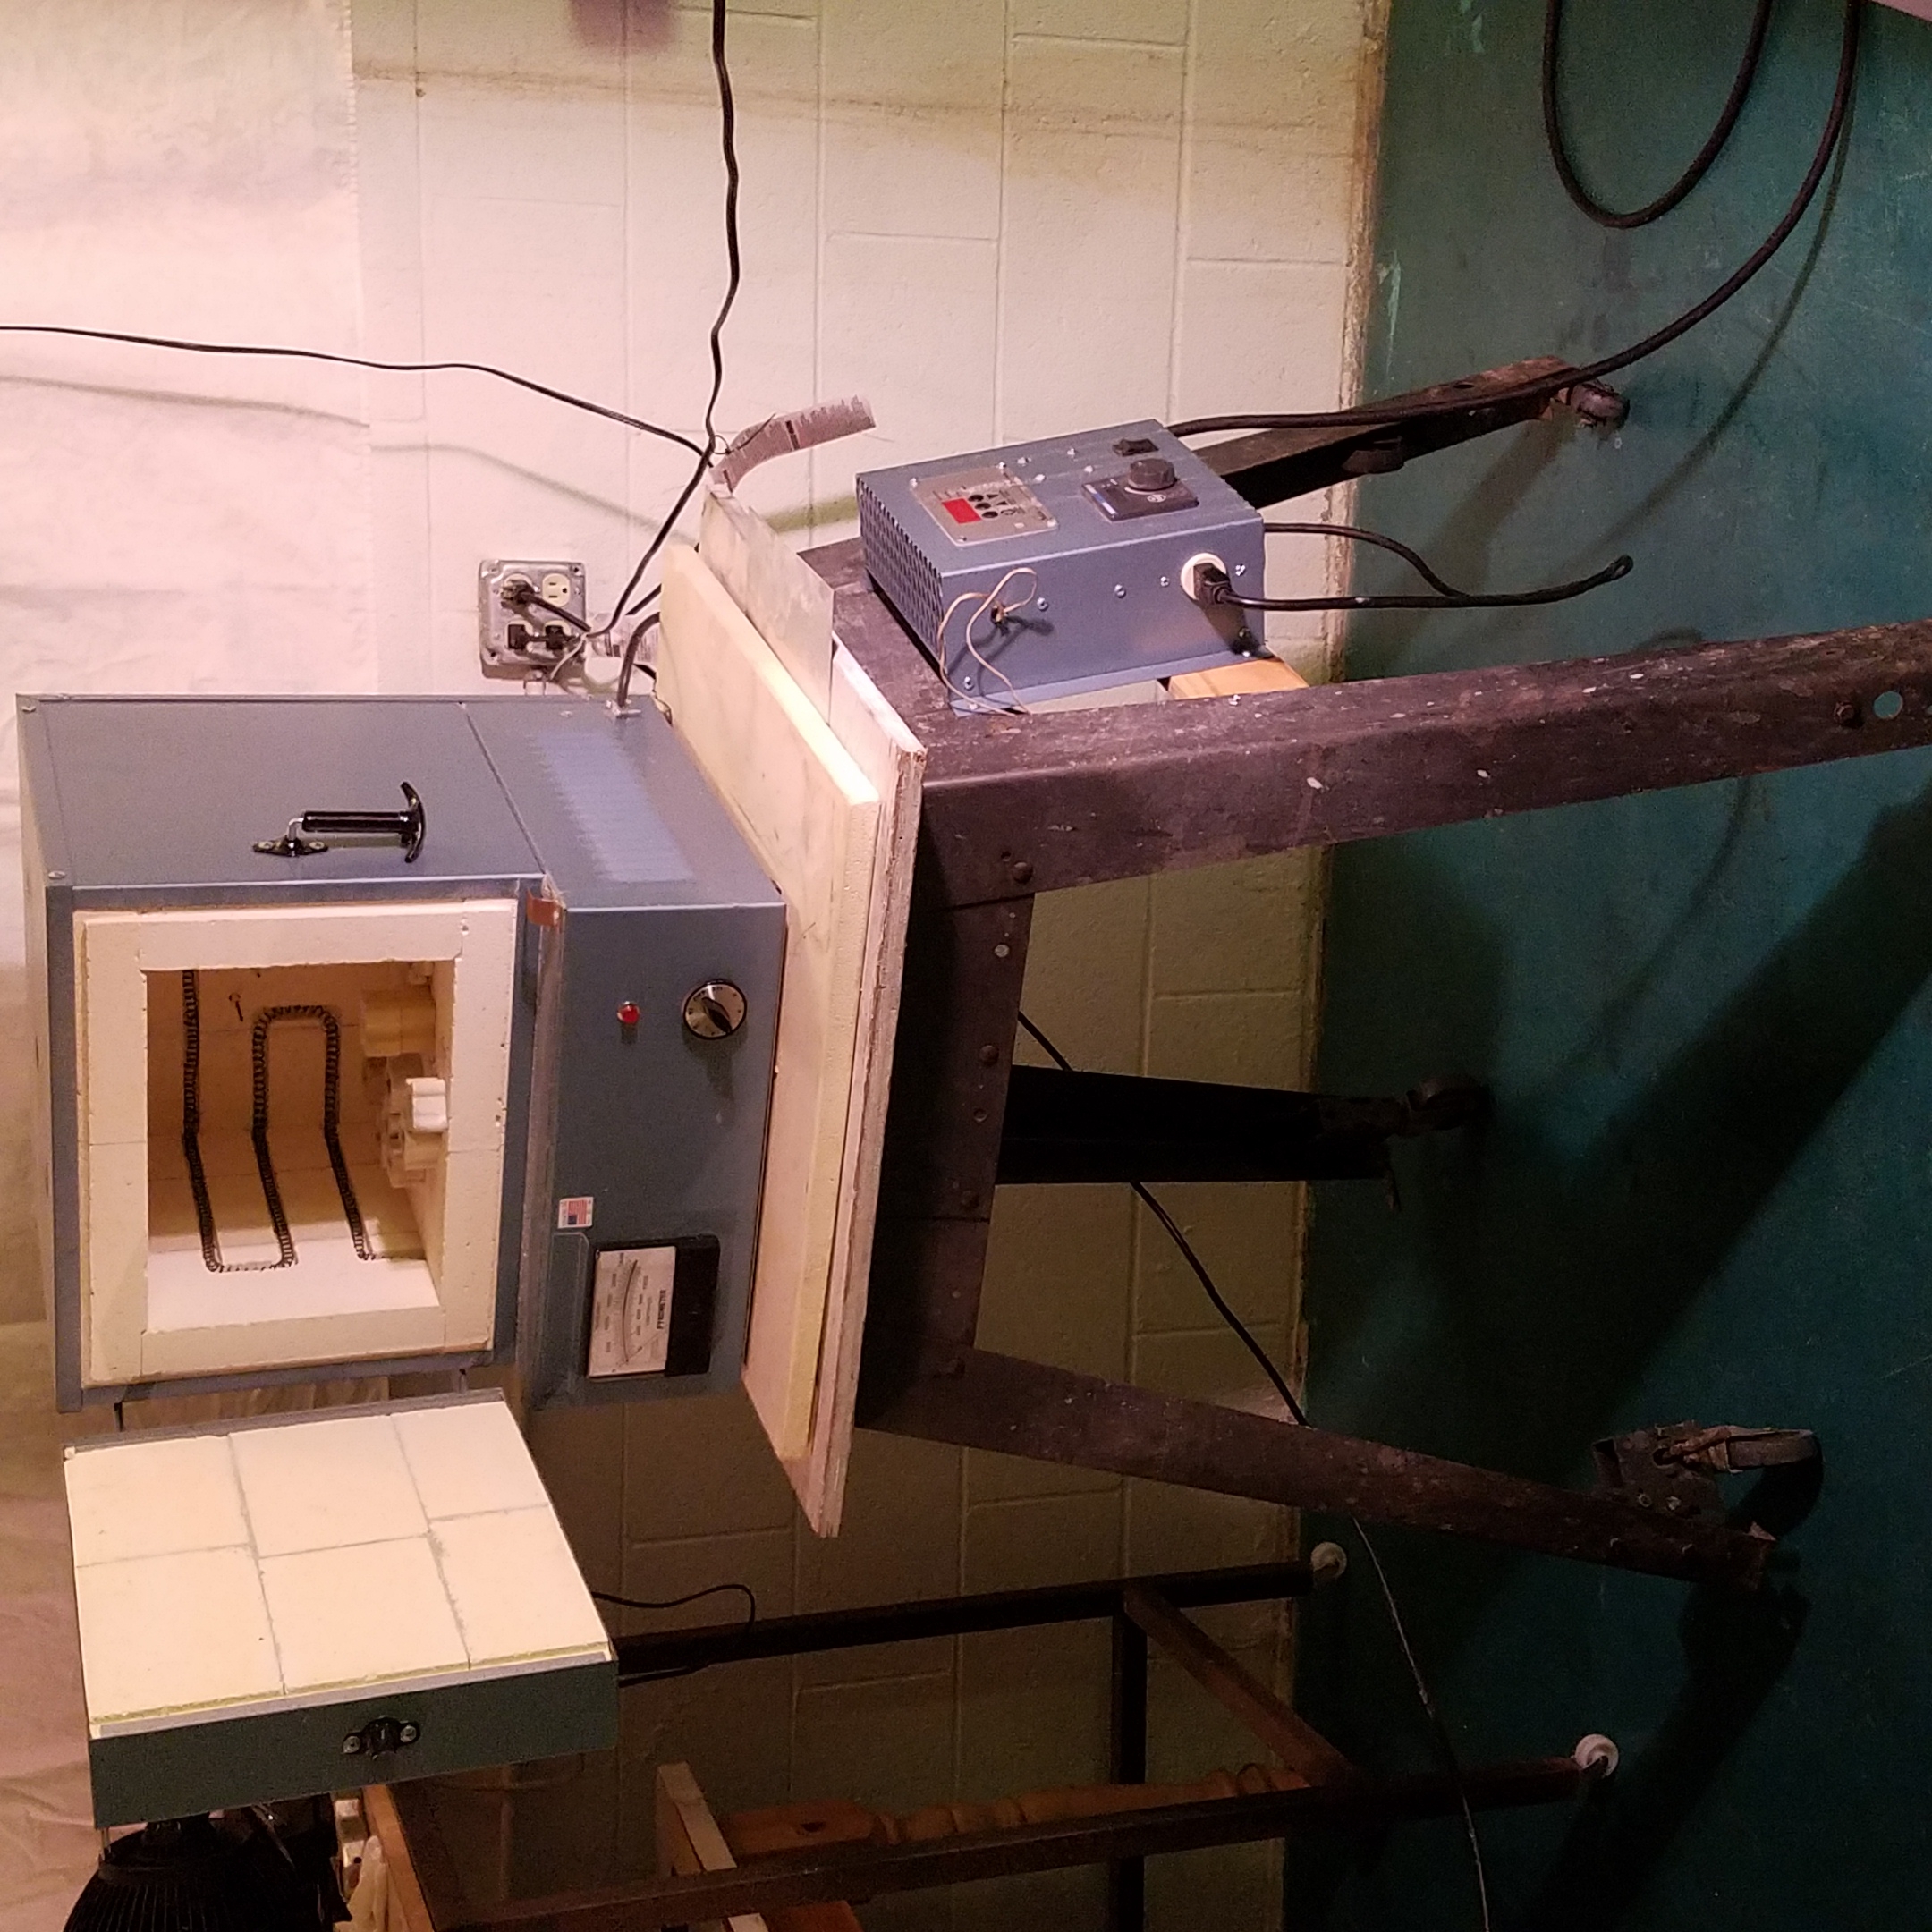
I do overnight burnouts all the time, or i start early to cast in mid afternoon - evening. I have a stand alone orton controller mounted to the side of my rolling tool stand that i use for the kiln. There is a separate thermostat sensor that turns the whole operation off if a certain temperature is exceeded. That’s really a great safety feature. I purchased some older table saw stands of varying heights for the ergonomic convenience. The kiln opens with the front door access higher than a conventional countertop. It’s easy peasy. under the kiln, I use a large conventional ceramic kiln shelf as the top layer of the tool stand. Because it’s larger than the kiln footprint, it creates a heat resistant " shelf " right next to the kiln door when I’m shifting hot flasks around. Very convenient set up, and a great improvement to my original learning studio set up which in my opinion was ergonomically hazardous.
I’ve had the kiln for almost two years.
Eileen
halstead1 Platinum
February 2 |
Hi Eileen,
Thank you for the information. This is exactly the size we need, I believe. I have a few more questions. How long have you had yours? Do you run yours all night during the burnout? Do you have a programmable controller on it?
Visit Topic or reply to this email to respond.
Brought to you by:
You are receiving this because you enabled mailing list mode.
To unsubscribe from these emails, click here.
That’s great to hear. I’m definitely going to look for a kiln that I can program for burn-outs with a separate option for a straight temp for enameling. I also need to figure out where to put it. I was going to place it on a shelf that sits about 1 ft above a metal desk, that set up would have me lowering the hot jewelry down. I like the idea of the heat-resistant shelf below that a lot. Thanks for the great advice!
![]()
![]()
Erica,
i’ll try to send an image of my setup later today.
Eileen
Oh that would be awesome. Thank you so much!!!
![]()
![]()
Erica
The kiln is in close to position. I have tools on rolling stands and the centrifuge and kiln share an exhaust system intake that fits snug over each unit. I have one coupling i install for the centrifuge. The kiln stops exhausting stinky air completely after 6 hours or so.
The inside bottom of the kiln is exactly 45" above the finished smooth cement floor. It’s lovely ergonomically.
The cut off circuit is a WATLOW LIMIT LV. I typically set it 10F above the maximum kiln temperature I program in.
The top of the orton controller had an expanded metal grating. I keep a small similar size piece of 16 ga galvanized sheet metal directly over the top out out - wedged into the tight gap between the original ply top of the tool stand and the 1"think kiln shelf.
When I’m doing a wax, plastic or organic material burnout i set two flasks - a small short and a taller thin one overt the top vent hike. It directs the fumes as a sort of flue insert into the overhead vent intake. There is no direct contact between the surface of the kiln and the vent.
It’s been a sweet success.
Eileen
Thanks, Eileen. We purchased a kiln this morning. I would love to use your stand example as the height that we need. We will have to build something to set it on, too. We have a huge hood, so I will place it under that to try to keep the smell and fumes out. I hadn’t even thought of that yet. So thank you!
[/uploads/db0786/original/2X/f/f1647f3dbfbf506a1cae924d7843245f32e8fe49.png]
You can see it here in the back above the soldering station. I’m thinking of placing the kiln to the right of that, as close as I can to the hood.
Thanks for the valuable input.
Erica
Congratulations!!
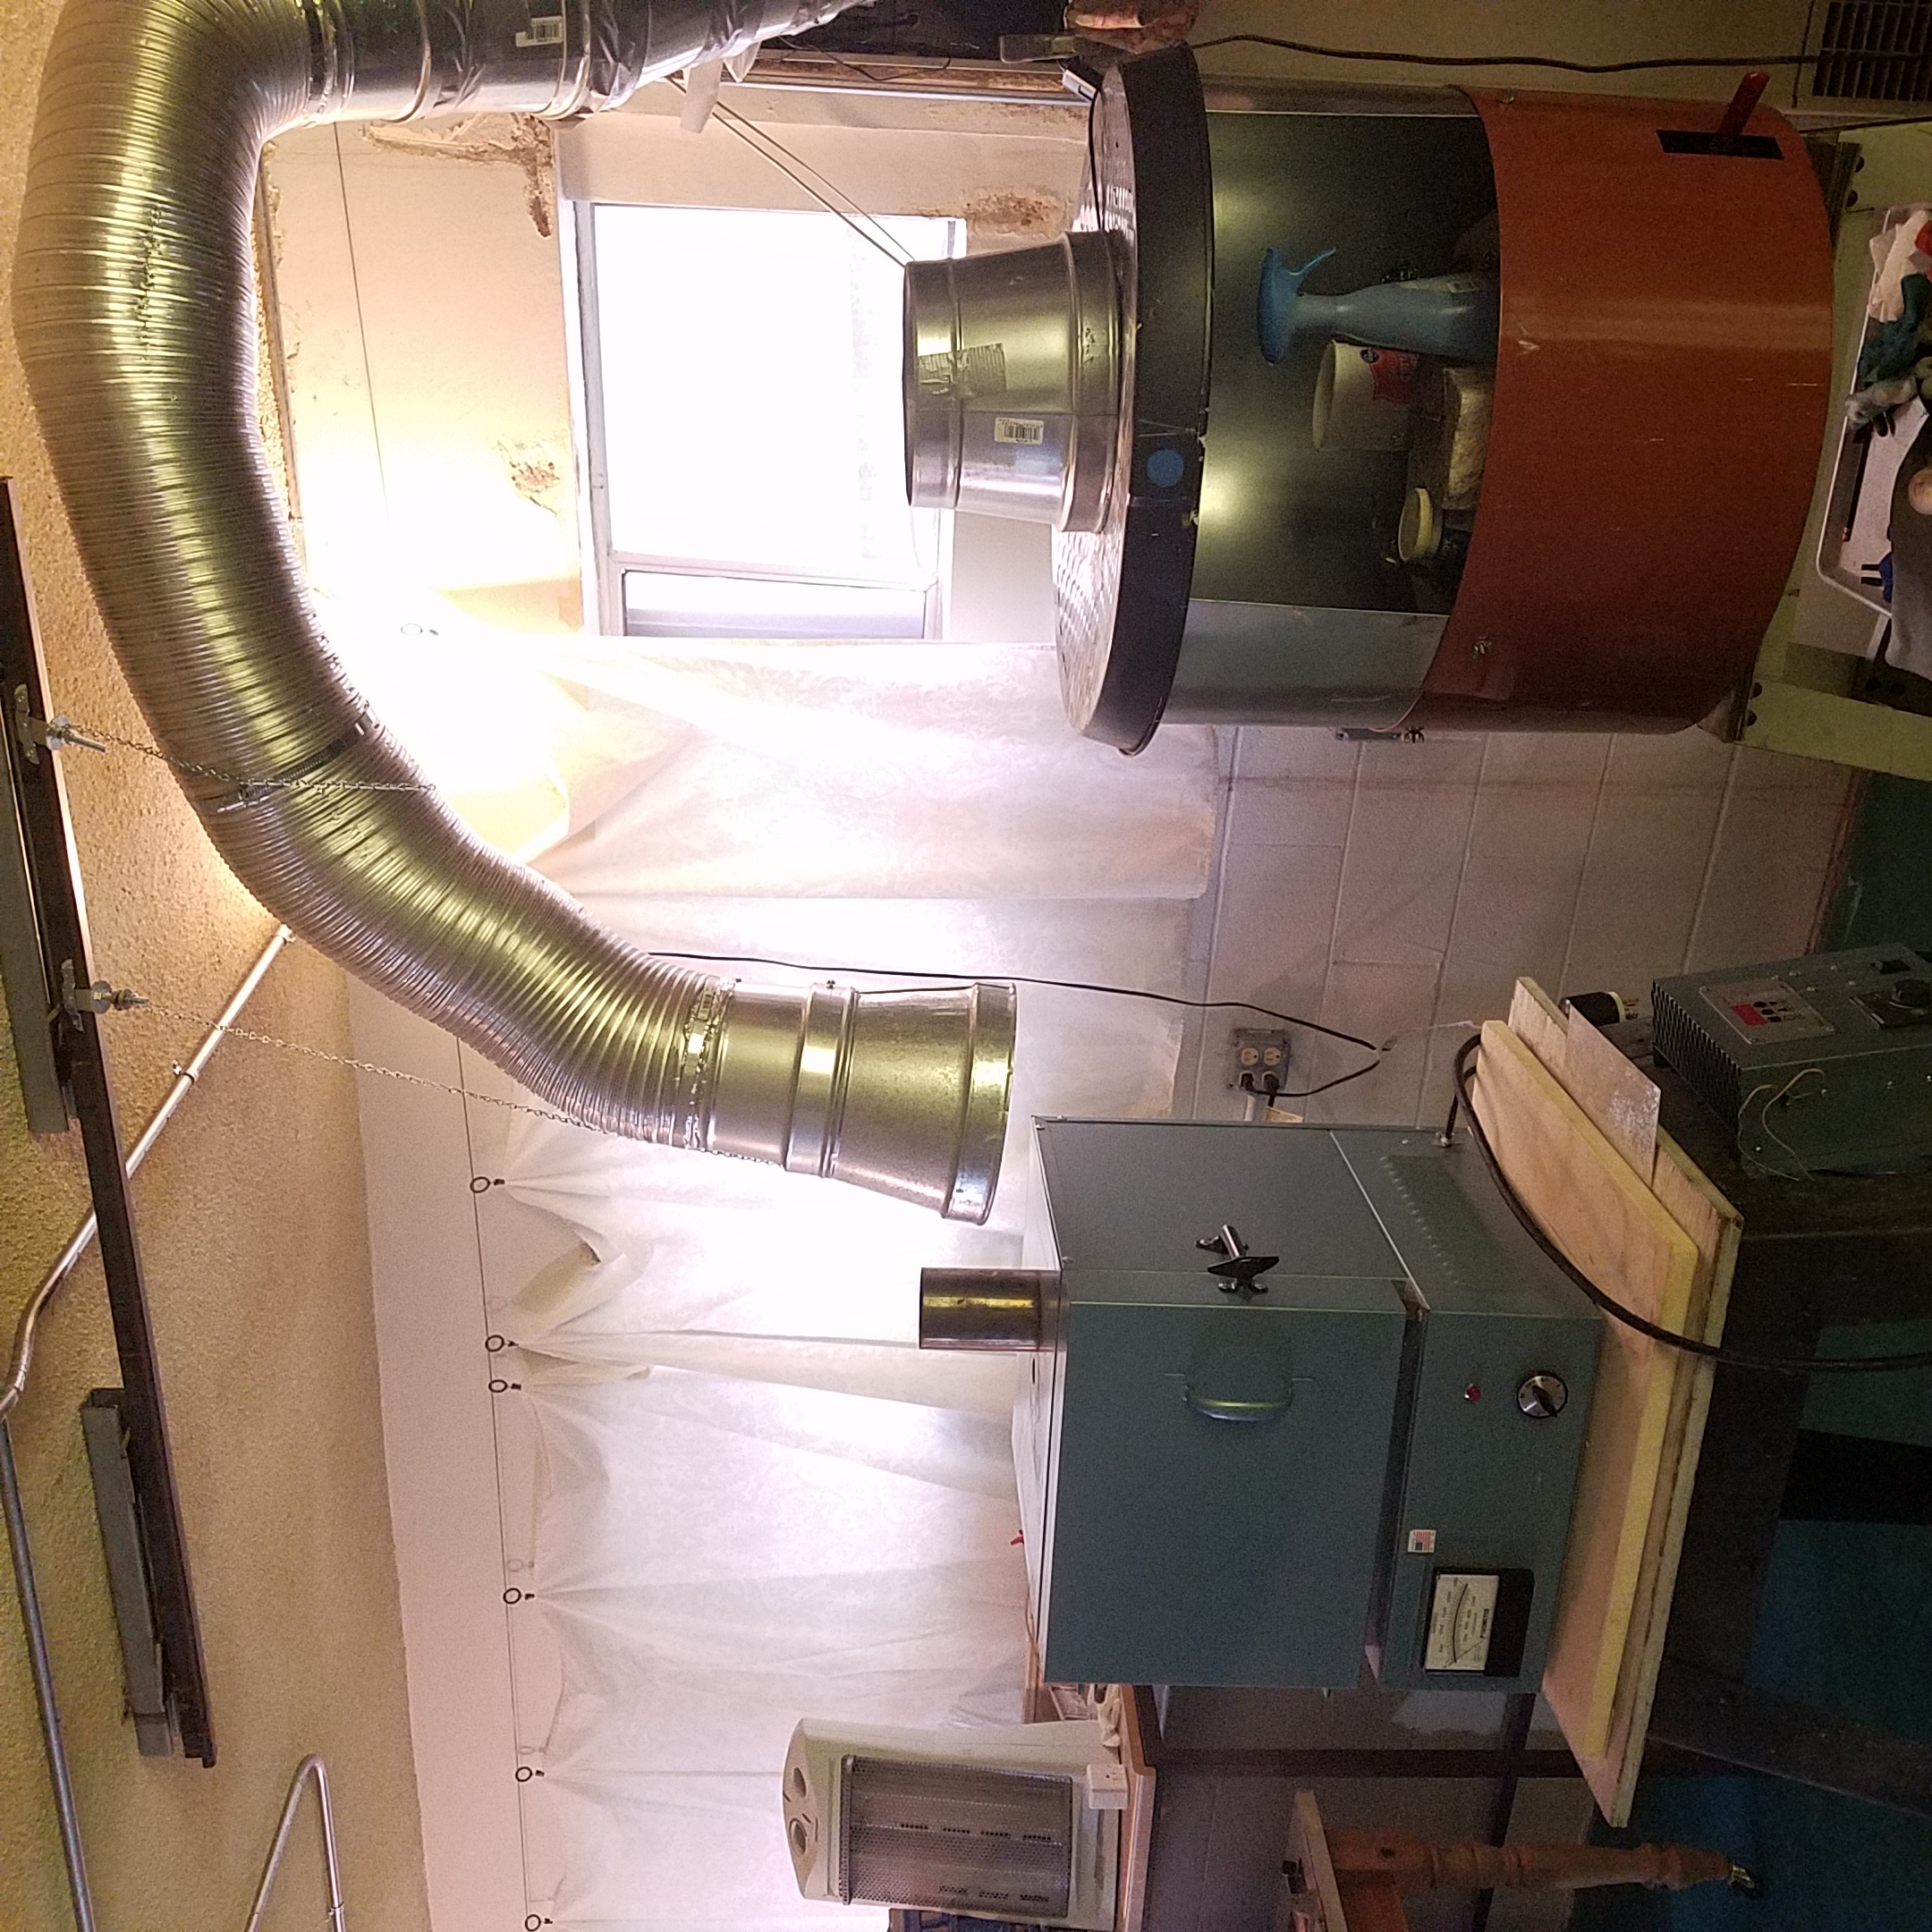
It would be nice to have a “formal” ventilation system. I did a frankenvent system that is shared by my kiln, centrifuge and then the custom centrifuge 3/4 cylindrical wrap wall for a soldering station and vulcanizing station with a custom hood . It takes caee of all the stinky stuff. There’s an overhead track I fabricated with toilet chain and closet door rollers. It adjusts somewhat.
At the top of the kiln, i use a 5 1/2" tall flask to serve as a mini chimney flue. It doesn’t touch the exhaust system coupling, so no heat is currently transferred and it reassess the fumes to within the exhaust hood. Without it, i had some burnout fumes escaping a bit. Just looking at the top of the kiln, some condensation of vaporized wax occurs within that flask /flue and a bit of carbonization in the top kiln vent itself. That portion of the system moves 256 cfm and had a reostat control.
When using the centrifuge station a second fan steps it up to over 500 cfm.
You might try making an extension of dryer flexy aluminum and a sheet metal coupling with hose clamps. As long as your overall exhaust system in a big bad hoover (it really sucks LOL)
Image might give you some ideas. Excuses for the holes in the ceiling. I was out of town and there was an undetected plumbing leak for two weeks. No studio equipment was damaged but the studio structure itself took some damage. I’ve been drying, demoing,
fixing and getting back up online. I have all my equipment and stations on wheels, platforms etc. (for good reason).
Eileen
halstead1 Platinum
February 6 |
Thanks, Eileen. We purchased a kiln this morning. I would love to use your stand example as the height that we need. We will have to build something to set it on, too. We have a huge hood, so I will place it under that to try to keep the smell and fumes out. I hadn’t even thought of that yet. So thank you!
[/uploads/db0786/original/2X/f/f1647f3dbfbf506a1cae924d7843245f32e8fe49.png]
You can see it here in the back above the soldering station. I’m thinking of placing the kiln to the right of that, as close as I can to the hood.
Thanks for the valuable input.
Visit Topic or reply to this email to respond.
Brought to you by:
You are receiving this because you enabled mailing list mode.
To unsubscribe from these emails, click here.