Calculating ring blank length

Now there's one big exception to all this leading edge stuff.
Comfort fit rings need to be measured on the mandrel where the
inside actually contacts the mandrel at it's smallest diameter.
Usually, but not always, this will be centerline, or close to it. 

Comfort fits are a “looser” fit then flat inside profiles so if you
measure the finger with a flat finger gage you will have to fudge
the size. Oh and then there is also the business about how ring
width messes with how a ring fits so a comfort fit that is narrow
will fit closer to the leading edge than a wide one. So the solution
is to stick with the leading edge to describe the size and have
finger gages that match the profile and width of the ring design and
calibrate them to the “shop standard” mandrel that is the reference
that all rings and finger gages in the studio are measured against.
An add to that that all finger sizes given to you by someone who is
not calibrated to your mandrel is likely wrong when compared to your
mandrel. It can be maddening :slight_smile:

Regards,
Jim

James Binnion
James Binnion Metal Arts

Grab your un mounted blade with smooth pliers maybe 1/2" from the
end (before the teeth start) another pair of pliers 1/8" away and
twist 90 degrees. 

Or just buy one of the latest versions of the Knew Concepts saws that
have blade clamps that can be rotated 90 degrees so you can saw long
lines un obstructed. :slight_smile:

James Binnion
James Binnion Metal Arts

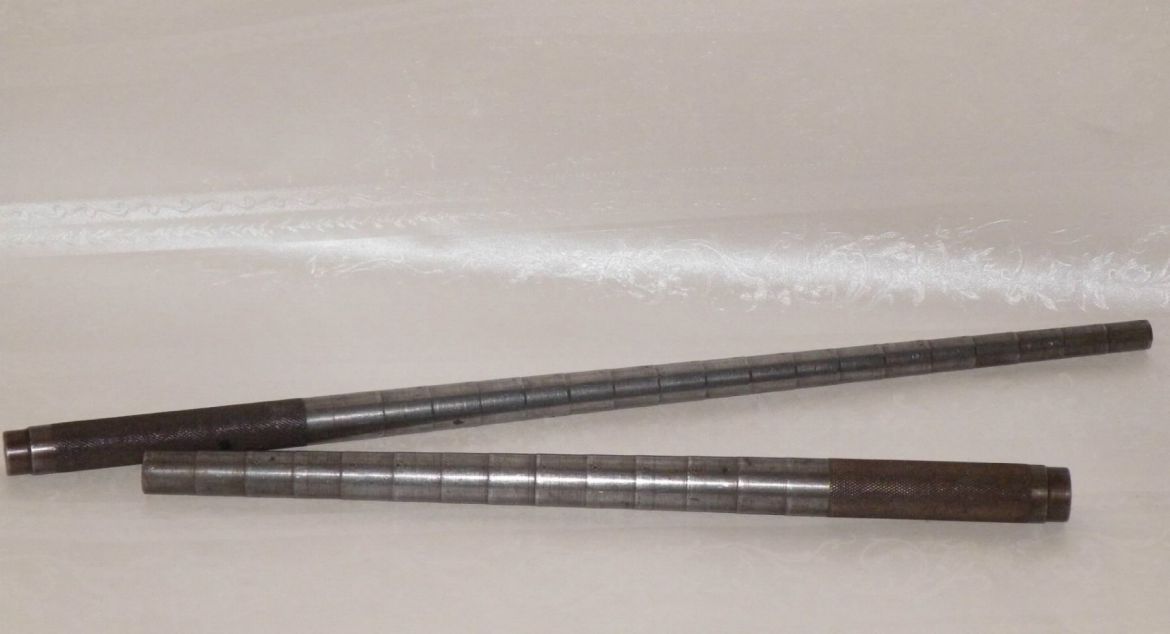
50 years ago, when I first started making jewellery, I decided I
needed something on which I could shape rings. Since I didn’t know
about tapered mandrels in those days I decided to make my own “ring
sticks” as I called them. Here’s a photo of them:

They are stepped; each step is about 3/4" long and corresponds to
one UK ring size. Since there are 26 UK ring sizes, I made two
sticks, as shown in the referenced photo; the long one is for sizes B
to S (I forget why I didn’t include A), and the stubby one for sizes
Q to Z+2. I’ve never seen similar ones in tool shops, has anybody
else?

They work very well and are in constant use; they are far more
useful than tapered mandrels. And yes, I know they don’t have
half-sizes, but, in practise, it’s very easy to estimate a (UK)
half-size increment - it’s a sloppy fit on the full-size step and
won’t go onto the next step.

For proper consideration I’m willing to make one or two more if
anybody feels they would be useful to them. It’s not difficult if you
have a lathe, but it’s certainly not quick. Did I mention I’m in UK?

Regards, Gary Wooding

An ellipse is two circles overlapping each other - not exactly, of
course, but all should understand that, I'd think. Make two circles
out of anything (cardboard) with the centers marked, that are of a
diameter that fits your oval. Meaning the arcs of the circles
should correspond with the arc of the ends of your ellipse. 

I can suggest alternative method.

Start by drawing two perpendicular lines.

On horizontal line mark long axis of an ellipse ( the longest
dimension).

On vertical mark the short axis. It should be done so the
intersection of line is the center.

Subtract short axis from the long one and mark this distance from
the center on short axis, in both directions. If we have 10 x 8
ellipse, than the difference is 2 and we are marking 2 from center on
vertical line ( short axis) in both directions. Divide short axis by
the long one. In our case it will be 8/10 or 4/5, or in decimals
0.8. On long axis mark 0.8 of the distance marked on short axis. We
marked 2 on short axis, so we are going to mark 1.6 on long axis,
from center, in both directions. we have our 4 centers which uniquely
define our ellipse. Draw 4 lines from marks on short axis, through
the marks on long axis. If we label our centers as scl for short
center low, sch for short center high, lcl for long center left, and
lcr for long center right. The lines drawn are from scl through lcl
and lcr, and from sch through lcl and lcr. Open compass to the
distance from scl to the upper end of short axis and draw an arc
until intersection with lines. Repeat from sch point. Open compass to
the distance from lcl to the end of long axis and draw arc until
intersection with lines. repeat from lcr mark. The ellipse is ready.

It is much faster and easier than may appear from description. After
some practice it becomes second nature very fast.

Leonid Surpin

jewelry math becomes an existential question instead of a practical
one. 

Just the other day I was reading Einstein (yeah, yeah, yeah…) and
he said that mathematics is only really useful in the abstract -
meaning simply that it becomes more and more ponderous to describe
the real world mathematically. You can describe a leaf with math -
20 or 30 pages of it - but then you have to do it all over again for
the leaf next to it. Chaos and all that.

perhaps you could tell me (us?) how you would set about making it
without the use of mathematics. 

Don’t really want to belabour this thread, but since Gary asks, I
won’t ignore it, either. And bear in mind that I said:

And it ~could~ be madewithout even that, but I wouldn't, either.
I'd use a ruler...... 

Ya get yer wire (we’re not copying the picture, it’s original work,
remember) about ~yay~ long. Ya bend it into a circle and solder it
closed. You make that into an oval and then twist it until it makes
a figure eight.

Then ya get two more wires that are ~yay~ long minus a smidge, and
do the same thing, then two more wires minus 2 smidges. And you also
link them together, and then when you hit 16" you add a catch and
you’re done. Really, really simple - that sort of thing has been
made over the centuries by people in grass huts.

  1. The necklace should nicely fit onto the conical area where the
    neck starts to spread onto the shoulders. This implied that the
    inner and outer lengths had to accurately match the corresponding
    neck circumferences.

Not really, no. Not to the extent of agonizing over calculations.
That comes under the heading of knowing how to make jewelry at all -
intuitively knowing what works and what doesn’t.

  1. With these basic requirements, it was then necessary to determine
    the number and size of the links, and then to devise a method of
    making them. The wire thickness influences the number of links
    required.

That’s what I personally would do, but I wouldn’t get quite so
nervous about the details as they’ll largely sort themselves out in
progress. This is a crude, not especially fine piece, by my own
working standards. Perhaps calling it “a casual piece” is kinder,
but that’s what it is. Not a jet engine…

  1. The price had to be known before it was made; in other words, the
    length and thickness of the gold wire had to be known, together with
    an estimate for the time to actually make it. The final price had to
    match a known budget.

If it does. It doesn’t necessarily… If it’s made on spec, you
make it, weigh it, and price it - none of which has any bearing on
that it ~could~ be made without math. I’d probably draw some
squiggly lines around a 16" circle as a representation, make the
center link crudely and the last link, crudely. Weigh them, count
links, extrapolate, add 20% and go from there. But that’s business,
not bench work.

On vertical mark the short axis. It should be done so the
intersection of line is the center. 

Yes, Leonid, that’s one way to draw an ellipse. The OP wanted a way
to lay out an divide an EXISTING ellipse, which is entirely
different.

I've never seen similar ones in tool shops, has anybody else? 

Nice job, Gary. Yes, such things exist - we have one. They’re called
“stepped mandrels”, used mostly for wax work. Ours is aluminum, which
do esn’t take kindly to hammering.

Re finding centers etc. on ovals - go to Staples or a store catering
to draftsmen, and buy a set of templates for drafting ovals, circles,
arcs, etc. They are plastic sheets with various shapes and sizes
depending on your needs, and are marked with vertical and horizontal
lines. You can also use a tool from grade school (at least they used
to come in pencil boxes long ago) a protractor - to find angles other
than 90 degrees.

I guess I was lucky to have draftsmen in the family, and to have
worked for an engineering company doing cutaways of hand grenades!
Whoever would have thought it would come in handy in jewelry work!

Good luck,
Noralie Katsu

John, thank you for proving my point. Your ad-hoc construction
method would probably have produced a chain, but whether your
customer would have liked it is a moot point.

Just for the record, the piece was a commission and the weight and
price had to be determined in advance. And the client was delighted
with the final result; the links appear to shimmer when the light
catches each one in turn.

Regards, Gary Wooding

The OP wanted a way to lay out an divide an EXISTING ellipse, which
is entirely different. 

We can derive the method for dividing existing ellipse if we know
how to construct one. The construction of an ellipse is determination
of 4 arcs comprising it’s circumference. When we already have an
ellipse, we proceed as follows: one needs to have a tool which is
similar to feeler gage, only instead of different thicknesses, every
blade is a radius template. It is also not difficult to make one.

With such gage determine radiuses of 4 arcs. Only 2 are required
because opposite arcs equal. Simply try to fit one template after
another until one fits. Mark where arc begins and ends. Now we have 4
marks. Using draftsman triangle, either 30:60, or 45:45, draw angled
lines from these 4 marks toward the center of the ellipse, but
aiming a bit short. We will obtain two intersection points. By
connection these points we divided ellipse in half, perpendicular to
it’s long axis.

We can repeat the process, only drawing angled lines towards ends of
the ellipse. When we connect intersection points, we divide ellipse
in half perpendicular it’s short axis.

One has to watch out for the angle of lines must be the same. It
does not matter what the actual angle is, as long as point of
intersection is shorter than 1/2 of corresponding axis. But all
angles must be the same or the method would not work.

Leonid Surpin

I own an old numbered stepped steel mandril. I have no idea where I
got it or who manufactured it, though. It doesn’t get very much use
in my shop, however. Its steps are only in full sizes, and the edges
of each step are somewhat sharp. Rounding up a ring on that stepped
mandril would heavily scar the interior of the band getting up to the
right size step. That’s why it doesn’t get much use for fabrication
jobs.

Stepped mandrils are really handy if you are making a wax ring model
out of soft, build-up wax, and need an exact, non-tapered ring size
to form up the ring on. Unfortunately, I’m not a fan of build-up
waxes, so that mandril doesn’t see much use, as I said.

Jay Whaley

Its steps are only in full sizes, and the edges of each step are
somewhat sharp. Rounding up a ring on that stepped mandril would
heavily scar the interior of the band getting up to the right size
step. That's why it doesn't get much use for fabrication jobs. 

Interesting.

The god of serendipity must have taken kindly to me when I made mine

  • the step edges are rounded, by accident, not design. I guess I’ve
    just got used to them 'cos I use them far more than I use the tapered
    one.

Regards, Gary Wooding

Gary

I have a stepped ring mandrel (parallel, not tapered segments) sizes
4-16 from Rio ( http://www.ganoksin.com/gnkurl/rio112370 ). One: $27;
2: $25; 3-5: = $23. I thought it was a standard item. [The picture
looks tapered, but the individual segments are not.]

Janet in Jerusalem

The Knew Concept saw is absolutely sold out at Rio :frowning: Pliers might
be the answer until they are restocked!

Thanks Janet,

Do you find it useful? My own feeling is that whole USA ring sizes
are a bit coarse; the 12 USA sizes 4-15 cover approx. the 24 UK
sizes F-Z+5. As previously mentioned, I’ve never seen them for sale
here in UK (I admit I haven’t really looked), but did find a couple
(of USA ones) available for import.

Regards, Gary Wooding

Hello,

This is not very professional but a very easy way to find out the
ring me asurement: Take a heavy paper, (not a carboard) cut it the
widht of your shank, put this around your finger, and cut. Measure
the lenght and to it add the thickness of the metal you are using.
The lenght of the shank should be this. For exemple; the paper
measures 55mm and your metal thickness is 3mm. the lenght of the
metal you will use for the shank is 58mm.

Kind regards,
F. Oya Borahan GG. FGA. DGA.
http://www.birdamlasu.com

Come on guys!!!.. surely there is a table of at least the diameter
of all given ring sizes?? … Knowing the diameter, and pi…
3.1416… should give you the length of the circumference of the ring
and therefore the length around the ring??? I would like to have this
table…that is, a table of ring size diameters …anyone have or
know of one???

thanks,
Jim

Page 734 & 735 in Oppis book lists two tables. One conversion table
between US - UK - European ring sizes and inside diameters in Inches
and mm. The other table is ring blank length based on inside diameter
and ring blank thickness (in B&S gauge)

In my part of Europe (Sweden) we make it easier for us, we measure
everything in mm (ring measure is always inside diameter and
material thickness in mm - no tables needed :slight_smile:

R G D S Lars

Hi Jim,

Come on guys!!!!... surely there is a table of at least the
diameter of all given ring sizes?? 

You obviously didn’t read my post of 17th. Feb. Take a look here…

http://www.ganoksin.com/orchid/archive/201102/msg00552.htm

Regards, Gary Wooding

How about “the Jeweler’s Bench Reference” by Harold O’ Conner. Pages
9-11

Sorry if this is is being repeated. I haven’t been
following this thread.

Kathy