I am new to jewelry making and wanted to ask for recommendations. I discovered making jewelry with metal clay and I fell in love with it. I like to make jewelry with texture mats but I wanted to design my own textures. I recently started to draw mandala on my laptop but I want to make a texture mat from my digital designs? Any recommendations? do I look for a rubber stamp vendor or is there equipment I can buy to make my own stamps? Or maybe 3D print it? Any one have experience with this?
Three suggestions. All similar
-
Perhaps use a technique for etching glass then use that as a mold
-
Spam as #1 but look at etching as in a printed circuit board
-
Take your design to a sign shop and have them cut it in vinyl.
Sorry if these are off base just trying to think out of the box
Regards Ron Wade
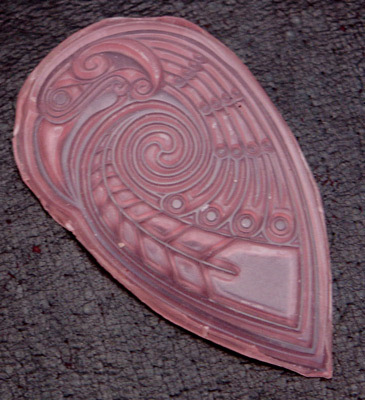
I’ve been experimenting with embossing plates, essentially letterpress printing plates.
Although letterpress is a dying art there are a few firms still producing them.
I sandwich the embossing plate, a sheet of wax (cover it both sides with clingfilm first) and a silicon baking sheet (to provide push) and two outside pieces of thin steel or wooden sheets, then press in a vice.
The resulting wax is then put in a freezer to harden the wax and make it easier to remove the clingfilm.
Sprue and cast as normal.
This should work with silver clay just as easily, just make sure to oil the plate before use.
Alternatively etch copper or brass using the laser transparency method.
Dave
2 Likes
You can make your own stamps ISO g photo polymer plates and a UV light or have someone make them for you. Look at you tube.
I believe the above wax was from a polymer plate, they do tend to be less deep and have more rounded base to walls. The magnesium printing plates tend to have a much squarer base. Just depends on the finished profile you require and how deep you need the design.
I’ve recently purchased a uv lightbox and am looking forward to making my own.
Located a paper lasercutting service nearby and am going to try rolling mill texture with that also.
If you want a tutorial on lots and lots of ways to make texture plates, including low tech photo etching and photopolymer plates, go to Craftcast and click on “Learn to Make Texture Plates with Barbara Becker Simon” It is extensive in information.
Hi Kadohearts
I’m a longtime metal clay artist and have made texture plates in a variety of ways:
- at rubberstamps.net you can upload your art file. Good quality and choose just about any size.
- use polymer clay. can carve a sheet before or after baking it.
- photopolymer plates have been mentioned too. I use boxcarpress to get my plates. I also have a CraftCast titled “Enamel Illusions by Cindy Silas” that details making photopolymer plates, along with using resin and alcohol inks to simulate transparent vitreous enamel on silver metal clay.
- I have a 3d printer and have used it to make texture sheets, but this isn’t the best use for a 3d printer as a texture sheet is usually fairly flat.
- with the Silhouette die cutter, you can cut a stencil from your design file.
and my favorite new method
is to laser my own rubber stamps! I purchased a 4W laser called the Emblaser 1 for a very reasonable price and put together the kit. This can be found at www.darklylabs.com
:)) Cindy Silas
www.cindysilas.com
3 Likes
Thanks Ron. I didn’t think about using vinyl, that might work nicely. I’ll have to do some research on the glass etching. Can you clarify #2, not sure what spam is?
I think he meant “same” not “spam.”
Alec
Thanks for sharing Dave. That looks awesome. I’ll have to check it out
Thank you Jackie. I found some good videos on that. It looks simple enough to make 
I have been interested in the same thing. There are (at least) two different brands of photopolymer stamp-making kits you can buy online for well under $200. Do a search on “photopolymer stamp making kit” and that will bring them up – as well as other information on the process. Looks fairly simple.
You could also send your designs to a custom rubber stamp manufacturer. With laser cutting so popular now, prices have really gone down. Another online search should give you some options. Good luck!
I have been etching Sterling silver for several years now to make unique textures. For etching base metal plates, you can use nitric acid or ferric chloride (which is a bit kinder, but slower) and get very detailed results. There are several ways of creating a resist of your design but the easiest is to use PnP which is a blue film that is used for etching copper circuit board. You need a crisp black and white design and a laser printer, not inkjet, as the toner acts as the resist. The design is then transferred with care to the metal using heat and pressure - I use an old iron. If you are not keen on using acid, you can electro-etch.
The results are lovely detailed plates of any crisp black and white design you choose. There are resources on the internet that will give you detailed instructions of these methods.
Good luck!
There are contract mfgs (and small shops) that will take your good, clear digital image and create either a photopolymer or rubber stamp. If your texture plates are relatively small, you can also buy a stamp maker kit. I have the Imagepac kit (Imagepack Stampmaker Refill Packs | BLICK Art Materials) and I like it. The main trick is having a negative that is dark enough; I tend to print two identical image sheets (onto transparencies) and glue them together to get them to be dark enough to properly block light. The stamps are fairly good.
Margaret
Has the imagepak worked pretty well for you, Margaret? I keep looking at
them and also the QuikArt – which is on sale for $89 now at Metal Clay
Supply
https://www.metalclaysupply.com/QuikArt-ReVerseArt-Photopolymer-Starter-Kit-p/55539.htm
Sasha
Yes, it works well. In that DickBlick page that I posted, click on reviews. I wrote up how I deal with the negatives; some of the mfg’s suggestions on printing dark negatives just didn’t work for me, so I opted to print two identical images (including registration marks), gluing them together (I used a scrapbooking glue pen from Zig), then using that negative to create my stamp. It worked wonderfully. The included and online video instructions were very helpful.
I made stamps for metal etching; I was finding that the image transfer methods weren’t working for me. I thought this was a great way to get my own designs on the metal…have not been disappointed. I also purchased some extra photopolymer ‘sachets’ at the same time.
$89 is a good price!
Hope this helps!
Just took a look at the QuikArt version. Nice that it has a way to do the negatives within the system. That was the biggest hurdle with the ImagePack version. The plates themselves are metal-backed. That’s nice as well, as the ImagePacs are not and can curl. However, if you’re going to want to create multiple images in one pack and use them separately, NOT having a metal back is nice; you can cut the stamps apart and use them as you want. You could, however, get the ImagePac frame and packs and use the UV lamp with both systems; the QuikArt frame/clamps are simply binder clips, a rigid back, a thin foam pad and glass; the ImagePack version is a very heavy duty acrylic with JUST enough room in the middle to properly hold and mush (technical term!) the photopolymer in the pack into an even layer. So, the answer of which to get is “it depends.” You certainly can use the QuikArt packs or the ImagePac lamp to do the same thing; what kind of stamps you want really to make really drives what you buy. If you were to buy the QuikArt model and want to use the ImagePac sachets, you’d need to get the clamp ($25+ shipping), but the consumables are MUCH less $$ than the QuikArt. http://www.imagepacstampmakerusa.com/online-store/Stampmaker-A7-clamp-3-x4-for-75-sachets-p30658087